25 Innovative Christmas Gift Wrapping Ideas To Impress Everyone

When it comes to holiday gift-giving, you want to give the perfect present. Away with those store-bought gift bags, and choose one that is thoughtful, creative, and memorable. We have compiled a list of 25 innovative Christmas gift wrapping ideas with step-by-step instructions on wrapping them up in style.
Boxed Gifts
1. Kimono-Wrap Gift Box

Kimono-Wrap Gift Box - Image by Areumdeuri
Kimono-wrapping is an economical yet classy way to wrap your boxed gifts. You can decorate it with an elastic or slim ribbon, then seal it with a minimalist gift tag, sticker, or hot wax.
What You'll Need:
Directions
- Measure your gift wrapper, so it covers about 3/4 of your gift box.
- Fold the wrapper over the box, then crease along the sides.
- Fold the upper side of the wrapper over the top, then the lower side, so they overlap on the top.
- Tape to close the wrapper.
- Fold the bottom part of the wrapper to finish the wrap.
2. Twig Christmas Tree Gift Box

Twig Christmas Tree Gift Box - Image by Vinn Pang
Gift-wrapping ideas abound on the internet, but those that stand out captures the audience's attention is not elaborate decoration. It could be very simple, like kraft paper decorated with innovative ideas like this twig Christmas tree.
What You'll Need:
Directions
- Wrap your gift as usual in kraft or white paper.
- Tie a raffia grass around the box.
- Trim your twigs to remove excess branches.
- Cut the twigs to different lengths to resemble a Christmas tree.
- Glue the twigs on the box, then glue wooden beads or soybeans on the twigs for the decors.
- Top with a gold star.
3. Ripped Christmas Gift

Ripped Christmas Gift - Image by Flower Tech 9
Here's another simple gift-wrapping idea using butcher paper. To take it a notch higher, though, the crafter decided to rip the wrapper! Your recipient may react negatively, but they will love the lovely thought when they see the sweet message under the wrapping.
What You'll Need:
Directions
- Wrap the gift box with a small wrapping paper and tape it. Write your message on plain wrapping paper.
- Glue a piece of satin ribbon to the gift box.
- Position the gift box on the kraft wrapping paper, allowing some length over the length of the paper.
- Make a small slit on the wrapping paper, then thread the satin ribbon through it, so the ribbon is visible outside the wrapper.
- Continue wrapping the gift and decorate it with a jute string bow.
- Just before giving the gift, pull the ribbon out to rip the kraft wrapping paper to reveal the message under it.
4. Paper Flower Bow Wrap

Paper Flower Bow Wrap - Image by Vinn Pang
Get the tutorial on paper flowers here if you want more unique ideas on making flower gift toppers to wow your lady friends and female relatives. For more elaborate flowers, you may use craft paper instead of printed wrappers and use colorful ribbons, too.
What You'll Need:
- Floral gift wrapper
- Satin ribbon
- White tissue paper
- Floral wire
- Potpourri
- Silver Christmas berries
- Silver pine needles
Directions
- Wrap the gift box with floral wrapping paper.
- Tie a thin satin ribbon around the gift box. Position it at the upper right corner for an asymmetrical look.
- Fold a white tissue paper in 8, then cut the sections.
- Fold the tissue paper accordion-style, cut a scallop, or point on the edges, depending on your preferred look.
- Tie a floral wire around the middle of the flower, then pull the petals out gently to fluff them.
- Glue the flower to where the ribbons make a cross.
- Decorate with potpourri, pine needles, and Christmas berries.
- Curl the excess ribbon to complete the look.
5. Gift Wrapping with Paper Ribbon Decoration

Gift Wrapping with Paper Ribbon Decoration - Image by I. Sasaki
How do you enhance the look of simple kraft paper into one of your favorite gift-wrapping ideas? Use a little creativity like adding shoelace designs. Instead of using plain colored cardstock inside, you may opt for a polka dot print scrapbooking paper.
What You'll Need:
Directions
- Measure the gift box. Make a 1-inch allowance on both sides of the kraft cardstock while leaving a 1 1/2-inch gap in between to allow the second cardstock later.
- Cut the colored cardstock, then glue it at the top of the gift box.
- Mark the kraft cardstock to align the holes before punching them. Leave a gap between the eyelet punches on each side, grouping them by 3s.
- Cut a 1/2-inch strip of kraft cardstock for the ribbon. Fold the cardstock strip to make a 1/4-inch ribbon.
- Thread the paper ribbon into the holes on the kraft cardstock as if threading shoelaces.
- Cut off the excess paper ribbon, and secure the ends under the wrapper.
- Close off the ends of the wrapper, making sure that the kraft and colored cardstock are of the same length to keep it clean.
- Cut a 9x5-inch rectangle from the colored cardstock to make the paper bow. Fold it to make a square.
- Trim off the sides to make a dome, starting from the folded side.
- Cut again to make a shape that resembles a 4-legged insect.
- Glue the "legs" to the center, then the "body."
- Cut a long strip of the colored cardstock, then fold it.
- Make small cuts on the folded side to create a fringe.
- Roll this fringe strip to make a small button, then glue it at the center of the paper bow.
- Glue this bow to the wrapper.
Gift Wrapping Ideas for Small Gifts
Small gifts are notoriously hard to wrap, but here are some great ideas to wrap those small gifts creatively. Armed with just construction paper and a glue stick, you can turn your bland gift bags into something beautiful.
6. Origami Gift Bag

Origami Gift Bag - Image by Kimigami
This cute origami bag is best for wrapping small items like jewelry, keychain, etc. It looks complicated to make, but you can finish the bag in less than 5 minutes after the first try. An 8x8" square can make a 2 1/2" gift bag.
What You'll Need:
Directions
- Cut a square gift wrapper or scrapbooking paper if you want a sturdier one.
- Fold the square to make a triangle.
- Open it on the wrong side, and turn sideways.
- Repeat steps 2 and 3.
- Take one corner of the wrapper, fold it about 1 1/2" or 2" from the center, depending on the width of the gift bag you want. Repeat for the other corner.
- Turn to the right side, then fold the paper to make a 1/2" or 3/4" crease from the center, so it resembles a paper boat.
- Using the 1st crease as reference. Fold the corners of the wrapper upwards.
- Open the paper, then fold the opposite corners of the square inward, touching the triangular crease on the wrapper.
- Fold the 1/2" or 3/4" crease inward, then fold the sides with folded corners, similar to what you did on step 7.
- Fold the top corners to touch the folded corners you made earlier.
- Fold the top corners inwards, then fold the inner creases again.
- Bring the topmost part together, then punch two holes on it using a single-hole puncher.
- Put your gift inside, then close the origami bag with a string or yarn.
7. Stringed Origami Gift Bag

Accordion-Fold Origami Bag - Image by ZIZ Origami
Turn up your origami gift box a little by threading ribbons through it for a more elegant look and easy-closure gift boxes. You can adjust the sizes from your 8x8" cardstock.
What You'll Need:
Directions
- Fold your cardstock in half to make a triangle.
- Measure 3/4" from the center, then fold it along the long side of the triangle.
- Fold the corners on the 3/4" fold inwards, so you get a squared corner.
- Open the cardstock and turn it over. Fold the small triangle you made earlier inwards.
- Measure 4" from the corners, then fold them inwards. Use a scorer to deepen the creases.
- Open the cardstock again. You will find triangles in between the rectangles you made from folding.
- Fold the triangle in half to make smaller triangles.
- Spread the cardstock open again, then make 3/4" marks on the center of the bag body. Identify the outer and inner flaps and stop the marks about 4 inches on the inner flap.
- Using a 1/2" ribbon, make cuts wide enough to fit the ribbon.
- Thread the ribbon through the holes.
- Place double-sided tapes along the edges of the triangles on the corners of the bag. Add more tape to close the outer corners later.
- Fold the corners inwards, then tape them together.
- Fold the inner flap inwards, then tape it.
8. Accordion-Fold Origami Bag

Accordion-Fold Origami Bag - Image by Paper Kawaii
Do you have any gift wrap ideas involving simple brown paper bags? A few folds and a length of ribbon is enough to make that paper bag into a lovely gift wrap you'll be proud to display under the tree.
What You'll Need:
Directions
- Fold the cardstock, allowing a 1/4" overlap at the center. Glue this flap to close the paper bag.
- Hold the paper bag flat on the table, then fold a 1 1/2" triangle from the corner for the bottom of the bag. Do the same on the opposite corner. Use a ruler to align the folds.
- Turn the bag over, open the bottom flap to glue one side.
- Fold the sides of the paper bag, using the corner fold as a guide.
- Glue the other flap of the bag's bottom to close it completely.
- Turn the bag over, then push the side folds inward to form the paper bag.
- Bring the upper end together, fold it half the length of the paper bag.
- Make accordion folds on the upper half, then press the fold down at the center to fan them out.
- Cut a piece of satin ribbon long enough to tie around the origami bag.
- Glue the middle of the ribbon at the bottom of the bag.
- Bring both ends of the ribbon over the bag, and tie them into a bow.
9. DIY Origami Cut Gift Bag

DIY Origami Cut Gift Bag - Image by Jaks Art & Craft
This DIY origami cut gift bag is best for gifts that won't slip through the slats. There is no need for a hot glue gun or double-stick tape as the bag seals on itself.
What You'll Need:
- Colored cardstock
- Scissors
- Pencil
Directions
- Fold an 8x8-inch square cardstock into 4 to make a small triangle.
- Make a heart-shaped outline on the triangle with a pencil. Leave enough space for the notch and the heart-shaped lock.
- Cut out the excess paper.
- Fold the four corners of the box.
- Bring the lock side of the box together, then push it out of the notched side to close the box.
Wrapping Bottle Gifts
Liquors are a staple gift idea, whatever the season is, and Christmas is one season that you can indulge. Looking for more liquor gifts aside from champagne and wines? Check out these whiskies for special occasions that your guy friends will surely love. Also, get busy finding the best bottle wrapping ideas we have here.
10. Exploding Champagne Box
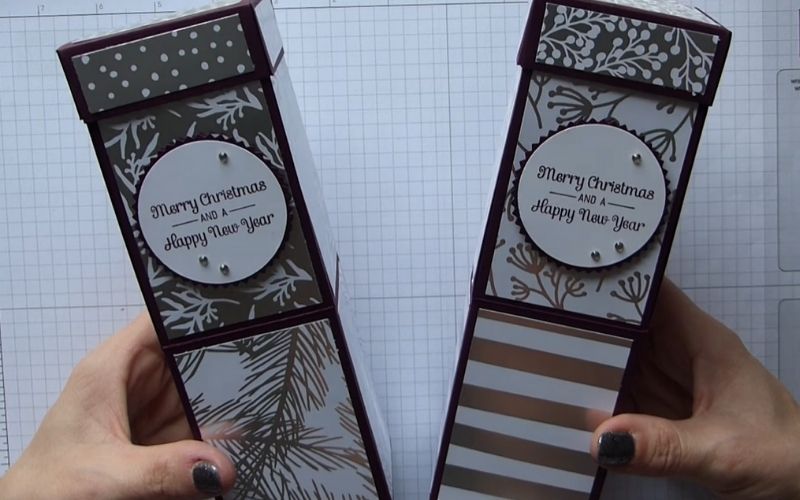
Exploding Champagne Box - Image by Sally Stampers
What better way to celebrate Christmas and New Year than giving a bottle of champagne wrapped in an exploding gift box? This creative gift box is something you'll love to display on your bar, along with the champagne bottle itself.
What You'll Need:
- Colored cardstock
- Silver leaf cardstock
- Champagne
- Double-sided tape
- Scoring board
- Scoring tool
- Embossing stylus
- Hot glue gun & glue sticks
- Pearl spray beads
- Starburst punch
- Circle punch
- Rhinestones
Directions
- Measure the height and diameter of your champagne.
- Divide your cardstock into 4 sections on the scoring board, leaving enough space for the 5th section to close your box.
- Turn the cardstock sideways and divide it into three sections - exploding, lower, and bottom.
- Deepen the creases using the scorer.
- Cut the upper and bottom sections.
- Measure the sections on the metallic cardstock.
- Cut out the metallic cardstock to 1/4" smaller than the sections; 4 for the exploding section and 4 for the lower section.
- Glue the metallic cardstock to their assigned sections.
- Close the lower and bottom sections using double-sided tape.
- Hot glue the pearl spray beads to the back part of the box.
- To make the cover, measure the bottom part of the box, score, then cut out the sections.
- Repeat steps 7 and 8 for the cover.
- Assemble the cover.
- Put the champagne into the box, then cover it.
- For the gift tag, stamp a message on white cardstock. Cut it out using the circle punch.
- Cut out the backing for the tag using a starburst punch.
- Decorate the tag with rhinestones.
11. Two-Toned Bottle Wrapper

Two-Toned Bottle Wrapper - Image by WonsWrapping
This elegant two-toned bottle wrapper is a gift in itself. Don't throw it out, but rewrap the empty bottle to display on your bar. Dropping a string of fairy lights into it is an excellent way to make last-minute Christmas crafts.
What You'll Need:
Directions
- Cut the cardstock into an 8x8" square and the metallic gift wrapper into a 4x8" rectangle.
- Position the cardstock square sideways, so it looks like a diamond.
- Wrap the cardstock around the wine bottle, then secure with double-sided tape.
- Wrap the bottle's lower half with the metallic wrapper without fully covering the bottle.
- Make a bow from the tulle ribbon, then secure it around the bottle with the cord.
- Fray the bottom of the cord. Open the bow to make it look more fluffy.
12. Champagne & Chocolate Bundle
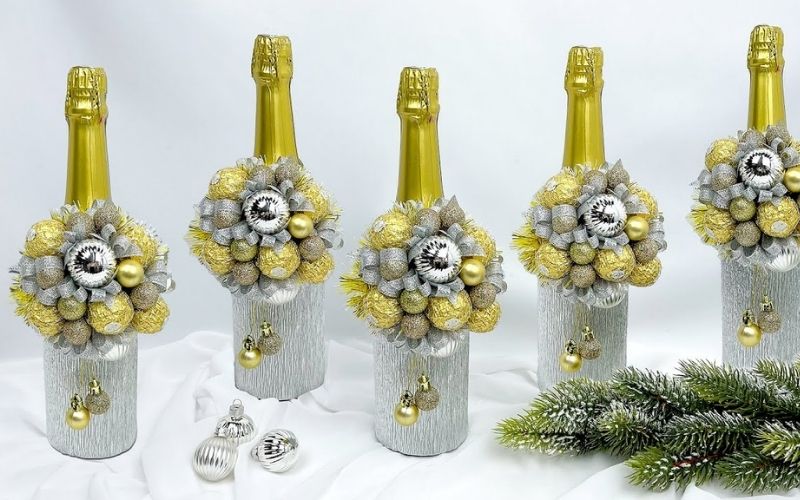
Snow Maiden Champagne - Image by Buket7ruTV
What You'll Need:
- Champagne
- Metallic crepe paper, silver
- Metallic tulle, silver
- Christmas balls
- Ferrero Rocher
- Metallic silver satin ribbon, 1/4"
- Hot glue gun & glue sticks
Directions
- Wrap the champagne bottle with metallic crepe paper, then secure it with glue and silver satin ribbon.
- Wrap a 1 1/2-inch square foam with more metallic crepe paper.
- Measure enough satin ribbon to hold the square foam. Glue it to the back of the foam.
- Cover the top of the foam square with gold tinsel garland using hot glue to make a small wreath.
- Cut an 8-inch square from metallic tulle.
- Remove the brown wrapper from the Ferrero Rocher and wrap it with the metallic tulle.
- Close off the tulle wrap using floral wire.
- Cut off one side of a bamboo toothpick and glue it to the tulle-wrapped candy.
- Arrange these candies on the wreath you made earlier.
- Embellish the wreath with metallic silver satin ribbons and gold and silver Christmas balls.
- Place it on the champagne bottle for a festive feel.
Irregularly-Shaped Gifts
13. Wrapping a Jar

Wrapping a Jar - Image by Gift Elements
Wrapping a jar is not easy, so some skip the wrapping altogether and use a baker's twine to hang a gift tag around the jar instead. However, if you want to give your jar presents a mysterious vibe, here is a creative way to wrap them.
What You'll Need:
- Florist paper
- Wrapping tissue paper
- Single-hole puncher
- Double-sided tape
- Satin ribbon, 1/4"
- Organza ribbon, 1 1/2"
- Christmas bells
Directions
- Fold the florist paper 8 times, so you get a thin triangle.
- Fold the wrapping tissue paper in 4.
- Align the center crease of the florist paper and the tissue paper, then secure them together with double-sided tape.
- Fold the wrappers again, following the fold of the florist paper.
- Measure the wrapping paper from the bottom center to the upper center of the jar, and mark it off.
- Punch a hole on the mark. You should have 16 holes around the wrapper.
- Thread a satin ribbon through the holes until the two ends meet.
- Put the jar inside the wrapper, then pull the ribbon together.
- Arrange the creases around the jar, then tie a double knot to secure the wrapper.
- Wrap a length of organza ribbon around the top of the wrapper, then decorate it with small gold bells and Christmas berries.
14. Wrapping a Cylindrical Gift

Wrapping a Cylindrical Gift - Image by Areumdeuri
Cylindrical gifts are yet another challenging shape to wrap. However, this gift wrapping idea is as simple as child's play, yet the result is so elegant you won't think that the only thing you need is tissue paper and ribbon.
What You'll Need:
Directions
- Place your gift at the center of the wrapper.
- Gently gather the wrapper around the gift until you can hold the wrapper in one hand.
- Tie a satin ribbon tightly around the wrapper, then double knot.
- Punch a hole on the gift tag, then thread the satin ribbon through the hole.
- Tie a knot, then a bow to finish the wrap.
- Hold the excess tissue paper in one hand, then cut across, leaving the top with a flower-like look. Fluff the "petals" for a more natural finish.
15. Wrapping a Stuffed Animal

Wrapping a Stuffed Animal - Image by Cityline
In this DIY Christmas gift wrapping idea, we'll explore the possibility of wrapping a gift without actually wrapping it. Does that make sense? All you need is some paper straw and a basket. Sit the bear in the basket, and voila! Instant gift wrapping without a sweat. The recipients will love it even more because they can use the basket for organizing their clutter.
What You'll Need:
Directions
- Fill the bamboo basket with paper shred filler to add height to the basket.
- Place the stuffed bear inside the basket.
- Fill the gaps with assorted chocolate candies.
16. Wrapping Fruits

Wrapping Fruits - Image by WonsWrapping
This fruit basket is best for families with different preferences for fruits. For example, the mom loves honeydew melons, but the dad can't tolerate it. You can wrap the fruits individually and label them accordingly. Kiwis for dad, grapefruit for best friend, etc.
What You'll Need:
- Burlap ribbon
- Lace ribbon
- Organza ribbon
- Ribbons, assorted colors
- Raffia grass
- Dried flowers
- Fruits
- Floral wire
- Christmas gift tags
- Fruit basket
Directions
- If the ribbon is too wide for the fruit, tie a short floral wire at the middle of the ribbon.
- Wrap the ribbon around the fruit, then tie a ribbon at the top.
- Decorate with some dried flowers, bows, and gift tags.
- Depending on your preference, you can use different ribbons on a single fruit,
- You can also arrange these individually-wrapped fruits in a fruit basket or give the fruits as individual gifts.
Christmas Gift Baskets
Christmas gift baskets are excellent for giving a single gift that the whole family can use or putting together a themed gift for your friends. Moms are notoriously hard to get a gift, but we've got a list of gift baskets for moms that you can update for the season.
You may also find this list of gifts for your artist friends helpful. Get a few and come up with an exciting gift basket of your choosing.
17. Champagne Gift Basket

Drop-Side Wine Bottle Box - Image by Stephanie
Personalize your gift by using etching cream on your champagne flutes and painting them with glass etching paint. This romantic gift is best for couples or as a gift for yourself and your spouse.
What You'll Need:
- Champagne
- Stemless champagne flutes
- Mason jar
- White tissue paper
- Paper shred filler
- White roses
- Baby's breath
- Bamboo basket
- Faux greens
- White chocolate truffles
Directions
- Arrange the flowers in a mason jar.
- Put it on one side of the basket and stabilize it with crumpled tissue paper.
- On the other side of the basket, arrange the champagne and the glasses.
- Fill the gaps with paper shred filler to support the champagne bottle and the glasses.
- Drop a few white chocolate truffles inside the champagne glasses.
18. Black & White-Themed Christmas Basket

Black & White-Themed Christmas Basket - Image by Bren's Boutique
Not everything about Christmas is red and green; others like the classic look of black. If you have one such friend, this is the perfect Christmas basket for him/her. The items included in this list are good for two baskets, so go ahead and divide them. Word of caution: don't give them to mutual friends, LOL!
What You'll Need:
- Black & white gingham basket
- Black & white gingham scarf
- Black & white ceramic salad plates
- Black & white gingham napkins
- Mason mug
- Black & white throw pillow cover
- Vintage Christmas truck door hanger
- Candy cane
- Assorted Christmas candies
Directions
- Line the basket with the scarf, napkins, and throw pillow covers.
- Arrange the other items inside the basket, putting the larger items at the back and the smaller ones at the front.
- Decorate the basket with candy canes and assorted Christmas candies. There is no need to wrap the basket in cellophane wrap unless you travel with it.
19. Christmas Tin Basket for Chocolate Lovers

Christmas Tin Basket for Chocolate Lovers - Image by FabedHacks
Remember to stick to a theme and a color scheme to organize a gift basket to keep your gift cohesive. Using a Christmas tin can instead of the usual basket is perfect for assembling a small but diverse gift for your office mates and roommates.
What You'll Need:
- Christmas tin
- Chocolate bars
- Brownie brittles
- Chocolate balls
- Chocolate nougat candies
- Paper shred filler
- Scotch tape
Directions
- Fill the tin box with paper shred filler.
- Arrange the brownie brittles, chocolate bars, and the rest of the items inside the tin box.
- Tape the box's lid at an angle to support the items inside the tin box.
20. Christmas Basket for Hot Cocoa Lovers
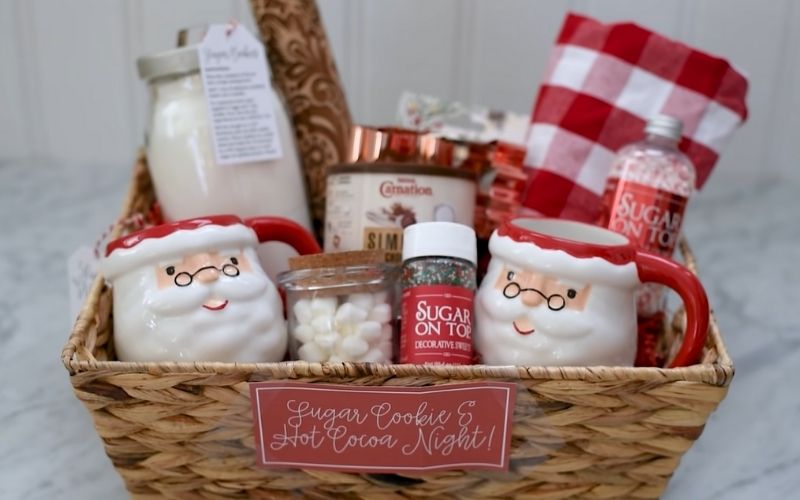
Christmas Basket for Hot Cocoa Lovers - Image by The DIY Mommy
Here is another themed gift for hot cocoa lovers. This basket is super simple to assemble, and the whole family can enjoy it.
What You'll Need:
- Grass basket
- Paper shred filler
- Sugar cookie mix
- Glass containers, various sizes
- Gingham apron
- Rolling pin
- Hot chocolate mix
- Santa mugs
- Marshmallows
- Sugar sprinkles
- Cookie cutters
Directions
- Fill the grass basket with paper shred filler.
- Pour the sugar cookie mix into the bigger glass container. Print the recipe in cardstock, then tie it to the container for easier reference.
- Fill the smaller containers with marshmallows and sugar sprinkles.
- Arrange the gift items, and they're ready to deliver to your hot cocoa-loving friends.
Fabric-Wrapped Gifts
Wrapping gifts in the colorful fabric is popular among Asian cultures, especially Japanese and Korean. Aside from being green alternatives to paper and foil gift wrappers, the gift receiver may also use the fabric used in wrapping for other purposes. Here are a few examples of wrapping your gifts in fabric.
21. Furoshiki Bow Wrap

Furoshiki Bow Wrap - Image by Shiho Masuda
Furoshiki is a Japanese method of wrapping gifts in fabric. There are many Furoshiki techniques, but we included two examples for you in this tutorial. To update the traditional methods into a modern Christmas wrapping, use a Christmas-themed scarf to tie the theme together and decorate it accordingly.
What You'll Need:
Directions
- Position your gift at an angle with the square scarf. The scarf should be large enough for the bow you will make later.
- Pull opposite corners of the scarf together, then tie it tightly. Do the same to the other corners.
- Tuck the ends of the scarf's corner under the knots to resemble a flower petal. Do the same for the other ends.
- Fluff the bows to spread them evenly.
- Add berries and pine cones to give this gift a festive vibe.
22. Furoshiki Gift Basket

Furoshiki Gift Basket - Image by Shiho Masuda
You can also use the Furoshiki technique to make a basket. Line the scarf you’ll use with a recyclable basket, make your knots, and fill the basket with fruits or other items.
What You'll Need:
Directions
- Place the grass basket at the center of the scarf.
- Wrap the basket with the scarf by arranging the opposite sides of the scarf inside the basket.
- Pull the outside corners together, then tie them with a satin ribbon.
- Fill the basket with paper shred filler or raffia grass.
- Arrange the fruits on top of the filler.
- Finish the basket by tying the two ends of the scarf together for the handle.
23. Traditional Bojagi Wrap

Traditional Bojagi Wrap - Image by TrueHeartWrap
There are different methods of wrapping using the Bojagi - the Korean way of wrapping foods and gifts. Some have very elaborate knots that are art in themselves. However, let's begin with one of the most basic traditional wraps for your Christmas gifts.
What You'll Need:
Directions
- Place two linen napkins on top of each other.
- Place the gift box at the center of the napkins. Be sure you have enough length to bring on top of the gift box.
- Fold one side of the linen napkin to cover the gift box.
- Fold the other side inward, then fold it over the gift box, so it covers only half its size.
- Gather the two ends over the gift box, carefully arranging the sides for a cleaner look.
- Tie the two ends together with a rubber band, securing it tightly on top of the gift box, so it stays tight.
- Fluff the excess linen napkin to resemble flower petals.
- Decorate with Christmas-themed decors or fresh flowers.
- Cut a ¾ x 3-inch piece of cardstock and write your message on it. Stick this message between the petals.
24. Ring-Shaped Head Pad Bojagi Wrap

Ring-Shaped Head Pad Bojagi Wrap - Image by Levien
Here’s a more elaborate Bojagi wrap that is best for circular gifts. We hope you find the wrapping process a joy in itself and translate the same joy to your friends.
What You'll Need:
Directions
- Place the gift box at the center of the scarf.
- Gather the corners together, then tie them tightly using a rubber band.
- Take one section of the scarf, twist it around itself, then twist it around the scarf sections at the top of the gift box. Secure the end in between the knots.
- Repeat step 3 on all the other sections.
- Decorate the gift box with Christmas-themed decorations.
25. Wrapping Wine in Fabric Napkin

Wrapping Wine in Fabric Napkin - Image by Lia Griffith
Looking for something to give to your Asian friends or Kpop fan friends? Why not wrap a bottle of champagne in Bojagi style? This gift will bring you together to enjoy your diverse cultures bound by the gift of friendship.
What You'll Need:
Directions
- Place the fabric napkin on the table and center the wine bottle on it.
- Bring the opposite corners to the top of the wine bottle, then the two other corners.
- Tie the outer corners around the bottle's neck.
- Decorate with a Christmas gift tag.
Conclusion
The countdown to Christmas is officially on, and it's time for us to get our wrapping game on point. We have compiled a list of 25 innovative yet simple ideas that will please any giftee this holiday season. Whether you need an easy DIY gift wrap or want something more extravagant, we guarantee there will be at least one idea in here that tickles your fancy.