How To Paint Etched Glass: Creative Techniques To Different Designs

Painting on etched glass makes the design stand out, especially if you know how to choose the right colors to use.
It is easy to do! Just prepare your design, then stick your stencil to the glass you want to paint. Etch your glass following the instructions on the etching cream. After 5 minutes, wash the glass under running water. Let dry before painting the etched pattern.
Painting etched glass is possible with patience, some practice, and the correct technique. This article provides 6 variations on how to paint etched glass in different designs to help you start your project.
What You'll Need
- Milk bottle
- Etching cream
- Stencil film
- Paintbrush
- Squeegee
- Foam brush
- Painter's tape
- Opaque paint marker, gold
- Rub' n Buff Wax Metallic Finish, European Gold
Step-by-Step Instructions
1. Prepare your design
- Start by preparing your stencil. You can use a store-bought stencil, or if you want to customize one, you can also do it.
- Cut out the edges of the stencil to minimize the crinkling of your design.
2. Stick your stencil to the glass
- Be sure that your glass is devoid of grease and grime before adding the stencil.
- Peel off the protective backing off your design, then carefully lay it on the glass. Use a squeegee to even out air bubbles.
- Tape the sides of the stencil to protect the rest of the glass from the etching cream.
3. Etch your glass
- Apply an even layer of etching cream over the design. Leave it for 5-10 minutes or longer, depending on your etching cream brand.
4. Wash off the etching cream
- Wash the etching cream off the glass under running water while peeling off the stencil. Let it dry thoroughly before painting.
- If using a previously etched glass, clean your etched glass with soap and water. You can also use rubbing alcohol and a paper towel. Remove every bit of grime or grease, so you're sure that the paint will stay on.
5. Apply the paint
- You can use a paint marker or metallic finish to add color to your etched glass.
- Using the Rub' n Buff, add a small amount of it to a paper towel, then rub it in circular motions to the etched design.
- Wipe off any excess paint around the design.
- If using an opaque paint marker, follow the design until you have covered it entirely. Clean the excess paint.
6. Let dry to set the color
- Let the paint dry for 10-15 minutes. Don't wash painted etched glass in the dishwasher, though.
Warning:
- Paint applied to etched glass fades with time.
- Etched glass coloring should not come in contact with food or drinks.
- Adding color to your etching cream won't result in a colored etching on your glass.
- Etching cream is dangerous and may cause permanent damage or even death. Handle with care and use nitrile or latex gloves to protect yourself.
Paint Etched Glass Variations
1. Painting Etched Glass with Acrylic Paint

Image by UnicaHijaCreations
Create lovely designs on your glass coasters, chopping boards, and plates with glass etching and adding color to it using acrylic paint.
What You'll Need
- Glass chopping board
- Pumpkin stencil
- Etching cream
- Paintbrush
- Squeegee
- Foam brush
- Painter's tape
- Acrylic paint
Directions
- Clean your glass chopping board with soap and water, then let dry.
- Apply your stencil to the area you want to add the etching.
- Apply the etching cream evenly, covering the design completely.
- Leave the etching cream on according to the manufacturer's recommendation.
- Scrape off the etching cream with a foam brush and return it to the container. You can use a separate container for your used etching cream.
- Wash off the etching cream without removing the stencil and let the chopping board dry.
- Paint the etched design with acrylic paint, careful to keep within the etching.
- Remove the stencil.
2. Adding Color to Etched Mirror

Image by Chameleon Art Products
What You'll Need
- Mirror
- Etching cream
- Paintbrush
- Squeegee
- Foam brush
- Chameleon Color Tops, Cool Tones
- Blending solution
Directions
- Clean the glass part of the mirror with rubbing alcohol and a paper towel, careful that you don't scratch the back part of the mirror.
- Apply the desired design using the stencil. Remove air bubbles using a squeegee.
- Apply etching cream with a paintbrush, then let it rest for 5-15 minutes. Be sure to use nitrile or latex gloves when working with etching cream.
- Scrape off the excess etching cream. Don't throw it away, as etching cream is reusable.
- Wash off the etching cream under running water. Remove the stencil and dry well.
- Apply Chameleon Color Tops to the etched design.
- Spritz a bit of blending solution on a paper towel, then blot it lightly on the painted design to blend it.
3. Etched Glass Painted with Chalk Ink

Image by Betz Golden
Customize your glass mug with etching, then painting it with chalk ink. You can use any color you want, but cure your chalk ink in the oven before washing it.
What You'll Need
- Glass mug
- Etching cream
- Stencil film
- Paintbrush
- Squeegee
- Foam brush
- Painter's tape
- Sponge applicator
- Chalk paste
Directions
- Cut off an oval shape from your vinyl sheet to protect the rest of the glass mug from etching cream.
- Position the stencil inside the cut-out oval on your mug.
- Etch the glass per the manufacturer's recommendation.
- Wash off the etching cream but don't remove the stencil yet. Let dry.
- Using the sponge applicator, dab the chalk ink into the etched surface. Let it dry.
- Remove the stencil and the vinyl from the mug.
- Pop the glass into the oven, painted side up, without preheating it.
- Let it cure for 2 hours or more at 250oF before turning off. Let the mug cool in the oven before taking it out.
4. Etched Glass Plate Painted with Metallic Rub-on Colors

Image by UnicaHijaCreations
Add muted colors to your glass plate by painting the etched design with metallic rub-on colors. If you want to use the plate for eating and serving food, apply the etching on the backside, mirroring the design, especially if adding texts. If using it for decorative purposes only, you can add the design on the front side of the plate.
What You'll Need
- Glass plate
- Etching cream
- Stencil film
- Paintbrush
- Squeegee
- Foam brush
- Painter's tape
- Metallic rub-on colors
Directions
- Clean your glass plate well before attaching your stencil.
- Add your design on the plate, then etch it as usual. Wash off the etching cream and dry.
- Since this design uses three colors instead of one, protect the other design parts with painter's tape.
- Using a clean paper towel wrapped on your index finger, apply metallic rub-on paint to the etched design.
- Rub off the excess rub-on paint with a clean paper towel.
- Repeat steps 3 to 5 for the other colors.
5. Etched, Painted, and Glittered Wine Glass
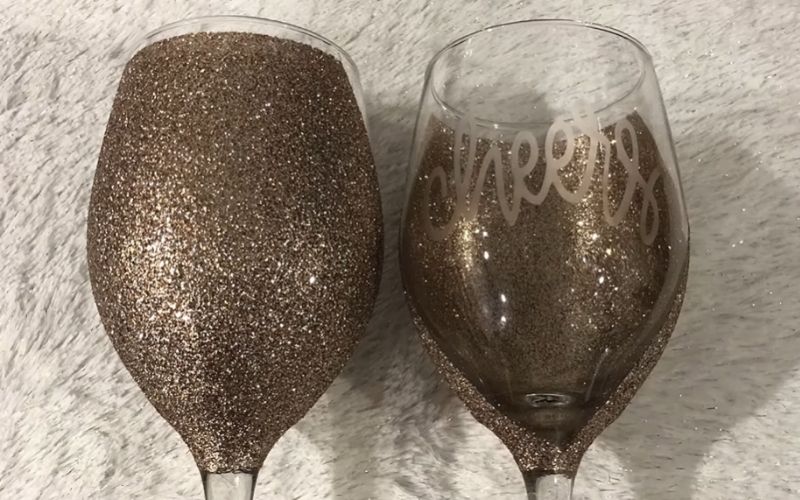
Image by Lisa Welander
Take your wine glass to newer heights by combining glitters and paint to beautify an etched wine glass. Keep the paint and the glitter coordinated to avoid a cluttered look.
What You'll Need
- Wine glass
- Etching cream
- Stencil film
- Paintbrush
- Squeegee
- Foam brush
- Painter's tape
- Mod Podge
- Glitters
- Acrylic paint pens
- Clearcoat
Directions
- Clean your glass with warm water and soap or rubbing alcohol and a paper towel.
- After making your stencil, apply it to the wine glass. Protect the rest of the glass with painter's tape.
- Etch as usual. Once done, wash and dry the wine glass.
- Protect the rim of the glass by adding a thin line using electrical tape.
- Line the other sides and the stem with electrical tape to protect it from the glue and glitters.
- Apply Mod Podge using a foam brush to the part you want to glitter.
- Add a liberal amount of glitter, then tap off the excess and return it to the container.
- Let the glitter dry overnight. Reapply if you see imperfections on the glittered part.
- Color in the text you added to the front using paint markers.
- Cover the side of the glass without the glitters with electrical tape or painter's tape.
- Apply an even layer of clear coat to the glittered part, then let it dry again.
Conclusion
Glass etching is a permanent method of customizing your glassware and other glass items in your home. You can also sell or customize them as a gift for a particular person.
Which design did you like? Leave us a comment below!