40 Creative Thanksgiving Craft Ideas For Kids And Adults To Enjoy

Fall is here, and Thanksgiving is right around the corner. Instead of cooking a Thanksgiving feast for your friends and family this year, make it fun with these creative craft ideas! There are tons of different crafts that you can do with children to show them how thankful we all should be for what we have. Better yet, there are also projects here that adults will enjoy too.
Easy Turkey Crafts for Kids
Do you know why we roast turkey for Thanksgiving dinner? Here's an interesting trivia. Wild turkeys were plentiful in early America and were served to early American settlers when they sat to dinner with the Wampanoag Indians in the historic first Thanksgiving feast.
Here are some super easy thanksgiving crafts for kids and their friends will love while teaching them the importance and significance of Thanksgiving as a holiday.
1. Wobbly Paper Plate Turkey

Wobbly Paper Plate Turkey - Image by Easy Kids Craft
Your kids will love adding this cute wobbly paper plate turkey to your Thanksgiving table. It's super easy for kids to make and needs only a few supplies. Treat your kids and their friends to a crafts-making party for Thanksgiving.
Things You'll Need
Directions
- Paint a paper plate with brown acrylic paint. Let it dry, then cut the plate in half.
- Fold the cut paper plate to form a cone, then staple the ends together. Press the paper plate down to flatten it.
- Cut a yellow, red, and orange construction paper in 1/2-inch strips. Glue the ends together to resemble a teardrop.
- Glue to construction paper loops on top of the cone to resemble the turkey's caruncles.
- Attach the googly eyes on the front, then add the beak and the snood.
2. Toilet Roll Turkey

Toilet Roll Turkey - Image by Easy Kids Craft
You can teach your kids to be thankful for recycling and upcycling efforts to rid our planet of trash. Use the paper towels and toilet paper rolls to try some Thanksgiving crafts for kids. This one is so easy that you can finish assembling it in less than 15 minutes!
Things You'll Need
- Toilet roll
- Acrylic paint
- Sponge brush
- Glue
- Googly eyes
- Feathers
Directions
- Paint the toilet roll with brown acrylic paper. Let dry.
- Attach the googly eyes and the beak on one side of the toilet roll.
- Glue the colorful feathers at the back of the toilet paper roll.
3. Popsicle Fall Turkey

Popsicle Fall Turkey - Image by Easy Kids Craft
Got some popsicle sticks? Why not make a Thanksgiving popsicle-shaped turkey face for fun decors on your pumpkin pies and Thanksgiving cakes? If you'll stick it into the cake, wrap the stand with cling wrap so the stick won't touch the cake itself.
Things You'll Need
Directions
- Line 8 popsicle sticks, then glue two popsicle sticks at the back to hold the 8 sticks together. Let the glue dry.
- Paint the popsicle sticks with brown acrylic paint.
- Cut a 3/4-inch heart from white construction paper and a 1/4-inch heart from black construction paper. Glue the white and black circles together for the eyes.
- Cut the beak out of orange construction paper and the snood from red construction paper.
- Glue the eyes, beak, and snood on the painted part of the popsicle sticks.
- Decorate the upper part of the popsicle with plastic fall leaves.
- Glue 2 popsicle sticks at the bottom of the turkey face to resemble a popsicle.
4. Pine Cone Turkey

Pine Cone Turkey - Image by Easy Kids Craft
Fall is the time when pine cones abound everywhere. Instead of letting the chipmunks take all the fun, why not make use of these lovely gifts of nature into a Thanksgiving decor? With a few basic art supplies, you can create fantastic decors from pine cones that you can string together to make a mantel garland.
Things You'll Need
Directions
- Cut a 1 1/4-inch circle from brown craft foam for the turkey's face.
- Cut an orange triangle for the beak and a red wormlike shape for the snood.
- Attach the eyes, beak, and snood on the face using craft glue.
- Glue the turkey face to the acorn using hot glue.
- Decorate the back of the acorn with plastic fall leaves for the tail.
5. Turkey Wreath

Turkey Wreath - Image by Easy Kids Craft
Try this easy-to-make wreath that your kids can hand on their doors, so they have their personal Thanksgiving touch to their rooms. Take it a notch better by hanging some message cards on a string, so you can tell your kids what you’re most thankful to them!
Things You'll Need
- Paper plate
- Construction paper
- Acrylic paint
- Sponge brush
- Small balloon
- Glue
- Googly eyes
Directions
- Cut out a 4-inch circle at the center of the paper plate.
- Cut a piece of cardboard for the turkey head. Paint it with brown acrylic paint.
- Cut red, yellow, and orange construction paper into 3/4-inch strips.
- Fold the strips in half, glue them around the paper plate, sealing the ends with more glue. Alternate the red, orange, and yellow paper strips.
- Cut a V at the end of the strips to resemble a ribbon.
- Once the turkey head is dry, attach the googly eyes, beak cut out from construction paper, and the small balloon for the snood.
6. Paper Plate Pumpkin Pie a la Mode

Paper Plate Pumpkin Pie a la Mode - Image by Create & Educate with Ms. Cristina
Craving for pumpkin pie but can't have one because of eggless Thursdays? Don't worry. We got you covered with this fun craft of pumpkin pie a la mode.
Things You'll Need
Directions
- Cut a paper plate in quarters and color it with orange oil pastels.
- Cut a brown construction paper in rectangles and glue it at the edges of the paper plate to resemble the pie crust.
- Add a swirl of gold glitter glue to the "pie."
- Crumple some kitchen towels and glue them on the pie to resemble the vanilla ice cream. You may take the ice cream to the next level by pushing the paper towels into an ice cream scoop.
7. Thumbprint Turkey
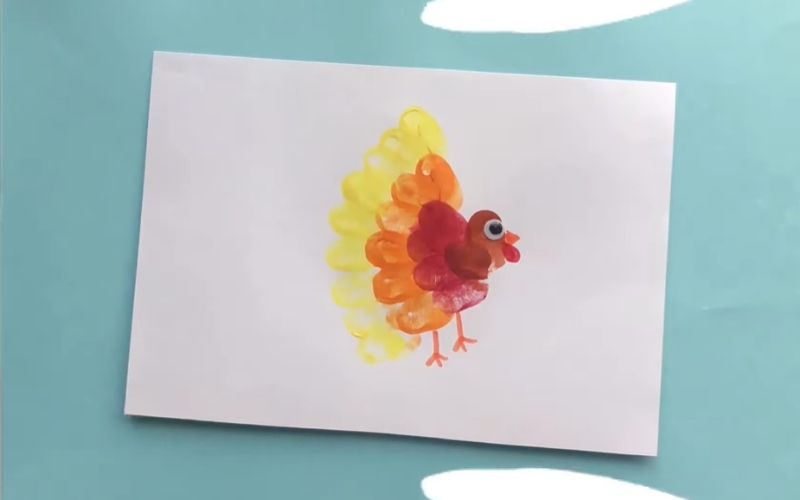
Thumbprint Turkey - Image by Create & Educate with Ms. Cristina
Kids who love to paint will love this thumbprint painting craft. Get some non-toxic finger paints and let your kids enjoy creating Thanksgiving paintings that you can frame for easy DIY decor. Alternately, your kids can also make hand turkeys from their handprints.
Things You'll Need
Directions
- Paint a turkey with your thumbprint using brown, red, orange, and yellow finger paint.
- Decorate the painting with a googly eye.
- Add the beak, wattles, and legs with colored markers.
- If you don't have googly eyes, you can cut two circles - a larger white and a smaller black - to glue together for the eyes.
8. Turkey Dotting

Turkey Dotting - Image by Create & Educate with Ms. Cristina
If you don't like the mess of fingerpainting, here is an equally excellent painting project that will also develop the fine motor skills of your younger kids.
Things You'll Need
Directions
- On a piece of cardstock, make several dots of different sizes and colors, spreading them out, so the colors and sizes are random.
- Let the watercolors dry.
- Cut out a bird shape from brown construction paper for the turkey's body.
- Glue the turkey on the cardstock, then decorate it with googly eyes, beak, and wattles.
9. Turkey Puppet
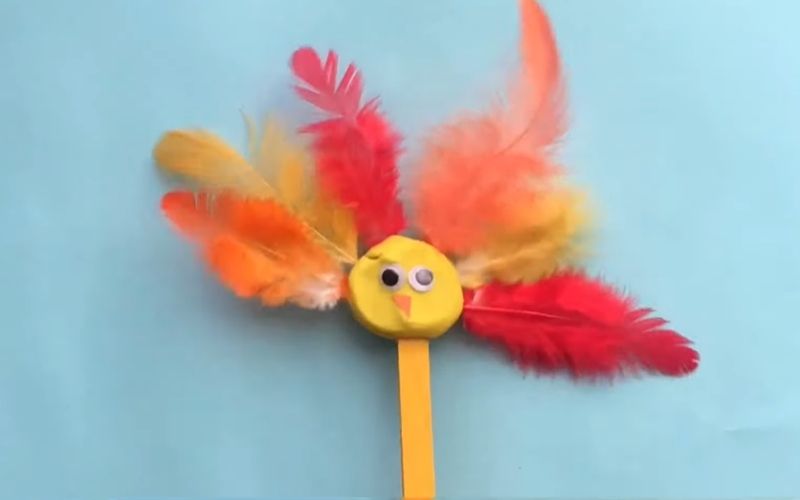
Turkey Puppet - Image by Create & Educate with Ms. Cristina
Puppets are an excellent way to improve your kid's creativity and story-telling skills. Make several of these turkey puppets with your kids, and have fun talking with them!
Things You'll Need
- Playdough
- Popsicle sticks
- Feathers
- Glue
- Googly eyes
Directions
- Form a 1-inch circle from a lump of play dough.
- Flatten the circle with the heel of your hand, leaving it at least 1/2-inch thick.
- Push a popsicle stick into the side of the play dough. You may also use bamboo skewers or lollipop sticks instead of popsicle sticks.
- Decorate the face with googly eyes and beak cut from construction paper.
- Stick the colorful feathers around the face.
10. Turkey Pop up Card

Turkey Pop Up Card - Image by Artsy Craftsy Mom
If you think pop-up cards are the best, how much better would it be if it's an invitation to join your family for a Thanksgiving dinner? Let your kids handle the invites and do the elbow job of preparing your dinner!
Things You'll Need
Directions
- Cut a 1 1/2-inch strip from yellow construction paper, 2 1/2-inch strip from orange construction paper, and 3 1/2-inch strip from red construction paper. Make sure the strips are of the same length.
- Make an accordion fold on the strips of construction paper, using the same fold width on the three paper strips.
- Fold a brown cardstock in half, then draw two overlapping semicircles along the folded line. The upper circle should be smaller (for the head), and the lower semicircle should be larger (for the body).
- Cut the shape out, then make a wide V at the bottom of the body.
- Draw a straight line from the center of the V outwards. From the outermost point, draw another line to the neck of the turkey. Score these lines.
- Cut out the beak, eyes, and wattles from construction paper.
- To assemble, attach the eyes, beak, and wattles on the turkey. Set aside.
- Fold a letter-size cardstock in half.
- Glue the red, orange, and yellow feathers at the centerfold of the card, placing them 1/2-inch apart.
- In the same centerfold, glue the turkey using the scored part at the V.
- You can also decorate the card with pumpkin cutouts or stickers.
11. Paper Plate Turkey Dots

Paper Plate Turkey Dots - Image by Julia's Wonder World
Welcome to another dot-painting project, this time on a paper plate to create a colorful background for your turkey cutouts. No more messy paints, though, since now you'll deal with marker daubers. They're so easy to easy, even for very young children, so no one feels left out.
Things You'll Need
Directions
- Dab the paint marker daubers on the paper plate to make random colored dots. Let the paint dry.
- Cover the paper plate with more paint daubers, so there are no visible whites.
- Cut a turkey head from brown cardstock.
- Decorate the head with googly eyes, nose, and wattles.
12. Candy Corn Turkey

Candy Corn Turkey - Image by Julia's Wonder World
Corn and turkey go well together, so why not use them in one easy-to-do craft? Instead, you can use popcorn kernels if you don't want your kids to gobble up too much candy corn while crafting. Throw in some treats and pop a few seeds for their snacks.
Things You'll Need
Directions
- Cut out a turkey from brown cardstock and an oval from orange cardstock.
- Glue the eyes, beak, wattles, and legs on the turkey, then glue it on the orange oval.
- Line a glue dot around the oval, then glue the candy corn around it to form the turkey tail.
13. Simple Paper Turkey

Simple Paper Turkey - Image by Easy Peasy Fun
Kids tend to stick to their crafts if they're fun and straightforward to do. Here's an effortless art craft that only needs a pair of crafting scissors to make the difference. You can skip the crafting scissors if you don't have them, though.
Things You'll Need
Directions
- Cut out two rectangles from brown construction paper using these dimensions: 2 "x7" and 3" x10".
- Roll the rectangles and glue the edges together, so they form two different cylinders. The smaller cylinder will be the head, and the larger one will be the body.
- Glue the head to the body, then attach the googly eyes and the beak.
- Cut out the turkey feet from orange construction paper, then glue it to the bottom of the body.
- Using a pair of zigzag craft scissors, cut out the turkey's tail feathers in red, orange, and yellow construction paper. Do not let the feather overlap. The red feathers should be smaller than the orange, with yellow as the largest.
- Glue the three "tail feathers" together and glue the body to it.
14. Paper Loop Turkey

Paper Loop Turkey - Image by Easy Peasy Fun
It's another super easy craft for younger kids to make, though they'll need assistance making strips of construction paper. If you don't have googly eyes, you can always use black and white construction paper to get the job done.
Things You'll Need
- Construction paper
- Glue
- Googly eyes
- Colored markers
- Rotary paper cutter
- Turkey template
Directions
- Trace a turkey on a piece of cardstock, then cut it out. Color it with a brown marker.
- Add the eyes, beak, wattles, and feet.
- Using a rotary paper cutter, cut 1/2-inch strips of red, yellow, and orange construction paper.
- Glue the yellow strips, then orange strips, and lastly, red construction paper strips on a letter-sized cardstock.
- Cover the part where the strips meet with the turkey cut out.
15. Turkey Hat

Turkey Hat - Image by Kids Craft Room
Make crafty things out of colored paper and cardstock that your little turkeys will love. Thanksgiving crafts like these turkey hats are a hit even for older kids to share with their friends.
Things You'll Need
Directions
- Draw a 4-inch circle on a Kraft folder, then draw a 3-inch wide rectangle through it. This piece is the front of the hat.
- Make another 3-inch wide rectangle from the same Kraft folder.
- Staple the two rectangles together, then measure it around your kid's heat to make sure it fits. Staple to secure the hat.
- Cut out a turkey body, beak, wattles, wings, feet, and two long rectangles for the legs.
- Decorate the hat with the beak, wattles, and wings.
- Fold the thin rectangle accordion style, then glue the feet to each leg.
- Glue the legs on the turkey's body. The legs should dangle on either side of your kid's face.
- Cut out the feathers in colorful shades of construction paper, then glue it behind the turkey to complete the look.
16. Turkey Standee

Turkey Standee - Image by Click2 Papercrafts
Things You'll Need
Directions
- Cut out turkey bodies and 2 sets feet from cardstock.
- Cut also the eyes, beak, and wattles from construction paper.
- Make a pattern of the feathers, then cut it out to trace your feathers on colorful paper.
- Cut the feathers from different colors of construction paper, then make feather markings using a black marker.
- Glue these feathers at the back of the turkey, allowing some to touch the table to support its weight.
- Decorate the turkey with its eyes, beak, and wattles.
- Score the feet, glue them together, then fold out the feet, so one is towards the back and the other facing the front.
- Glue the feet at the back of the turkey, so it supports the turkey's weight.
17. Paper Bag Turkey Puppet

Paper Bag Turkey Puppet - Image by Click2 Papercrafts
Thanksgiving is also known as the turkey day, with so much turkey going around. Join the merriment with fun thanksgiving crafts that you can fill with treats for the kids' table. Later, they can play with their paper bag puppets.
Things You'll Need
Directions
- On a piece of a brown paper bag, attach the googly eyes, beak cut from yellow paper and the snood, and two feathers from red construction paper.
- Cut feathers and wings from brown construction paper.
- Snip around the feathers to add dimension to the construction paper.
- Glue the wings and the feathers, alternating the brown with the red.
18. String Pumpkin Lantern

String Pumpkin Lantern - Image by HooplaKidz How-To
Make a few of these string pumpkins, then fill them with fairy lights to the lantern, then hang it on your porch to welcome your guests.
Things You'll Need
- Orange yarn
- Glue
- Balloon
- Pipe cleaners
- Fairy lights
Directions
- Pump a small balloon until you get the right size for the lantern.
- Mix 4 parts glue to 1 part water, then dip orange yarn into the glue.
- Wrap the yarn around the balloon and let it dry.
- Pop the balloon, then pull it out from the lantern.
- Make the pumpkin stem from an orange pipe cleaner, then add a few tendrils with a green pipe cleaner.
- Fill the pumpkin with fairy lights to hang in your garden, on your porch, and even on trees.
19. Yarn Pumpkin Garland

Yarn Pumpkin Garland - Image by HooplaKidz How-To
You'll need extra pairs of tiny hands to help you make and string these yarn pumpkins for this craft. Make several sizes, using the small hand of a toddler, an older kid, and yours for the gauge. Alternate the sizes when you string them for a more exciting, effortless art result.
Things You'll Need
Directions
- Wrap a length of orange yarn around your hand until you get a fistful.
- Remove this yarn from your hand, then tie it together with orange yarn. Make 9 or more of these yarn pumpkins.
- Cut a green pipe cleaner in half to make the stalk.
- String the yarn pumpkin on white yarn or jute rope, then hang it as a garland over your mantle.
20. Origami Fall Leaves Decor

Origami Fall Leaves Decor - Image by Red Ted Art
Make some origami leaves to spread over your dinner table to mimic the fall leaves on the ground for an exciting backdrop. Spread it around your candle holder for a lovely spread for dinner.
Things You'll Need
Directions
- Cut triangles from construction paper.
- Fold the triangle in accordion style, starting from the broadest part.
- Roll a small piece of construction paper, then flatten it for the stem.
- Fold in half to form a leaf, insert the stem, then glue the leaf together and the stem to fold the leaf.
Thanksgiving Crafts for Adults
21. Clay Pumpkin Tray

Clay pumpkin tray - Image by Red Ted Art
Fill this pumpkin tray made from modeling clay with candy and treats to the kids' table. Cutesy crafts like this pumpkin tray are the best ideas that double as a decor and serving tray.
Things You'll Need
Directions
- Shape your modeling clay into a circle, then shape it like a halved pumpkin. Make the stem from the same modeling clay.
- Smoothen the sculpture by dipping your finger in some water, then rub your fingers on the wet surface until it feels smooth.
- Pop the pumpkin tray into the oven for 25 minutes at 250oF. Let it cool in the oven.
- Paint the pumpkin with orange acrylic paint and the stem with green acrylic paint.
- You can apply varnish on it or leave it as is.
22. Clay Maple Leaf Tray

Clay Maple Leaf Tray - Image by Red Ted Art
If kids have something cute to serve their treats, this handmade tray makes serving treats for the whole family a treat in itself, especially when you see the little ones light up with these clay trays.
Things You'll Need
Directions
- Line a bowl with plastic wrap. The bowl should be smaller than your leaf mold, so it curves along the side of the bowl.
- Roll up a lump of clay and form it into a 4-inch circle.
- Flatten it with a rolling pin until you get at least 1/8 of an inch thickness.
- Lay a maple leaf on the top of the modeling clay and press it down to transfer the maple outline and veins on the clay.
- Cut off the excess clay with a knife.
- Carefully remove the clay from the table, then put it into the plastic-line bowl. Leave it to dry.
- Remove the plastic liner and bake the clay tray in the oven for 25 minutes at 250 Fahrenheit.
- Paint the tray with red acrylic paint and dry brush some yellow acrylics over it.
23. Hand-Drawn Holiday Plates

Hand-Drawn Holiday Plates - Image by Better Homes & Gardens
Serve your treats in these lovely hand-drawn holiday plates that an artsy momma can't do without celebrating the holiday. You can use plain white or colored ceramic plates or try some reverse glass painting techniques if you want to use a glass plate.
Things You'll Need
Directions
- Clean the surface of the ceramic plate with rubbing alcohol and a paper towel to remove dirt, grime, and grease.
- Draw your painting using oil-based markers.
- Pop the plate into a cold oven, set it to 400 Fahrenheit, then bake for 25 minutes. Let the plate cool in the oven before taking it out.
24. Velvet Pumpkins

Velvet Pumpkins - Image by Better Homes & Gardens
How about a pumpkin patch on your corner table? These velvet pumpkins will keep well, so you can use them for years to come.
Things You'll Need
- Foam pumpkin in different sizes
- Velvet cloth in fall colors
- Hot glue gun and glue sticks
- Green felt cloth
- Jute string
- Craft knife
Directions
- Remove the stem on the pumpkin using the craft knife. Be careful to keep the stem intact for later.
- Cut a circular piece of velvet cloth large enough to cover the pumpkin. Cut notches around the fabric for smoother folding.
- Glue one side of the velvet cloth on the foam pumpkin, then do the same on the opposite side, pulling the velvet cloth so it's tight around the pumpkin.
- Do the same around the pumpkin until you cover everything.
- Wrap the stem with the jute twine, then glue the stem into the pumpkin to cover the opening at the top where the edges of the cloth meet.
- For smaller pumpkins, use the irregularly shaped stem but skip the jute twine wrap.
- Cut out pumpkin leaves from a green felt cloth, then glue them on the pumpkin.
25. Fall Foliage Mantel Decor

Fall foliage mantel decor - Image by Better Homes & Gardens
Are you a fan of wildflowers and everything that comes with the fall season? Pick up some dried leaves and flowers and throw them in together with some pumpkins and gourds for lovely fall decor on your mantelpiece. One resourceful mama put this planter together, and we'd like to share it with you.
Things You'll Need
- Wooden planter
- Floral foam
- Pumpkins and gourds
- Ears of corn
- Fall leaves
- Spanish moss
- Dried daisies
- Gypsophila bouquet
- Fall flowers
Directions
- Add height to the pumpkins by arranging a foam piece inside the wooden planter.
- Arrange the pumpkins and gourds randomly in the wooden planter.
- Add the ears of corn into the arrangement.
- Fill in spaces with Spanish moss.
- Arrange more fall flowers and leaves towards the back and edges of the wooden planter.
26. Harvest Herbs Planter

Harvest Herbs planter - Image by Better Homes & Gardens
Get your herb garden inside using a multi-use wooden planter filled with herbs and pumpkins for Thanksgiving decor on your kitchen counter. If you can't find a wooden planter, a rectangular ceramic planter will do.
Things You'll Need
- Wooden planter
- Floral foam
- Pumpkins and gourds
- Spanish moss
- Plastic liner
- Different potted herbs
- Stones
Directions
- Line the wooden planter with a plastic liner to protect your counter from water when watering the herbs.
- Arrange foam pieces inside the planter to add height.
- Add the stones around the foam pieces, then arrange 3 or 4 potted herbs inside the planter.
- Arrange the pumpkins in between the potted herbs, then add Spanish moss to cover the gaps.
27. Gingham Pumpkin

Gingham Pumpkin - Image by Better Homes & Gardens
Gingham does not need to be on the table alone. It also goes well with your pumpkins to give them a new look. If you want a cuter version of these fantastic thanksgiving crafts, use mini pumpkins instead.
Things You'll Need
Directions
- Draw horizontal lines on the white pumpkin for the gingham pattern. If using an ordinary pumpkin, paint it with white or flesh-colored acrylic paint.
- Paint the sections of the pumpkin, skipping every other section.
- Paint across, using the horizontal lines as a guide.
- Once the paint is dry, mix a darker color to complement the paint used. Paint where the horizontal and vertical stripes meet.
- Let dry before displaying alone on your kitchen table, or you may use it as an accent piece in your planter boxes.
Thanksgiving Wreaths
Wreaths are popular on any occasion, and Thanksgiving is another excuse for anyone who wants to make one. Instead of the traditional flower wreaths, here are some novel ideas for another turkey craft.
28. Turkey Tulle Wreath

Turkey Tulle Wreath - Image by Amber Edwards
Do you want a fun way to decorate your front door with a wreath? Here’s a wreath that’s simple enough for kids to make yet add the needed color on your door.
Things You'll Need
- Foam wreath
- Brown yarn
- Tulle ribbons, assorted colors
- Styrofoam balls, different sizes
- Styrofoam cone
- Acrylic paint
- Sponge brush
- Toothpick
- Hot glue gun and glue sticks
Direction
- Paint a 2.5-inch styrofoam ball with brown acrylic paint and two 1-inch balls with a black dot for the eyes.
- Paint the styrofoam cone with yellow acrylic paint.
- Wrap about 5 inches of the foam wreath with brown yarn. Secure the ends with hot glue.
- Cut a 4 "x12" rectangle from cardboard.
- Wrap the ribbons around the cardboard 7 times. Do this for all the tulle ribbons.
- Cut both ends of the tulle ribbons.
- Wrap and tie each ribbon around the foam wreath, starting from the end of the brown yarn. Alternate the red, brown, orange, and yellow until you reach the other end of the brown yarn.
29. Nutty Wreath

Nutty Wreath - Image by Better Homes & Gardens
Wreaths make lovely thanksgiving crafts. Let's start the countdown on wreaths with this nutty wreath made from seed nuts and tree nuts. Forget about allergies. These nuts are not a threat to your health since they'll stay on your door only.
Things You'll Need
Directions
- Wrap a foam wreath with burlap ribbon and secure the end with a spot of hot glue.
- Glue the nuts around the wreath, then finish with a layer of acrylic varnish.
30. Plaid and Burlap Ribbon Wreath

Plaid and Burlap Ribbon Wreath - Image by Simply Shalese DIY
Ribbons are everywhere, and you can’t go wrong with ribbon wreaths. They’re easy to assemble and need only a little creativity to get going. To make it even easier, we added a bow maker. If it’s your first time to try using it, don’t worry because it’s like child’s play.
Things You'll Need
- Bowmakerattractive
- Orange wired ribbon
- Plaid ribbon
- Burlap ribbon
- Pipe cleaners
- Wire wreath frame
Directions
- Cut a piece of pipe cleaner and put it into the bow maker. Make sure it is long enough to secure the ribbons to the wire wreath frame, about 6 inches.
- Cut 4 inches from the burlap, orange, and plaid ribbons.
- Layer the cut ribbons into the bow maker, alternating the burlap, orange, and plaid ribbons, so you have 2 of each per bow.
- Remove the ribbons from the bow maker, then secure them into a bow with the pipe cleaner.
- Tie the remaining pipe cleaner to the wire wreath form.
- Add more ribbons until you get the right thickness.
Thanksgiving Centerpieces
Centerpieces are easy and fun thanksgiving crafts to add more character and a welcoming vibe to your thanksgiving table.
31. Thanksgiving Platter Centerpiece

Thanksgiving Platter Centerpiece - Image by Better Homes & Gardens
Start the dinner party with an “I'm-thankful-for” statement from each family with this lovely centerpiece prompter. Get creative with your centerpiece message or make a game of your simple "I'm thankful" idea.
Things You'll Need
Directions
- Clean the platter of any dirt and grease with a paper towel and rubbing alcohol.
- Paint the center of the platter with two or more layers of black chalkboard paint until fully covered and no brush strokes are visible.
- Write your Thanksgiving message using colored chalk.
32. Thanksgiving Mason Jar Centerpiece

Thanksgiving Mason Jar Centerpiece - Image by Better Homes & Gardens
Do you have empty mason jars lying around your house? How about spending one crafty morning making Thanksgiving crafts with just a few supplies. Here's what you can do with your mason jars.
Things You'll Need
Directions
- Clean the mason jar of grease and dirt so the Mod Podge and leaves will stick well to it.
- Apply Mod Podge on the mason jar, then stick silk leaves around it.
- Add more Mod Podge over the mason jar if you want to add more maple leaves.
- Apply another layer of Mod Podge over the leaves and let dry.
- Decorate with raffia grass. You can add a tea light inside for an interesting centerpiece.
33. Colorful Fall Centerpiece
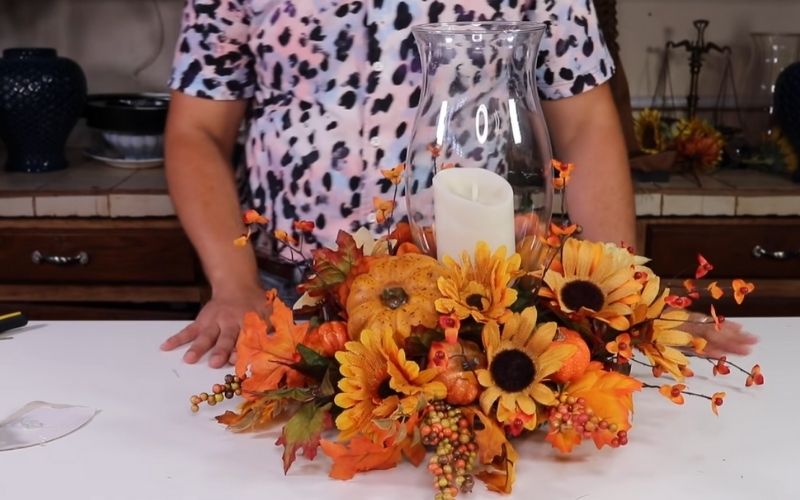
Colorful Fall Centerpiece - Image by Ramon at Home
If we're talking of some serious Thanksgiving crafts here, you shouldn't miss this colorful fall centerpiece for your dinner party. If you have orange flowers you used in the Halloween DIY decors, now is an excellent time to bring them out and forget the spooky vibes of that season.
Things You'll Need
- Clear plastic tray
- Floral foam
- Spanish moss
- Hurricane candle holder
- Hot glue gun and glue sticks
- Mini-pumpkins
- Fall berries
- Plastic maple leaves
- Twigs
- Orange flowers
Directions
- Arrange the floral foam and Spanish moss inside a clear plastic tray.
- Mark the floral foam with the hurricane glass by pushing the glass down.
- Arrange the leaves, pumpkins, berries, and flowers around the floral foam.
- Put the candle on top of the floral foam, then cover it with the hurricane glass.
- To hold the hurricane glass down, stick a skewer on a foam pumpkin and push the skewer into the floral foam, one pumpkin on each side.
34. Mini Pumpkin Flower Arrangements

Mini Pumpkin Flower Arrangements - Image by Garden Girl
Get creative with this mini pumpkin flower arrangement. You can use anything that strikes your fancy - dried flowers, silk flowers, wildflowers, twigs, seed pods. It will be a great addition to your holiday table.
Things You'll Need
Direction
- Glue to moss around the stem of the pumpkin.
- Arrange the flowers and the foliage around the stem until you get the right look you want.
35. Thanksgiving Candle Holder

Thanksgiving Candle Holder - Image by Life of Style Blog
We love candles, especially scented ones since they saturate the air with freshness and relaxing scent. However, you can always use battery-operated pillar candles because you don’t want your candles anytime soon.
Things You'll Need
Directions
- Wrap a few raffia grasses around the hurricane candle holder.
- Fill the candle holder with popcorn kernels, enough to raise the candle.
- Position the candle on top of the popcorn kernels for a lovely centerpiece.
36. Candy Corn Tealight Centerpiece

Candy corn tealight centerpiece - Image by Life of Style Blog
Want to have something light for your centerpiece? Try this candy corn tealight centerpiece for your holiday table.
Things You'll Need
Directions
- Arrange your tealight holders on a rectangular wooden tray.
- Fill the tray with candy corns, then fill the candleholders with tealights. You may also use battery-operated tealights for this setup.
37. Black Pumpkins Centerpiece

Black Pumpkins Centerpiece - Image by Naturally Ann
Whoever said pumpkins should be orange hasn't found their creative calling yet, LOL. And no, it's not for Halloween but Thanksgiving. These black pumpkins will add a hint of elegance to your table and break the monotony of fall colors. Pop a few white blooms into your basket to make your arrangement more welcoming and intriguing.
Things You'll Need
Directions
- Line a rattan basket with a fall-themed hanky.
- Arrange the black pumpkins, orange pumpkins, and acorns in the basket.
- Add a pop of color with some white flowers on one side of the basket.
Miscellaneous Crafts
Try also these crafts and party decor ideas to make hosting less stressful and more enjoyable for you. You may even use some of these crafts year-round, without anyone thinking that you used them for Thanksgiving.
38. Golden Thanksgiving Frames

Golden Thanksgiving Frames - Image by Life of Style Blog
These frames are what we think you can do for the whole year since the gold color doesn’t necessarily associate itself with Thanksgiving, so that you could give it a free pass for your wall decorations.
Things You'll Need
- Picture frames
- Metallic gold spray paint
- Silk maple leaves
- Berries
- Twigs
- Hot glue gun and glue sticks
- Foamboard
- Cardstock
Directions
- Remove the glass and the back from the frame, then wipe off any dirt or grease on it.
- Spray with metallic gold paint. Set aside to dry.
- Paint the leaves and other fall items you want to frame with metallic gold.
- Assemble the frame and line the inside with the cardstock, but skip the glass.
- Glue the leaves and other items on the cardstock. Hang or display the frames on the table in the foyer.
39. Thanksgiving Place Settings
Thanksgiving Place Settings - Image by Life of Style Blog
Add a bit of pizzazz to your casual home parties by using place settings on your table for your guests. A simple personalized place card and a Thanksgiving message on the napkin are sure to make them feel special and welcome as they sit to dine with you.
Things You'll Need
- Thanksgiving-themed plates
- Cloth napkins in fall colors
- Cardstock
- Metallic gold twine
- Single-hole puncher
Directions
- Layout your place cards and the personalized message in the Thanksgiving theme and print them.
- Cut out the place cards and score, then glue, so they stand on the table.
- Cut out the messages, then punch a 3mm hole for the gold twine. You may also use jute rope if you don't have a gold twine.
- Use the hand-painted plate you made in one of the crafts listed here. If you don't want to make one, you may also use plain plates instead of Thanksgiving-themed placemats.
- Fold the napkin in the style you want, then tie your Thanksgiving message to it. Place the napkin on the plate so your guest will feel the warm welcome.
40. Pumpkin Welcome

Thanksgiving-Themed Settings - Image by The Crafty Quinn
This craft is an excellent way to welcome your guests, especially if you’re hosting a crafting party and you want to direct them to a particular area in your house or yard. It helps give your guests the freedom to roam and not get lost.
Things You'll Need
- Wooden pumpkin cutout
- White chalk paint
- Paintbrush
- Jute string
- Thanksgiving-themed cutout
- Wooden beads
Direction
- Paint the wooden pumpkin cutout with white chalk paint. Buff some places with sandpaper to give it a distressed look.
- If you have a Cricut Maker, you can cut out your instruction and directions to the proper venue.
- If not, you can always cut the phrases with scissors.
- Glue your words on the wooden cutout.
- String several wooden beads on jute twine and tie them at the top of the wooden pumpkin.
- Add also another length of jute twine to have something to hold your signs.
Conclusion
We hope you’ve found some fun and creative Thanksgiving crafts that will help your family get in the spirit this year. Which of these does your kid love? Which is your personal favorite? Give us a shoutout, and have a happy, safe holiday!