https://glytterati.com/blogs/articles.atomglytterati - Articles2024-05-15T02:34:32-07:00glytteratihttps://glytterati.com/blogs/articles/how-to-make-fathers-day-more-special-with-custom-fathers-day-prints2024-05-15T02:34:32-07:002024-05-15T23:03:33-07:00How to Make Father's Day More Special With Custom Father's Day Prints?HARINI CHITRA MOHAN
Father is the person who holds a special place in our lives. They struggle throughout their lives to give us a better present and future. It's their fair right to celebrate a day by their names to acknowledge their efforts for their children. Thus, we celebrate Father's Day, a day to celebrate the amazing man who has shaped our lives.
We express our gratitude for his continuous support and guidance and the love he showered on us on this day. To express affection, many people buy gifts; although store-bought gifts are always appreciated, what touches the heart is the personalization touch, which can truly enhance the experience and help you create a lasting memory.
So, this time, don't think of buying unsentimental gifts; instead, avail yourself of the opportunity to create an exceptional Father's Day with custom gifts. This guide is only dedicated to finding and discussing various Father's Day customized gift ideas you haven't considered previously, exploring their unique qualities and providing tips to make them even more meaningful.
Preserve the Memories: Custom Canvas Prints
If you want to showcase a cherished photograph of your father, nothing is better than to create or get a canvas print. In this way, you will surprise him by simply transforming his picture into a piece of art that can be displayed proudly in his home or office. If you want ideas for the selection of photos, here are some
You can select a photo of a special moment you shared with your father. This could be anything: a vacation, a milestone achievement, or a heartwarming family gathering.
You can pick a picture that reflects his personality. Capture a moment when he is indulging in his hobbies or something of his interest. Moreover, a specific expression that embodies his spirit is another great thing to capture for a canvas print.
A sense of nostalgia is something that is needed at the time. You can evoke it by using a vintage photograph or a childhood picture of your father, which can bring back his cherished memories and evoke a sense of warmth.
Tips From My Side
You must try to give the best gift to your father on Father's Day, so try to choose a photo with good resolution and proper lighting to make sure that it looks best in a canvas print. If you have some special place to hang the canvas print in your father's room or office, then measure the size of the place prior to selecting the canvas size. Moreover, you can also make it more customized by adding a handwritten message or a quote on the back of the canvas to make it even more special.
Metal Prints for a More Modern Look
If you don't think that canvas print is a great gift idea or a random one, then you can pick metal print as a modern and sophisticated alternative to it. The sharp details and vibrant colors of your dad's photo are infused directly onto a metal surface, creating a truly eye-catching piece. If your dad appreciates a contemporary aesthetic or has a minimalist style, the metal prints will be a great gift option.
Advantages of Metal Prints:
There are some other reasons to pick metal prints, like
They are durable and resistant to scratches and fading.
Its metallic finish makes it more sophisticated and complements modern decor styles.
They are also resistant to moisture.
They are perfect for high-traffic areas or outdoor displays.
Direct infusion of your dad's photo on the metal offers a stunning and vibrant image.
I highly recommend wisely choosing the photo as in metal printing, high-contrast pictures or images with bold colors give the best result. Moreover, select the finish that best suits the photo and your dad's taste, as you often get two options: matte or glossy finish.
Custom Photo Coasters Offers Rustic Charm
If you want a rustic charm, nothing is a more thoughtful and practical gift than personalized photo coasters. You can print anything on the photo coaster, like your family photo, your dad's favorite funny joke, or a heartfelt message from your side. This is a type of gift that adds a touch of personality to his coffee table or desk while protecting surfaces from spills. It also symbolizes that he protects you and your family from the spills of hardships.
Benefits of Photo Coasters:
Coasters aren't only great gifts, but they come with many benefits, like
It is a practical gift, and your dad can use it on a daily basis, especially if he is a tea or coffee lover.
Personalizing coasters makes it a unique and sentimental gift. It also reminds your dad often in a day how important he is in your life.
When it comes to personalizing coasters, you can choose a photo of your dad, family, or a message that not only makes your dad feel special but also complements the rustic aesthetic of the burlap material. Be careful while selecting the shape and size of the coaster, as they are available in various sales and sizes at Smile Art Design. Instead of one, you can also gift a set of coasters with a matching personalized mug or a photo frame made from natural materials to make your dad's day even more special.
Decor your Father's Desktop With Customized Photo Prints
Not only at home, you can give your dad something that remains with him in his office. A desktop photo print is a great gift for this. It is a simple but meaningful way to keep your father close throughout his workday. You can choose a photo that will bring a smile to his face, like a picture of his grandchildren or a favorite pet.
Why Choose Desktop Photo Prints:
Why should we choose desktop photo prints as a gift for Father's Day? If your dad has a memorable photo on his desk, it will remind him of your love and support throughout the day.
As photo prints are small and lightweight, he can easily carry them and display them on any desk or workspace. Moreover, you can choose from various sizes, finishes, and even frames to personalize the gift further.
However, I highly recommend carefully selecting the photo print size. Pick the one that fits comfortably on his desk without cluttering the space. You can also add a small note on the back of the photo which expresses your love and appreciation for him.
Show Affection Custom Photo Panels
If you don't like the idea of photo print, then photo panels are a good alternative for it. They offer a unique way to showcase multiple photos in a cohesive display. You can create a collage of special moments, which cover the specific or special moments of his life or highlight a particular theme like his hobbies, family, or career achievements. If you give a photo panel to your dad on Father's Day, this personalized piece will always remain a constant reminder of the love and memories you share.
Advantages of Photo Panels:
Photo panels are versatile due to the availability of arrangements in various configurations to create a unique and personalized display. They give a modern look to any room and go best with different decor styles. You can combine multiple photos of your dad to tell a story about your father's life, passions, and achievements.
I highly recommend that you select photos of particular events related to a specific theme or some achievement of your father. Consider the size of the place before selecting the panel size. Don't forget to play with different arrangements of the photos to create a visually appealing and meaningful display.
Metal Magnets for the Fridge
Metal magnets are a fun and entertaining gift for your dad on Father's Day. These magnets are a functional way to personalize your father's refrigerator or any other magnetic surface. You can choose a photo that will make him smile every time he opens the fridge, like a funny picture of you together or a heartwarming quote.
Why Choose Metal Magnets:
Metal magnets are a budget-friendly gift to purchase that not only holds sentimental value but is a practical thing that your dad will use daily. You can choose a good photo for metal magnets or even add custom messages or quotes on it.
I highly recommend choosing a funny or lighthearted photo for the magnet if your dad appreciates humor. You can also include a short message that expresses your love, affection, and appreciation for your dad on the back of the magnet. If you want to properly decorate your father's fridge, you can gift multiple magnets with different photos or messages.
Other Ways to Celebrate Father's Day
We have discussed custom items to gift your dad on Father's Day, but there are also some other ways that add a more personal touch to enhance the experience. You can consider adding a handwritten message or a heartfelt card expressing your appreciation and love. You can also personalize the gift further by incorporating his favorite colors, hobbies, or inside jokes. However, you can also make Father's Day even more special by following these tips.
You can make a video clip compilation of family members in which they share their love and appreciation for your father.
Traveling is a great gift for your father, especially when it's a surprise tour. You can take your father anywhere, from a hike and a fishing trip to a visit to his favorite place.
Special cooking also makes a person feel more special, so prepare a delicious meal at home or take him out to his favorite restaurant on the special occasion of Father's Day.
Another great way to celebrate Father's Day is by spending time together. The most valuable gift is the time and attention that you give him. You can engage in activities that you both love and enjoy, whether it's watching a documentary or playing a game. You can spend time by simply having a conversation with him.
My Verdict
All the efforts you are trying to put into making a personalized gift for your father are fruitful and create a Father's Day experience that is unique enough that your dad will remember for years to come. Your love and effort behind the gift truly make it unique.
]]>
https://glytterati.com/blogs/articles/how-to-make-your-home-look-like-an-art-gallery2024-02-15T06:49:31-08:002024-02-15T06:49:31-08:00How to Make Your Home Look Like an Art Gallery?HARINI CHITRA MOHAN
Your home is a true depiction of your interests, lifestyle, and aesthetic. If you are into a minimalistic lifestyle or you like vintage, in most cases your home will work as a reflection of your interests. I am a huge art enthusiast and every time someone visits my place, I get many compliments.
The best thing about this whole process is that I am on a budget. I do not spend a lot of money on purchasing expensive art; rather I target the underdogs in the art world.
One of my very old friends who shares the same interest recently visited my home and asked if I have spent the same amount of money as her on my home. Surprisingly when I asked her about the price of each piece or the way she likes to decorate her home, she shocked me with a very large number. I have since been comparing why I have been able to achieve nearly the same home aesthetic within almost half the amount.
Now, I am not bragging because let’s face it, famous artists will literally charge millions for a single piece but if you step out of these famous names you can buy some remarkable art pieces or even make some on budget.
As a fan of Kim Namjoon, my inspiration was to make my home look just like a gallery. If you do not know what his home looks like, you can check it online or just go to his Instagram account. For more research and reference, you just need to use your internet and check sites like Pinterest for inspiration.
If you are currently struggling with an internet connection, we would recommend using Xfinity as it offers one of the best speed and reliable connection without draining your budget. For more information, you can contact it via Xfinity customer service phone number easily.
Tips To Make Your Home Look Like Art Gallery
1. Work On Negative Space
Negative spacing is one of the most important things that will make your home look like an art gallery. Most people fill up their home with art pieces but their placement and negative space is so low that it eventually impact the look of the home making every corner look crowded. This crowding will only make your home look tacky just like someone who is obsessed with collecting things.
Use very basic furniture with little or no character and repeat the same with your walls and cardboard. Similarly, avoid choosing floor prints for drapes, cushions, bed sheets, or any other fabric that you might like to cover your furniture with.
2. Invest In High-Quality Frames
Imagine you just bought a good painting but the frame is very low quality. What do you think it will look like? Frame is not just for protecting and ganging your art, it enhances the overall look of your art pieces.
If you look at modern art pieces in the gallery, you will notice that they have very delicate frames that add to the character of the painting. Even something as plain as a photo frame will make your wall look expensive. Moreover, if you are into creating modern art or abstract art, a good frame will make everything look better.
3. Choose Solid Colors
Solid colors will make everything pop a bit more. While most people go for colors, an art gallery always uses basic colors so it does not contrast or overshadow the colors of art. This is one of the main reasons an art gallery looks very different from when you hang it in your home. While putting your art on display, make sure everything around it doesn’t overshadow it.
4. Look For Pedestals
Pedestals are not generally seen at home but if you ever visit a gallery, you will see solid pedestals made of wood and concrete. Most people when putting art pieces on display hardly work on the surroundings. As a result, their art pieces get buried in the pile of other things which eventually make it look like a collection. However, if you get solid pedestals and put a single light right on the ceiling, it will make your art piece look like a showstopper.
Moreover, the surroundings will not contradict the mood of the art even if you have multiple other art pieces in the same line. Using pedestals of different sizes, colors, and shapes will give each sculptor the necessary attention it needs.
5. Use Daily Use Items for Art
Items that are generally used at home give a very different feel to the home, so most people end up hiding these items under the table or behind the TV. This is especially important if you have electric items that are connected to a cord. However, if you use the same household items and add a character to them with colors, sheets, covers, and aesthetic linings, it will eventually look much better and a part of your home.
Bottom Line
To sum it all up, just like any art gallery believe in enhancing the art rather than making your walls and furniture pop. Make your house look like a blank canvas and then add some basic color and art pieces to make it look like a gallery. Focus on art pieces that are affordable but stand out, clay pieces, glass boxes, or just plain wooden ramps will instantly improve the look of your home.
]]>
https://glytterati.com/blogs/articles/what-is-an-art-exhibition2024-02-01T05:09:29-08:002024-02-01T05:10:56-08:00What Is an Art Exhibition?HARINI CHITRA MOHAN
Art exhibitions serve as vibrant platforms where creativity converges with expression, inviting audiences to delve into the diverse realms of artistic imagination. From large modern wall art to graffiti masterpieces, these events showcase a spectrum of visual delights that captivate and inspire. In this article, we'll explore the essence of art exhibitions, highlighting the significance of various art forms such as graffiti artwork, modern wall art for living rooms, abstract art paintings, and their availability for purchase.
Understanding Art Exhibitions
An art exhibition is a curated display of graffiti artwork, often organised by galleries, museums, or independent curators, with the purpose of showcasing the artistic endeavours of both emerging and established artists. These events provide a space for creators to present their works to the public, fostering a dialogue between artists and art enthusiasts.
Why We Display Art Exhibition
Showcasing Artistic Expression: Art exhibitions provide artists with a platform to showcase their creative expressions and unique perspectives. This allows them to share their ideas, emotions, and visions with a broader audience.
Cultural Exchange: Art exhibitions often feature works from various artists, regions, or cultures. This facilitates cultural exchange and promotes a greater understanding of different artistic traditions and styles.
Promoting Artists: For emerging or established artists, exhibitions serve as a means to gain recognition and exposure. Galleries and museums attract art enthusiasts, collectors, and curators, providing artists with the opportunity to build their reputations.
Community Engagement: Art exhibitions bring people together, fostering a sense of community engagement. Visitors can appreciate and discuss art, creating a space for dialogue and shared experiences.
Large Modern Wall Art: Making a Statement
One of the captivating facets of art exhibitions is the presence of large modern wall art that dominates the gallery space. These pieces are characterised by their expansive size and contemporary aesthetics, making them focal points that command attention. Large modern wall art often employs bold colors, intricate details, and innovative techniques, creating an immersive experience for viewers.
Graffiti Artwork: Street Expression in Galleries
Graffiti, once confined to urban landscapes, has found its way into art exhibitions, challenging traditional perceptions of art. These dynamic and expressive creations, born from the streets, bring a raw energy to galleries. Graffiti artwork often explores social issues, personal narratives, and the artist's unique perspective, adding layers of meaning to the exhibition.
Modern Wall Art for Living Rooms: Blurring Boundaries
Art isn't limited to gallery spaces alone; it has the power to transform our living environments. Modern wall art for living rooms bridges the gap between traditional exhibition spaces and personal sanctuaries. These pieces are curated to complement contemporary interior designs, offering a seamless integration of art into everyday life.
Abstract Art Painting: The Power of Interpretation
Art exhibitions frequently feature abstract art painting, where artists embrace the freedom of expression through non-representational forms. The beauty of abstract art lies in its openness to interpretation, allowing viewers to derive their own meanings from the canvases. These paintings often serve as a testament to the artist's emotions and creative journey.
Art Painting for Sale: Bringing Art to Homes
Art exhibitions not only provide a visual feast for enthusiasts but also offer an opportunity to purchase these exquisite creations. Art paintings for sale enable individuals to bring a piece of the exhibition into their homes, fostering a deeper connection between the artist and the collector. This accessibility promotes a sustainable ecosystem for artists and encourages a wider appreciation of the arts.
Living Room Wall Art: Personalized Aesthetics
As art continues to transcend conventional boundaries, living room wall art becomes a personalised expression of style and taste. Choosing artworks from exhibitions allows individuals to curate their living spaces with pieces that resonate with them personally, transforming houses into homes adorned with stories and emotions.
Conclusion
In essence, an art exhibition is a dynamic celebration of creativity, providing a glimpse into the diverse world of artistic expression. From large modern wall art to graffiti artwork and abstract art paintings, these exhibitions serve as bridges between artists and their audiences. The availability of art paintings for sale ensures that the impact of these exhibitions extends beyond gallery walls, enriching homes and lives with the beauty of artistic imagination. Whether exploring the realms of traditional or avant-garde, art exhibitions remain an indispensable part of the cultural landscape, inviting everyone to appreciate the endless possibilities of human creativity.
]]>
https://glytterati.com/blogs/articles/art-galleries-the-catalysts-of-local-artistic-flourishment2024-01-06T05:56:44-08:002024-01-06T05:56:44-08:00Art Galleries: The Catalysts of Local Artistic FlourishmentHARINI CHITRA MOHAN
Art galleries serve as dynamic epicenters nurturing and bolstering local art scenes. These spaces are not just mere exhibition areas but vibrant platforms that significantly contribute to the growth of artists, foster community engagement, and play an integral role in cultural enrichment.
Nurturing and Promoting Local Artists
Platforms for Emerging Talents:
Galleries provide crucial exposure for emerging artists, allowing them to showcase their work to a broader audience.
They offer opportunities that emerging artists might not access independently.
For instance, a local gallery in Brooklyn, New York, known for its commitment to showcasing emerging talents, provides exhibition space for young, up-and-coming artists, giving them a chance to gain recognition and visibility in the art world.
Supporting Artistic Growth
Galleries often offer residencies, workshops, and mentorship programs to nurture the development of local artists.
These initiatives encourage experimentation and innovation, fostering the growth of artists' skills and creativity.
One real-life example is a community-based gallery in London that hosts workshops and provides studio spaces for local artists to experiment and develop their artistic practices.
Fostering Community Engagement
Accessible Art Spaces:
Galleries create inclusive environments accessible to diverse communities.
They organize events, talks, and workshops to engage the public and make art more approachable.
For instance, a non-profit gallery in San Francisco regularly hosts open studio events where community members can interact with artists and learn about their creative process, fostering a deeper connection between artists and the local community.
Cultivating Dialogue and Connection:
Galleries initiate conversations and discussions around art and societal issues.
They host interactive experiences that facilitate connections between artists and audiences.
In a city gallery in Barcelona, regular art salons are organized, inviting artists and the public to engage in lively discussions about contemporary art trends and their impact on society, encouraging dialogue and interaction.
Supporting Cultural Growth
Preservation of Local Artistic Heritage:
Galleries play a crucial role in preserving and promoting local cultural heritage through exhibitions and events.
They provide a platform for artists to celebrate and showcase their cultural traditions.
For example, a heritage gallery in Kyoto curates exhibitions that showcase traditional Japanese art forms, ensuring the preservation and continuation of these rich cultural legacies.
Contribution to Socio-Economic Development:
Galleries contribute to the local economy by attracting cultural tourism and stimulating creativity within communities.
They provide spaces for social interactions and contribute to the cultural vibrancy of neighborhoods.
An art district in Berlin, with its multitude of galleries, not only attracts tourists but also serves as a hub for creative professionals, fostering a thriving local economy and cultural ecosystem.
Pearl Lam and the Influence of Gallerists
International gallerists like Pearl Lam play significant roles in shaping local art scenes:
Through their curation and global connections, they bring international perspectives to local galleries, fostering cross-cultural dialogues.
They often introduce diverse and innovative art practices that enrich local artistic landscapes.
For instance, international gallerist Pearl Lam, known for her global curation, has curated exhibitions in various local galleries worldwide, introducing diverse artistic voices and fostering cultural exchange.
Art galleries, as exemplified by international gallerists like Pearl Lam and various local initiatives, are vital components in nurturing and supporting local art scenes. These spaces are not only avenues for exhibiting art but also catalysts for artistic growth, community engagement, and cultural preservation. Their contribution to the socio-economic and cultural fabric of local communities solidifies their role as pivotal platforms in the cultivation and flourishing of local artistic expressions.
]]>
https://glytterati.com/blogs/articles/the-complete-guide-to-resin-crafting-10-diy-projects-to-make-with-epoxy2023-11-29T08:39:47-08:002023-11-29T08:39:47-08:00The Complete Guide to Resin Crafting: 10 DIY Projects to Make with EpoxyHARINI CHITRA MOHAN
Epoxy resin has become an incredibly popular material for crafters and DIYers in recent years. The shiny, glass-like finish you can achieve with resin makes it perfect for creating jewelry, home decor pieces, artwork, and more.
While working with resin requires some safety precautions, the end results are well worth it. If you're looking to try your hand at some resin crafts, here are 10 great projects to get you started.
10 Resin Crafts and DIY Projects to Make with Epoxy
Resin Jewelry
One of the most common uses for resin in crafting is to make jewelry. You can encase dried flowers, coins, beads, seashells, and any other small objects in resin to create unique pendants, charms, and other jewelry pieces. Resin gives these items a smooth, professional finish and helps preserve the materials you put inside it.
To get started, choose silicone molds in the shapes you want, like circles or teardrops. Mix up your two-part epoxy resin according to the package directions. Carefully pour the resin into the molds, adding your dried flowers or other embellishments on top. Let it cure fully, pop the resin piece out of the molds, and attach a chain or cord to create a necklace or bracelet. The possibilities are endless!
Resin Coasters
Protect your tables and add a unique touch to your home décor with handmade resin coasters. These make great gifts too. Choose any small items to encase inside the coaster, like sea glass, shells, or pressed flowers. Or add drops of paint or swirls of glitter before pouring the resin for colorful, artistic effects. Square, round, or fun shaped molds all work well.
To prevent sticking, spray the molds lightly with nonstick cooking spray before pouring in the mixed resin. Top the resin with a few bubbles or white wisps to give the coasters an ocean vibe. Once cured, felt pads can be added to the bottom for function. Display them in a coaster set or give them out individually as thoughtful presents.
Resin Boxes and Trays
Pour resin into silicone baking molds to create gorgeous jewelry trays, trinket boxes, and desk organizers. Mix in mica powder, alcohol inks, or acrylic paints for pops of color. Or top the resin with colorful sand, dried flowers, or glitter before curing. This project allows you to get creative with the designs.
When unmolding the resin, flexibility is key to preventing cracks. Gently bend and twist the mold to pop the resin out smoothly. Finish by attaching small rubber feet on the bottom to keep the trays and boxes from sliding around. A quick DIY way to add colorful storage options to any room.
Resin Keychains
Make your keys distinctively yours with homemade resin keychains. Simply pour resin into keychain molds, add any small embellishments like beads or charms, and insert a key ring before curing. This is an easy resin project that comes out looking professionally done.
Get creative by placing tiny flowers inside clear resin or adding drops of gold mica powder swirled with a toothpick for a marbled effect. Or sprinkle in glitter and small studs for funky, dazzling designs. With the wide variety of keychain molds available, from animals to geometric shapes, you can create unique keychains for yourself or great little gifts for friends.
Resin Serving Trays
Transform inexpensive serving trays from a dollar store into dazzling centerpieces for any table with resin. Pick up one or more basic plastic or wooden trays, tape off any handles or edges you don’t want covered in resin, and start decorating. Add strips of lace, fresh flowers, leaves, or other flat items across the surface of the tray before pouring on the resin.
The natural materials immersed in the resin create a lovely display for appetizers, drinks, or desserts at your next dinner party. For extra sparkle, try topping off the resin with glitter, iridescent mica powders, or glass beads. The finishing touch is peelable rubber bumpers on the bottom to protect tabletops. Now you have a customized serving tray that looks like a million bucks!
Resin Pet Keepsakes
Preserve your beloved pet's paw print or hair forever in resin as a sweet memorial keepsake. Mix a small batch of resin and pour into a silicone mold or baking pan lined with parchment paper. Press your pet's paw into it gently, being careful not to move their paw around too much to keep the print clear.
You can also imprint their nose or add a tuft of fur. Float a small heart charm or their name in resin over the paw print before curing for a sentimental touch. Once fully hardened, pop the resin out and you'll have a transparent cast of their paw to cherish always. Display it on a shelf or carry it with you in a pendant or keychain.
Resin Paperweights
Paperweights made from resin are easy to craft and make stunning additions to a desk or bookshelf. Find flat bottomed glass votives, vases, or other small glass containers. Print out photos, quotes, comic strips, or pages from a favorite book and cut them to fit inside the glass container.
Arrange the paper how you like within the glass, then mix the resin and pour it inside to cover the paper fully. Top off with beads, shells or other embellishments before the resin cures if desired. The paper design sealed beautifully in clear resin makes for an incredibly meaningful paperweight to cherish.
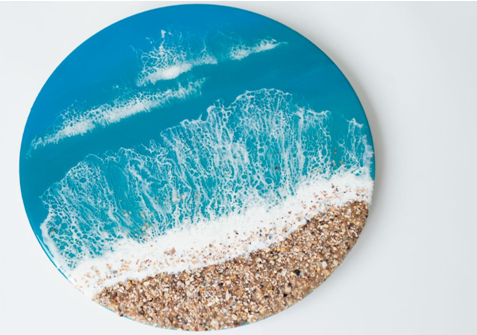
Resin Wall Art
For a contemporary home accent, create abstract resin wall art. Stretch colorful canvas across simple wood frames. Then layer on different organic materials like dried flowers and leaves or coffee grounds. Pour on clear resin to coat the materials and seal them in place. The resin helps showcase and preserve the natural beauty of the plants and objects you embed.
Add interest by including bubbles or metallic mica powders swirled into the resin before drying. The plant filled designs sealed between the canvas and resin create bright, textured works of art to liven up any blank wall space.
Resin Countertops
If you're looking for a more ambitious DIY to transform your home, consider making custom resin countertops or tables. Kits are available online with detailed instructions for pouring and curing the resin. Choose from clear, colored, or artist resin options. You can embed decorative objects like sea glass, stones, dried botanicals or boldly colored artwork under the resin.
There are even ways to simulate the look of marble or granite with specialty resins and mica powders. It takes more time and skill but lets you re-do kitchen or bathroom counters on a budget with eye-catching customized results. Add some shimmery style to your living spaces.
Resin Shaped Lamps
Light up a room with your own hand poured resin lamps. Buy lamp bases and wire kits to combine with your resin pieces. Choose silicone molds shaped as abstract sculptures, geometric forms, or any shape that inspires you. Embed colorful flowers, glitter, photos or fabric in the resin before it hardens.
Then simply assemble the lamp kit components and adhere them to the resin base with epoxy glue for the finishing touch. The light glowing through the shaped resin makes for incredible decorative lamps perfect for accenting end tables, desks, and more in your home. Make matching sets for a cohesive style.
Conclusion
Epoxy resin can be used to make all kinds of beautiful, artistic projects for your home, for yourself, or to give as gifts. With just some simple resin molds and materials, you can let your creativity run wild. Whether you want to add some personal flair to everyday objects like jewelry or dishes, preserve natural materials like flowers or seashells, or create abstract art and designs, resin provides the clear, glossy finish to make it happen.
The only limit is your imagination! So try out some of these projects to get your feet wet with epoxy resin crafting. And don’t be afraid to experiment and put your own spin on these ideas. Part of the fun with resin is that you can embed practically any small objects, colors, or textures to achieve different looks. Just be sure to work in a well ventilated area, wear gloves for safety, and fully read product instructions.
With a bit of practice, you’ll be designing incredible resin crafts in no time that make perfect additions to your home décor or creative gifts tailored exactly how you like. Let the resin revolution begin!
]]>
https://glytterati.com/blogs/articles/efficient-home-improvement-strategies-for-long-distance-relocations2023-11-24T07:28:51-08:002023-11-24T07:32:39-08:00Efficient Home Improvement Strategies for Long-Distance RelocationsHARINI CHITRA MOHAN
If you're planning a long-distance move to Louisville, Kentucky, a city known for its vibrant culture and historic charm, efficient home improvement strategies become even more critical. Whether you're relocating for a job, family reasons, or a fresh start, preparing your current home for sale or rent is a crucial step in the process. In this guide, we will explore ten practical techniques for homeowners who are looking to optimize their home improvement efforts while planning a long-distance move to Louisville.
Assess Your Home's Current Condition
Before diving into any home improvement projects, conduct a thorough assessment of your home's condition. Identify areas that require attention, from minor repairs to major renovations. This initial evaluation will help you prioritize tasks and create a comprehensive plan.
When assessing your home, consider both the interior and exterior. Look for structural issues, outdated features, and cosmetic improvements that can enhance your home's appeal.
Set a Realistic Budget
Creating a budget is a critical step in planning your home improvement projects. Determine how much you can comfortably allocate for improvements while keeping in mind the expected return on investment (ROI). Setting a realistic budget ensures that you don't overspend and jeopardize your finances before the move.
Having a well-defined budget helps you make informed decisions about which projects to prioritize and how much you can invest in each one. It's essential to strike a balance between enhancing your home's value and staying within your financial means.
Declutter and Depersonalize
As you prepare your home for sale or rent, planning long distance move to Louisville with a reputable company like Coleman Worldwide Moving may add an extra layer of complexity. However, decluttering and depersonalizing the space is crucial. Eliminate personal belongings and unnecessary clutter to establish a neutral, open space that welcomes potential buyers or tenants. Top of Form
Consider renting a storage unit to temporarily store items that are not essential for daily living but may clutter your home. This step also makes the packing process more manageable as you get ready for your own long-distance move to Louisville.
Enhance Curb Appeal
First impressions matter when it comes to selling or renting a home. Boost your home's curb appeal by focusing on the exterior. This includes landscaping, fresh paint, a well-maintained roof, and an inviting front entrance. A visually appealing exterior can attract more prospective buyers or tenants.
Consider investing in landscaping improvements, such as trimming bushes, planting flowers, and maintaining a lush lawn. Repainting the exterior can give your home a refreshed look, increasing its attractiveness to potential buyers or renters.
Update Outdated Features
Outdated features can significantly impact your home's marketability. Consider updating elements like kitchen appliances, bathroom fixtures, and flooring if they are showing signs of wear and tear. Modernizing these areas can increase your home's value and appeal.
When updating features, choose styles and materials that are popular and timeless, as these are more likely to appeal to a broad range of buyers or renters. Neutral colors and high-quality finishes can make a significant difference.
Prioritize Repairs and Maintenance
Addressing essential repairs and maintenance tasks should be your top priority. Fix any plumbing leaks, electrical issues, or structural problems. Regular maintenance ensures that your home is in good condition and ready for inspection when potential buyers or renters visit.
By proactively handling repairs, you can avoid last-minute, costly surprises that could delay your relocation plans. This also demonstrates to potential buyers or tenants that your home has been well-maintained.
Paint and Refresh Interior Spaces
A fresh coat of paint can work wonders in giving your home a clean and updated look. Stick to neutral colors that appeal to a broad range of tastes. Painting is a cost-effective way to make a significant visual impact.
Consider repainting rooms that show signs of wear or have bold or outdated color schemes. A fresh and neutral palette allows potential buyers or tenants to imagine how they would personalize the space to their liking.
Maximize Energy Efficiency
Energy-efficient upgrades not only make your home more attractive to potential buyers or renters but can also reduce utility bills. Consider installing energy-efficient windows, adding insulation, and upgrading HVAC systems. These improvements can add value to your home and save money in the long run.
Highlighting the energy-efficient features of your home can be a selling point. Provide information about energy savings and the environmental benefits of these upgrades in your listing or promotional materials.
Work with Professionals
For complex home improvement projects, consider working with professionals such as contractors, painters, or landscapers. Their expertise can ensure that the work is done efficiently and up to industry standards. Hiring professionals can also save you time and stress during the home improvement process.
Before hiring professionals, do your research and obtain multiple quotes or estimates. Check references and reviews to ensure that you choose trustworthy and reliable contractors or service providers.
Regularly Inspect and Maintain During the Selling/Renting Period
Once you've completed your home improvement projects, it's essential to maintain your home's condition during the selling or renting period. Regular inspections and minor touch-ups can prevent issues from arising when you're far away. Stay in touch with your real estate agent or property manager to address any concerns promptly.
Consider creating a maintenance schedule to ensure that routine tasks, such as lawn care, gutter cleaning, and HVAC system servicing, are consistently addressed. Regular maintenance demonstrates to potential buyers or renters that your home has been well-cared for.
Conclusion
Efficient home improvement strategies play a crucial role in preparing your home for a long-distance relocation. Assessing your home's condition, setting a budget, prioritizing repairs, enhancing curb appeal, and updating outdated features are essential steps. Decluttering and depersonalizing, painting, and maximizing energy efficiency further improve your home's marketability.
Remember that working with professionals and maintaining your home during the selling or renting period is key to a successful transition. By following these strategies, you can not only increase the value of your property but also ensure a smoother and less stressful long-distance relocation.
]]>
https://glytterati.com/blogs/articles/best-practices-for-teaching-creativity-and-innovation-through-performing-arts2023-11-03T02:51:32-07:002023-11-03T02:51:32-07:00Best Practices for Teaching Creativity and Innovation Through Performing ArtsHARINI CHITRA MOHAN
The performing arts are an effective means of encouraging originality and creativity in people of all ages. The creative process is at the core of every effective performance, whether in theater, dance, music, or any other performing art. The performing arts can be used to help students, professionals, and artists alike acquire these vital abilities through a combination of creative thinking, cooperation, and risk-taking. The finest methods for teaching creativity and innovation through the performing arts will be discussed in this article.
Cultivate an Open and Inclusive Environment
Creating a safe and inclusive space is paramount in teaching creativity and innovation through performing arts. This environment should encourage participants to express themselves without fear of judgment. Students are more likely to explore, experiment, and take creative risks in this atmosphere. It's essential to emphasize that there are no "wrong" ideas in the creative process, as mistakes and failures can lead to valuable insights and innovations.
Such an environment can only be created when the students have ample time, and they are not under a lot of stress. However, the sad reality is that students are often overwhelmed by their coursework. In these situations, students can ask for help from a literature review writing service which employs professional writers to write some of the students' assignment work. This way, students can reduce their stress levels without letting that impact their academics. Then, they can participate in more workshops on performing arts and gain the ability to express themselves freely.
Encourage Diverse Perspectives
Diversity of thought and background can be a wellspring of creative inspiration. Encourage students to bring their unique perspectives, experiences, and cultural influences into their performances. This diversity can lead to innovative storytelling and performances that resonate with many audiences.
Emphasize Collaborative Work
Collaboration is a core component of the performing arts. To teach creativity and innovation effectively, emphasize the value of collaboration. Encourage students to work in groups and explore the collective creative process. Through collaboration, students can gain exposure to various ideas, sparking innovation and helping them develop the essential skills of teamwork and compromise.
Incorporate Creative Exercises
Incorporate creative exercises and activities into your teaching methodology. These exercises can take many forms, such as improvisational games, brainstorming sessions, or problem-solving challenges. These activities can help participants break free from creative ruts, think outside the box, and develop novel ideas.
Foster Adaptability
The performing arts constantly evolve, and performers must adapt to new challenges and circumstances. Teach your students the importance of adaptability and encourage them to embrace change. This will help them develop the ability to find creative solutions in high-pressure situations, a valuable skill both on and off the stage.
Teach the Value of Failure
Failure is integral to the creative process. Teach your students that it's okay to make mistakes and that failure can lead to innovation. Share stories of famous artists and performers who faced setbacks and turned them into opportunities for growth and creativity.
Explore Cross-Disciplinary Learning
Creativity often flourishes when different disciplines intersect. Encourage students to explore various art forms and incorporate elements from one discipline into another. For instance, dancers can experiment with multimedia elements, musicians can incorporate dance into their performances, and actors can explore musical theater. This cross-disciplinary approach can lead to groundbreaking innovations and unique artistic expressions.
Provide Freedom Within Structure
Balancing freedom with structure is essential for fostering creativity in performing arts. While giving students creative freedom is important, they should also understand the importance of mastering the fundamentals of their chosen art form. Creative innovation often emerges from a solid foundation of technique and knowledge.
Showcase Success Stories
Introduce students to success stories from the world of performing arts. Highlight individuals and groups who have pushed the boundaries of traditional art forms, broken new ground, and created innovative performances. These success stories can serve as inspiration and motivation for your students.
Support Risk-Taking
To foster creativity and innovation, students must be willing to take risks. Encourage them to step outside their comfort zones and explore the unknown. Share examples of artists who have taken creative risks and reaped the rewards, inspiring your students to do the same.
Emphasize the Power of Storytelling
Storytelling is at the core of many performing arts. Teach your students the art of storytelling, emphasizing the importance of narrative structure, character development, and emotional connection. The ability to tell compelling stories is a gateway to creativity and innovation.
Concluding Thoughts
Teaching creativity and invention through the performing arts is a complex process that calls for a friendly environment, teamwork, and a willingness to accept variation and change. By adopting these best practices into your teaching style, you may enable your pupils to develop into more imaginative, inventive, and flexible people. The performing arts not only improve the lives of people who take part but also help create a more dynamic and forward-thinking society.
]]>
https://glytterati.com/blogs/articles/6-tips-from-art-directors-for-creating-a-visually-impactful-presentation2023-09-20T13:22:29-07:002023-09-20T13:27:55-07:006 Tips From Art Directors for Creating a Visually Impactful PresentationRandy Woodward
The visual support of a presentation — or the famous slides — is an important tool for capturing the audience's attention and explaining complex concepts in a graphic way. Therefore, a presentation with an impactful design is essential to generating the desired impact.
To help you structure an impactful, state-of-the-art look, I gathered tips from the biggest experts, which are art directors! They are responsible for creating the visual identities and presentations and they agreed to share their knowledge with me for the sake of this article.
Check out these valuable steps to create more interesting, engaging slides and an even more compelling presentation.
Create a good script
If you thought you'd come here just for visual tips, you're wrong. For a visual to be truly impactful, it needs to be linked to a good script. Because the script and the visual go together and need to be in sync. A well-constructed script allows you to visualize the main topics covered and the focus. With this in hand, it is easier to create slides that complement and illustrate the speech — and do not repeat the presenter. Furthermore, the well-defined script eliminates excesses — especially in the amount of text.
Define a visual identity
Preparing a creative presentation with a visual identity is fundamental, whether for a product, an event or a brand. As I explain in this text, the choice of colors, fonts, shapes and symbols are means of making the public recognize your business, in addition to giving unity to the presentation.
An identity is also capable of transmitting the values and essence of your project. The good news is that you only need to do this job once. Then, you can repeat the pattern in other presentations — as long as the objective, context and audience profile are the same.
For example: if a person from an IT company is giving a presentation at a sales convention to talk about strategy, the visual identity should be more impactful, use metaphors and have animation effects that attract and connect the audience. If this same presentation is made to the board, it needs to have a more serious visual identity.
Break content down into steps
It bears repeating: a good visual presentation is one that doesn't have too much text and/or images on the same slide. In addition to polluting the material, too much can have the opposite effect of a good slide: hindering, rather than helping, understanding. Always prefer to divide the most 'loaded' projections into two or three slides. Thus, the material will be more enlightening and will not clutter your interlocutor's head. Imagine the horror of someone who stops following your line of reasoning because they are trying to understand that fine print or read the 15 bullet points you selected.
A tip: separate the content of your presentation by messages and use tools such as 'click' (an effect that makes an image or text appear on the slide). This helps make the presentation more dynamic and visually pleasing.
Use contrasts
Contrast (of colors, sizes and shapes) is an excellent tool to make a presentation more interesting and draw the audience's attention. Just as I explained in this article about design tips, the technique can be applied in different ways. So don't be afraid to dare. You can create different sizes and fonts for the texts, work with information arranged in different colors, and even vary the dimensions of the images. This means that the reader is much more likely to focus on exactly the information you want.
Choose images carefully
Choosing certain images and tones for your visual presentation makes all the difference. Here, it is worth remembering the psychology of colors: each hue causes a different sensation in people. Calmness, tension and even hunger can be awakened by color. Therefore, it is necessary to find figures with tones that relate to the subject to be treated.
It is also necessary to be always attentive to select images that make sense for the proposed theme. Avoid choosing old or low-quality images and always try to maintain a standard. Do not mix photos, drawings or other types of illustration in the same presentation.
Diagramming
The arrangement of objects within the slide expresses organization and clarity. Therefore, when diagramming your presentation, use and abuse tools such as contrast, and take care of the alignment and breathability of the text. Organize the content so that it is pleasant, but also expressive. Different layout models can be found on the pages of newspapers and magazines. So, if you have no ideas for building your presentation, just look for the nearest copy.
To assimilate so many tips, looking for examples is always a great idea. Fortunately, there are resources like SlidesCarnival, which offers templates and real-world examples to inspire your own presentations. By using these templates, you can witness firsthand how expertly crafted scripts, distinct visual identities, segmented content, creative contrasts, careful image selection, and meticulous diagramming come together to create visually captivating and compelling presentations. Thus, by combining these insights with practical examples, you can elevate your presentation skills and leave a lasting impact on your audience.
]]>
https://glytterati.com/blogs/articles/8-diy-artwork-ideas-to-decorate-your-study-room2023-09-01T01:57:51-07:002023-09-01T02:50:50-07:008 DIY Artwork Ideas to Decorate Your Study RoomRandy Woodward
Calm and serene, it is the idea of study rooms around the globe. Isn’t it? But what’s wrong with some fun updates? After all! Studying can be fun. However, by fun updates, we didn't mean balloons or streamers.
We’re talking minimal yet cute decor, and no, you don’t have to run down to Target to spend a bunch of cash, either. You’re going to make them yourself! Yes, DIY decor!
For your study room makeover, we have fantastic decor ideas that you can create yourself and transform your space! Check out our guide for 8 DIY artwork ideas to decorate your study room. Let’s begin!
Create the most beautiful and charming artwork yourself to adorn and decorate your study room, so you can concentrate on your work and also feel inspired by the aesthetic your creativity helped curate.
Here are 8 DIY artwork ideas to decorate your study room
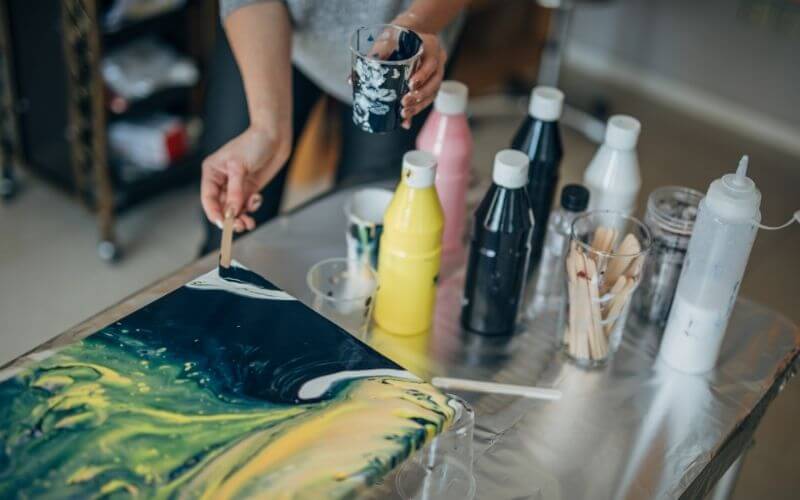
1. Artwork/ Paintings
Unleash your inner Van Gogh and create the most exquisite paintings yourself on different-sized canvases. You could paint sceneries, abstract art, or splash watercolor to create your own masterpieces! Hang them on the walls and let those colors energize you whenever you feel a little low. If you can’t generate your ideas, you can take help online or check out these simple drawing ideas from acrylgiessen.com.
What you’ll need:
Paints (Acrylic, Watercolor)
Different-sized and shaped canvas
2. DIY Photo Frame
Display your favorite moments in frames you created yourself! Set them up in various room parts and hang them on the walls. Whether it’s pictures of your family, friends, or your furry friends, adorning a handmade DIY frame around their photos is just going to elevate the sentiment! You could also place them on your table to help you readjust your focus whenever you feel a little stressed out.
What you’ll need:
Crafting Knife
Paints
Duct or crafting tape
Pieces of cardboard for the frame structure
The picture you’ll frame
What you’ll do:
Cut the shape of your frame out of the cardboard.
Start painting, coloring, and decorating the pieces, and let them dry fully.
Tape the pieces together with duct or colorful crafting tape.
After you’re done, slide the photo in carefully.
You can also place it flat under books to retain its shape if it looks crooked. And you’re done!
3. Book Page Art
Upcycle old books or magazines by cutting out fun pictures, text, or shapes and displaying them on a DIY frame you created yourself! Frame an iconic magazine cover of your favorite pop star, a news article from the day you were born, or some fun graphics from your old history textbook, these are perfect ways to amp up the look of your study room!
What you’ll need:
Old books, newspapers, or magazines
Canvas or cardboard for your frame
Washi tape or craft tape, and glue
Stickers, pasties (optional)
What you’ll do:
Cut out pages, pictures, text, or shapes that interest you.
Make your frame by following the steps for creating a DIY frame above.
Start setting them up in collage style or any special one on its own, and carefully glue them to the frame.
You can also tape them with fun washi tapes or colorful craft tapes.
Stick cute stickers if you want; if not, you’re done!
4. Natural Art
A natural art is a unique and lovely decor to include in your study room. Hang it on the wall or set it by your table lamp. It is going to look perfect, especially because you made it yourself!
What you’ll need:
Leaves
Flowers or petals
Shells
Pebbles or small rocks
Cute twigs or vines
Canvas or a piece of wood
Glue or a hot glue gun
Paint or coloring pens to decorate (optional)
What you’ll do:
Clean and flatten leaves, flowers or petals, twigs, or small branches by pressing them between books.
Arrange them on a canvas or a flat piece of wood.
Gently glue each article on the surface with a hot glue gun or regular glue, and wait to dry before gluing others. Use extra glue on the rocks.
Lay the frame flat to let it dry completely, then set it up where you want.
5. Collage Wall
A DIY collage wall is definitely going to be the hit of your study room, no matter who walks in! Hang your favorite moments, images, or your own DIY paper quills or origami and turn them into a piece of art themselves. Picasso who?
What you’ll need:
Photos, DIY paper quills, artworks, drawings, quotes, illustrations
Canvas, strings, posters, wire board (the background to use to hang it on)
Stickers, colors, paints, washi tape (for decor)
Painter’s or masking tape
What you’ll do:
Plan your layout with all your photos, artwork and choose the focal point of your artwork.
If you’re using a separate canvas, like a poster or wire board, hang or glue your artwork carefully and let it dry completely.
If you’re hanging on the wall, hang or glue larger pieces first, then go in with the smaller pieces.
Fill in the gaps with stickers or other decor pieces.
Add personal touches like small plants, trinkets, or even string lights!
6. DIY Hand or Paw Prints
There’s hardly a better way to remind you of your loved ones than a cute print of their hands or paws! This handprint or paw-print art is not only going to charm up your studying space but also help you keep it together in those high-stress moments. Also, it’s so much fun to make!
What you’ll need:
Skin-safe paint
Canvas or poster board
Labels, quotes, text, or other illustrations
Washi tape for decor (optional)
What you’ll need:
Clean the hands or paws you’re going to take the print off.
Dip them in paint and firmly stamp the hands or paws onto the solid canvas or poster board, and hold it there for a while.
Lift hands or paws swiftly without letting the paint smear or extra paint dripping on the canvas.
Let it completely dry, then decorate how you want, and voila!
7. Fabric Wall Art or Hanging
A fabric wall art or hanging is an excellent way to jazz up your study room! Be it your childhood clothes or just a snazzy piece of fabric, DIY fabric art for decor can truly tie together all your other DIY pieces in the room!
What you’ll need:
Fabric of your choice
Decor elements (beads, buttons, pearls, crystals, patches)
Hot glue gun or fabric glue, if you can sew, that’s great!
A wooden dowel or canvas
What you’ll do:
Prepare the fabric you choose and cut it to the desired length for your wall hanging. You can also use one of your childhood clothing items!
Fold the top edge of the fabric over the dowel, stick, or canvas. If you’re using your childhood clothes, then you want to just glue them as is.
Use the hot glue gun or fabric glue to secure the folded edges.
Press the fabric down firmly with an iron or hair straightener (don’t make it too hot!)
Cut the bottom edge according to the shape you want.
Add decorative pieces like beads, buttons, pearls, crystals, or patches.
Attach hanging strings to each end of the dowel and hang on the wall!
As for your childhood clothes, you can glue or pin it on a sturdy frame.
8. Paint A Wall
A DIY-painted wall will boost your confidence and mood in your study room! Paint with fun pops of colors and styles, so one glimpse at it brings your focus back instantly!
What you’ll need:
Paints of your choice, acrylic is long-lasting and best to use on walls. You could also use other finishes of paint like metallic or spray paint.
Painting tools; brushes, scrapers, palette and roller knives, painter’s tray, painter’s tape, gloves, and a ladder.
What you’ll do:
Clean the wall you’re going to paint on.
Put on your gloves and painting overalls, and go crazy! Unleash your creativity out on the wall.
FAQs
What Is The Best Type Of Paint To Use On Fabric?
Ans: Acrylic paints hold up well on fabric, but an acrylic fabric paint that is specifically made for fabric, is going to be your best type of paint for the job!
What Paints Are Safe For Skin?
Ans: Watercolor paint, latex-based paint, metallic paint, henna, body paint, and alcohol-based paint are safe to use on the skin. But remember, if you’re using any of these for creating hand or paw prints, wash and clean the hands or paws thoroughly after using paint on them.
Conclusion
Look at all these fun ideas, we bet you already locked in on one or several to try out in your study room. Anything DIY is a fantastic way to exercise your creativity and imagination, and using DIY artwork in your study room will only let them fly!
]]>
https://glytterati.com/blogs/articles/how-to-make-a-leather-bag-for-the-first-time2023-07-31T07:17:00-07:002023-08-01T19:26:55-07:00How To Make A Leather Bag For The First TimeJoshLevi Soriano
Few can rival a leather bag's timeless elegance and enduring appeal for handmade items. Skilled craftsmen have been transforming leather into stylish and durable bags for centuries. Today, this tradition of craftsmanship continues, but you don't need years of training to make a leather bag. With patience, the right tools, and guidance, anyone can create a beautiful, long-lasting leather bag from scratch. This article is designed to guide you through the process step by step.
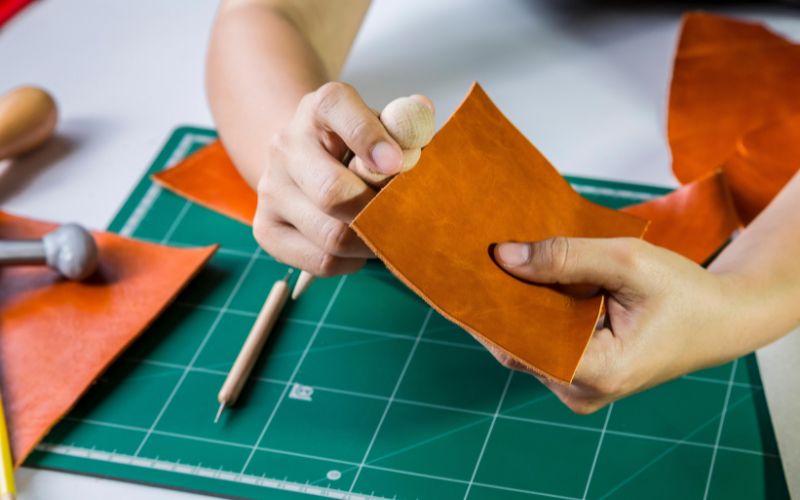
1. Selecting The Right Leather
Selecting the right leather for your bag is crucial to ensure its durability and appearance. Cowhide is a popular choice due to its durability and ease of handling. It is known for its strength and ability to withstand wear and tear, making it ideal for bags that will be used frequently. Additionally, cowhide is available in various finishes, such as full grain and top grain, offering different levels of quality and texture.
While cowhide is a common option, other types of leather can also be used based on your preferences. Goatskin, for example, is known for its softness and flexibility, making it suitable for creating bags with a more luxurious and supple feel. On the other hand, Lambskin is prized for its buttery smooth texture and lightweight nature, making it a great choice for creating elegant and lightweight bags. Although less commonly used, Pigskin can be a more affordable option and provide your bag with a unique grain and texture.
2. Gathering Necessary Tools
Gathering the necessary tools before starting is essential to ensure a smooth leather bag-making process. A sharp knife or leather shears is a must-have tool for cutting the leather pieces accurately. A ruler or tape measure is needed to correctly mark the pattern and measurements.
A sewing awl or sewing machine suitable for leatherwork is essential to sew the leather pieces together. A sewing awl can help you create finer stitches and be easier to handle than a sewing machine. Additionally, needles and thread suitable for leatherwork are necessary for the sewing process. Waxed thread is commonly used for leatherwork as it provides strength and durability to the seams. With these necessary tools, the leather bag-making process can be more accessible, and the results can be refined.
3. How To Punch Holes In Leather
The next step is preparing the leather for sewing. Leather is a notorious material for being difficult to punch holes into, so you need to purchase a specialist punch to do this properly. Maun Punches include a range of options for punching through thick leather, using lever assisted technology to make it a lot easier to do repeatedly, excellent for making a leather bag.
'Revolving Punch by Maun'
4. Crafting The Leather Bag
Crafting your leather bag involves precise cutting and hole punching for seamless assembly. Cut the leather to your desired size, ensuring clean and straight cuts that produce a polished final product. The next step is to punch holes along the edges of the leather pieces, where the bag will be sewn together. Using a Maun punch, ensure that the holes are evenly spaced and consistent in size, providing a professional and neat appearance to your bag.
By cutting accurately and punching holes evenly, you can ensure that your leather bag will come together seamlessly, resulting in a well-crafted and visually appealing finished product. These steps are crucial to maintaining your leather bag's quality and aesthetics.
5. Burnishing The Edges
After cutting the leather for your bag, you may find that the edges appear rough or unfinished. You can burnish the edges using an edge beveler and edge slicker to achieve a more polished look. The edge beveler helps to remove sharp corners and smooth the edges, while the edge slicker further smooths and seals the edges using friction and water.
Burnishing the edges can enhance your leather bag's overall appearance and durability. This process gives a refined and professional touch, ensuring that the edges are smooth and well-finished, adding to the overall quality of your crafted bag.
6. Creating A Pattern
If you prefer a more precise approach or lack confidence in free-handing the dimensions, consider creating a pattern on paper for your bag. This allows you to make adjustments and ensure the desired outcome. Remember to include a seam allowance in your pattern to account for sewing. Carefully cut out the pattern using sharp scissors, ensuring accuracy in the shape and size of your leather pieces.
Creating a pattern gives you more control over the final result, ensuring that your bag matches your vision. It also enables you to replicate the design in the future. It serves as a useful guide during the cutting and sewing process, enhancing the overall quality of your finished bag.
7. Adding Pockets And Compartments
To incorporate pockets or compartments into your bag design, cut additional leather pieces and sew them onto the inside. Take precise measurements and use markings to ensure the pockets are level and evenly spaced. This attention to detail ensures that your bag looks visually appealing and provides functional storage solutions, allowing you to easily organize and access your belongings while maintaining the overall integrity of the bag's design.
8. Embossing And Stamping
You can use leather stamps or embossing tools to add patterns or designs to your leather bag for a personal touch. By doing so, you can make your bag unique and distinguish it from others. Embossing and stamping are creative and enjoyable techniques allowing you to express your individuality and make a statement with your bag's design. Get creative and experiment with various stamps and embossing tools to create a truly one-of-a-kind look for your leather bag.
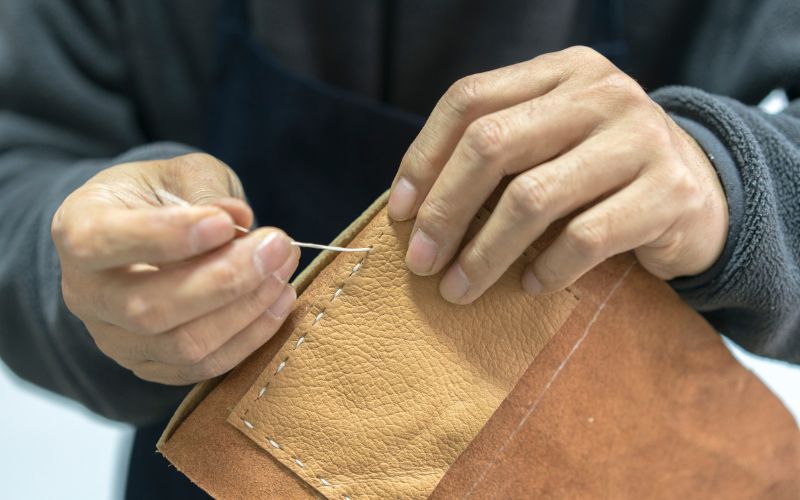
9. Sewing The Bag Together
Once the holes are punched, widen them with the awl to prepare for sewing. Take a piece of waxed thread twice the length of your bag and thread it through a leather needle.
To sew the bag together, insert the needle inside the bag through the first hole, then out through the second hole. Continue sewing with a simple running stitch until you reach the end of the thread. Repeat this process on the other side of the bag, ensuring a secure and even seam that holds the leather pieces together.
10. Adding The Strap And D-Rings
After sewing your leather bag, it's time to add the strap and D-rings. Cut the leather strap to your desired length and sew the D-rings onto the ends. Ensure the D-rings are securely stitched in place.
Next, sew the straps onto the bag, paying attention to their alignment and adding sufficient reinforcement to support the bag's weight. Carefully stitch the straps in place, ensuring they are level and securely attached, offering functionality and a polished appearance to your leather bag.
Conclusion
Making a leather bag for the first time can be daunting, but with the right tools and materials, you can create a beautiful and functional bag that you'll be proud to use. Remember to take your time and pay attention to the details. Happy crafting!
]]>
https://glytterati.com/blogs/articles/how-to-make-upcycled-rrt-journals2023-05-31T21:04:23-07:002024-04-09T04:32:48-07:00Upcycled Art Journals: Learn the Easiest GuideJoshLevi Soriano
Upcycled art journals are perfect to use as a diary or journal, or even scrapbooking. Used art supplies can also be used to decorate its covers and pages. In this article, you'll learn how to make upcycled art journals.
If you’re an artist or a writer and you want something that will inspire your creativity, then yes! Upcycled art journals are perfect for those who have a lot of creativity inside them but need a medium for it.
An upcycled art journal will be more than just your average journal because it has been created by using upcycled materials like old magazines, newspapers as well as other things such as colored pencils, pens and even ribbons. This means that there's going to be so much creativity involved in making these items because you have to use your imagination to come up with something new every time!
What is an Art Journal?
An art journal is a place to record your thoughts and ideas, as well as your artwork. As you create, you will find that the journal becomes more than just a vessel for your ideas – it becomes a living thing. You will discover that the more you use it, the more it becomes a part of you. It's a place where you can experiment with different mediums and techniques, and where you can freely express yourself without fear of judgment from others or no limitations on materials and techniques used.
This is not just any ordinary journal that you would find in the market. It is made by combining different materials together to create something new. The result is an item that is truly unique and special, unlike those mass-produced ones that are sometimes boring and ordinary. These journals have a lot of meaning behind them, so if you're looking for some inspiration, keep reading this article!
How to Make Different Upcycled Art Journals
Collage Art Journal
Collage art is the art of journaling with images and words to depict a story or mood. It is also known as the art of combining various photos, texts, patterns, and patterns to create a piece of art.
Fold the newspaper or magazine in half and cut along the fold line to make little pieces. If you need more than one piece of it or want a smaller shape, cut more scraps.
Apply Mod Podge on the front of your journal using a brush or your fingers. Spread it evenly on the journal’s surface.
After sticking the scraps on the front cover, you may either move on to the back cover or design the pages first.
Let dry for 10 minutes or so, then repeat with another layer of mod podge on top until all of the paper is covered in a thin layer of Mod Podge to ensure the paper scraps won't fall off.
While it's drying, use some leftover scraps to decorate the edges of your pages with paint or colored pencils.
Apply Mod Podge to the back of each image and place it on the front cover of your journal or wherever you want to place it.
An upcycled sketchbook is a blank one where you can draw or write anything you like, like a practice book. You take it everywhere and make simple sketches or drawings for practice.
Cut out pictures from old magazines or catalogs. Try not to use more than one color per page.
Cut out any background material you want, such as old envelopes, tissue paper, wrapping paper, wallpaper scraps, fabric scraps, or any background material for your collage pages.
Paste the pictures onto the background material and layer beads or glitter over them to create depth and interest.
Use a glue stick to hold down the edges of photos and other pieces of paper, so they don't rip out when flipping through later.
When finished with each page, seal it with Mod Podge or another sealant spray so it will last longer, or make sure they go into an album immediately.
Let it dry overnight before using.
Graphic Journals
These can also be made from old books or magazines, but they're more likely to include colorful graphics and patterns than sketchbooks.
Gather up some old newspapers, magazines, or old catalogs. Cut out images from these sources and arrange them however you wish on your notebook cover.
Use a glue stick to glue down each image layer simultaneously.
Once all the images are glued down and dry, flip over the notebook cover, so it's facing upward again with the collage facing away from you.
Add any additional photos or designs on any part of your journal. Make sure the glue is dry before using it!
Travel Journal
If you're a traveler, you probably have a lot of souvenirs and photos from your adventures. You can use old maps, postcards, and pictures from your trips to create a beautiful book you can carry with you anywhere. They are often made of leather or canvas, or something that is also made of paper that can't withstand the wear and tear of being packed into your suitcase to record each day's adventures!
Cut a piece of kraft bag to the size of your standard office paper.
After cutting to the correct size, trim the outsides of the office paper to create a jagged-uneven texture.
2. Binding the journal together
Take around 10 sheets of office paper with your newly cut kraft cover and fold it in half.
On your fold line, mark two spots two inches from the outsides. These will be your stitching marks.
Starting from the inside, use your needle and thread to make an outward hole, then return the thread through the opposing hole. Tie them together with a little knot.
Paint the cover or add any designs of your choice.
Junk mail art journaling is a way to use the unwanted junk mail that arrives in your mailbox as an art journal. The idea behind junk mail art journaling is to take the unwanted advertising and catalogs you receive in the mail, tear them up and use them in your art journal.
Dilute various colors of neon paint on your spray bottles with 50% water or until it sprays easily.
Unfold and flatten your junk mail
Spray the Gel Press with Americana Neon Spray
Press and pull your junk mail sheets
Spray paint on the paint roller
Roll the paint roller on the impressable.
Apply the design to any pressed sheet of old bond paper.
Copy or scan design templates on your pressed sheet, or you can sketch if you want.
Stack a mix of junk mail with pressed sheets.
Stick down the center and fold in half.
Make enough stacks to fit inside an old book cover.
Spread the Americana decoupage on a book cover.
Attach the pressed sheet.
Trim the edges and remove the corners.
Decoupage the flaps to the book cover.
Hot glue the stacks to the spine.
Let it dry overnight before using.
Children's Book Art Journal
Children's books turned into Art Journals - Image by YouTube
This journal is made from a children's book that has been cut up and put back together in a new way. Children's Book Art Journals are great for preserving memories of your child as they grow up. They also make wonderful gifts for grandparents and other family members who would enjoy seeing what their grandkids have been up to lately!
Trim the inside pages, as well as the front and rear cover artwork, to fit.
Stack the sheets and covers in a tidy manner. Staple them around the binding edge. Staples should be around 12 inches away from the edge. Use at least three staples down the side.
Make a duct tape strip slightly longer than the edge of your book.
Stick half of the duct tape on the front cover.
Wrap the duct tape around the back cover of the book.
Burnish the tape on both sides using your finger.
Remove any excess tape from both ends of the book.
2. For attaching the Latch (optional)
Score a fold line on the back cover the width of the front cover with an Exacto knife. Allow the children to fold the paper and burnish the fold with their fingers.
Place the Velcro sticker's latch side in the center of the back cover flap.
Place the Velcro sticker's loop side on the front cover opposite the latch sticker. For added safety, place the stickers near the top and bottom of the journal.
Dictionary Page Art Journal
Dictionary pages sketched with mushrooms - Image by papercraftography
The journal's cover is made from a single dictionary page glued onto a cover with a pocket on the front for storing notes and drawings. The inside pages are made by cutting up the rest of the dictionary into strips, then glued down to create a grid pattern that looks like graph paper.
Remove the front, back, and spine of the dictionary or Encyclopedia.
Remove any staples and cut through the binding strings.
Separate one page by removing one segment or bundle of pages.
Measure the outer margin on the page's bound side, and draw a line from top to bottom, then trim with a paper cutter.
Measure the dimensions of the page for future usage.
Look for a photo with a white background.
Open the image in your favorite image editing software.
Crop the image and remove any unneeded areas. Play with the exposure settings until you get the desired result.
Save photographs in the highest resolution your software supports.
Add the image to a word processor, adjusting the image size and page margins to fit the size of the dictionary page you're using. Test pages should be printed on standard printer paper until the sizing and alignment are perfect.
Load the old book page onto the printer if satisfied with the test page.
Masking tape resists are an easy way to add a pattern to your paper without the mess and fuss of paints or inks. The process involves putting masking tape down on your surface and then painting over it with watercolor paints or ink. You remove the tape when the paint dries, leaving behind a design.
Cut the edge off an old book page or paper and tear it into strips.
Roll the strip into a ball and then flatten it out again. This helps give the resist some texture.
Fold over the edges of the strip, so there are no sharp edges - this will help prevent tearing when you remove it from your paper.
Line up your masking tape on your paper, ensuring enough space between each piece of tape so that you can see through it when you add paint. Using masking tape, you can also use a ruler and pencil to make straight lines or circles!
Bind out each page after the paint has dried using a stapler or tape.
Fabric-based Journal
Art journal with colorful fabric cover - Image by clayscrapkreativ
Fabric-based journals are often made from old t-shirts or sweatshirts that someone doesn't want anymore but still have sentimental value attached to them. They're easy to make by simply turning shirts inside out and cutting them down the middle lengthwise.
Make a pillow out of two contrasting patchwork squares.
Baste three sides, either by hand or machine, with the uneven sides together.
Fill it with polyester filling, ensuring that the pillows are firm but not overstuffed.
Sew the fourth side up. Produce ten of these.
2. Oversew the Edges.
Use embroidery thread to thread your needle. Then, double it over and tie the ends together.
Choose which side of the pillow will be the front and fold it once over the edge of the cushion.
If you want the raw edge to appear and the rear cloth to be folded, contrast it with the front. Leaving the rough edge visible adds to the finished journal's appeal.
Begin approximately a quarter inch in on the front, where the knot will be buried as the cloth is folded over it. Sew in from the front and out from the back. Bring the needle back over and back into the front, folding the cloth as you go.
When you reach a corner, you can fold it triangularly or in a square technique. Sew right through the fold to keep it in place.
3. Quilt the Pillows.
Hand-quilt the pillows with embroidery thread.
Thread your needle, but this time do not double the thread. Start on the opposite side and knot the end.
Insert the needle at a specific spot. Push the needle back through from the front to make a little stitch. Stitches should be about a quarter-inch apart.
Continue to quilt the cushion in the pattern on the cloth until it suits your taste.
4. Construct the Panels.
Arrange your cushions so that the different colors contrast and complement one another.
Lay your pillows on a hard surface and whip stitch them together using doubled embroidery thread. Connect the colorful squares, use different colors or maybe stick to one color this time.
Make two four-pillow panels and one two-pillow panel.
Sew the two major panels together to form the spine of the journal cover, this time with the opposite sides facing instead of on a flat surface.
Sew the fold-over panel to the back cover, ensuring it faces the right way when closed.
5. Sew In the Pages.
Merge your pages to create a signature.
Place them on the journal cover, with the fold aligned with the spine. You can use bulldog clips or huge paper clips to secure them.
Sew the journal pages together with polyester or embroidery thread. Turn and sew up through the alternate holes to produce a continuous sewing line once you reach the end.
6. Finish the Fabric Journal.
You can add whatever finishing touches you want.
Add buttons to the front to add interest. You can sew little silver bells around the spine and close the journal with a black braided string
Best Tips to Decorate Upcycled Art Journals
The ideal way to use your journal is to express yourself freely without considering how it will appear on the page or how other people will perceive it. As we all know, this is a junk journal, therefore, we'd have to start thinking about something from scratch.
Don't worry about how simple or vibrant it looks – just let yourself go and enjoy the process! Here are some ideas for transforming upcycled materials into lovely art journals.
Cover with Leftover Paint or Fabric Scraps
Use leftover paint or scrap fabrics from worn-out clothes or whenever grandmother has pieces left over from sewing to completely cover the outside of the notebook. Use a range of colors of paint and create patterns to make different illusions and designs. This is a fantastic approach to make something that completely represents your personality.
Add Some Stickers
Covering notebooks with stickers is another popular method of creating art journals. You can use stickers from any source, including scrapbooks, calendars, or even gift wrap rolls! This is a good option if you want to keep the original color of your notebook while adding some fun decorations on top.
Use Book Pages as Backgrounds
Use old books or magazines as the base of your art journal, or choose ones with interesting covers or pages, like National Geographic magazines from the 1960s or 1970s. You can also use scrapbook paper or old wallpaper as your book's cover or wrapping paper for a fun holiday theme.
You can cut out pages from your notebook and use them as backgrounds, such as collages or paintings. This can be done by cutting out specific shapes or simply tearing out pages with interesting designs or colors.
Top with Shredded Paper
You can shred paper into small pieces and glue them onto your journal using glue or even Mod Podge. This is an ideal way to use up leftover pieces of paper from other projects. It also allows you to experiment with different types of paper, such as tissue paper or maps. You can also use colored paper to make your book look more colorful.
Use Old Photos as Page Fillers
Use old photos as page fillers for your upcycled book by gluing them to pages or just cutting them out and inserting them inside the book. Simply avoid ripping any pages while cutting out photographs to prevent making uneven shapes and cutting out the main subject you wish to attach.
Add Feathers, Shells, or Leaves
If you enjoy being outside and engaging with nature, take advantage of this opportunity to collect feathers, shells, leaves, or dried sticks for added texture and color inside the pages of your journals. You can also choose to glue these materials as an accent on the edges of your diary rather than attaching them to the entire page.
Best Materials for Upcycled Art Journals
We are becoming more conscious of what we use to make art as we become more aware of our impact on the planet. The following are some of the greatest materials for upcycled art journals:
Sketchbooks
These are usually made from paper scraps or used file folders and are perfect for doodling, sketching, or writing notes. A sketchbook also acts as a memory aid, helping you to recall the things you have seen and done.
Postcards
Use old postcards as covers for your notebook or journal with glue, or tape them together using different colored pens or markers to make a collage cover for your book! If you're looking for inspiration, check out Etsy or Pinterest for ideas on how to use postcards as art journal covers.
Old maps
Old maps are also a great way to add some visual interest to your art journal pages. You can use them as a background texture or simply cut them up and use them as part of your collage. Cut out interesting parts of old maps and use them as page dividers for your notebook!
Cardboard
Cardboard is a strong, versatile material that may be used for a variety of purposes. You can simply print out your favorite pictures on plain paper or cardstock and cut them out with an Exacto knife or scissors, then just glue them onto a piece of cardboard, and voila!
Kraft Paper
Kraft paper is a strong brown paper that is made from wood pulp. It has a linen-like texture but is stiffer than linen. Usually, Kraft paper is a popular material for those who want to use it in their artwork because the texture appeals to many people's senses and can be used with paint, pencils, or markers without dulling them, as some other materials might do. Because of its simplicity, kraft paper can also be easily decorated with stamps or stickers if desired.
Magazine
Magazines are already printed on high-quality paper, so they will work well with any other mediums you may like to use, such as paint or glue. The paper is thick enough that it will not readily shred or be damaged.
They can create intriguing journal covers or pages, adding uniqueness and interest to your finished journal! You may create collages with vintage magazines as backgrounds or cut shapes from magazine pages to use as masks over stencils or backdrops for paintings.
Old Wallpaper
They come in lots of fun patterns and colors that would look great as backgrounds on your pages. You can use the old paper as is to create beautiful abstract art, or you can add some texture by painting over it.
Benefits of Exploring Different Upcycled Art Journals
Once people get into art journaling, they become addicts in a way. What they all have in common is the desire to create freely. But we've heard a lot of creative people ask how to fill an art journal about what to put in and what to write about.
We all have different tastes and interests. And while we may be drawn to certain types of art, we can also enjoy a variety of styles. Exploring new themes and styles is a great way to get more out of your journaling experience.
Keeps you Interested in Journaling
Curiosity and experimenting keep the fire burning for trying out new things, which is why the more you explore using different upcycled materials, the more you learn about how they are used and what can be done with them.
Reduce Waste
You are not confined to using only one form of journaling material. You can experiment with various materials to make unique art journal entries for yourself. Using recycled materials in your journal reduces waste that would otherwise be produced by manufacturing new materials from scratch. This is particularly important in today's society since there are individuals who toss away unused or unwanted things into landfills, causing a lot of pollution.
It's Therapeutic
Making an art journal is a terrific way to unwind and reduce stress at the end of the day. Taking rest time despite your busy schedule for creative time alone or with family and friends could be very calming.
Helps You Learn New Skills or Techniques
Having a variety of art journals allows you to explore your creativity from a variety of perspectives. It helps you discover what you truly enjoy and what you struggle with.
It's a great opportunity to learn about new materials you might not have explored before. Furthermore, these art journal ideas can be used as inspirations, so you always know what to create.
Allows you to Grow Artistically or Personally with More Insight
It makes the process of self-discovery easier and more realistic. Making these journals encourages you to be more creative by allowing you to express yourself profoundly and intimately in a way that allows you to truly connect with your art.
Creative Art Journal Ideas
Themed art journals are an excellent way to be creative in a variety of ways while maintaining one or more art journals, each with a different purpose.
In other words, keeping various art journals can help you stay more organized with your creative pursuits. You also watch your artistic expression with greater clarity. Finally, if art blocks are your thing, you'll be showered with ideas.
Positive Affirmations Art Journal
The Positive Affirmations Art Journal will help you develop and grow your self-esteem, creative ability, and personal development. You might get fresh insights into yourself and how to let them thrive through meditation and art journaling.
Since affirmations are so important and powerful, you can use them as a spiritual and inspirational treasure chest for you. If you believe you deserve to hear something positive from yourself, take out your art notebook and read what you've previously written something for yourself!
Colored Theme Art Journal
This journal is made up of various color palettes and has specific themes that the color produces. The theme includes flowers, nature, animals, insects, and many more.
You can express yourself creatively by choosing a color palette for your diary. For example, If you are sad or stressed, you can use a red palette to help you express these emotions more easily.
Collage Art Journal
A collage art journal is where you can add text or images on top of each other in layers, allowing you to combine different mediums, such as painting and drawing with stencils and stickers.
These journals, also known as mixed media or art journals, are made by cutting, shredding, folding, and pasting various things into a blank notebook. Its pages are rich in textures and colors, reflecting the artist's character.
The pages of a collage art journal can be anything from simple doodles to complex drawings and paintings. The key to this type of art is to keep it loose, so don't worry about perfectionism!
Quotes Art Journal
A quote journal is a blank book that features inspirational quotes, sayings, or words of wisdom from notable people throughout history. Quotes on love, romance, friendship, family, happiness, and success may be found on the pages of these works.
Quotes show you that you are not the only one with this certain feeling. It makes you feel that someone else feels the same way and has written this perfectly crafted line that hits you right in the heart.
Gratitude Art Journal
We should be grateful for everything we can do, for the love we receive, or for any other simple daily action that improves our lives. Creating a gratitude journal is the best way to become more conscious of the goodness we receive in our life.
The goal is to increase your awareness of what makes you joyful and appreciative. You'd be surprised how many things can be considered a blessing in your life, and writing them down allows you to notice and become aware of them.
Lyrics Art Journal
The lyrics art journal is a type of art journaling that uses song lyrics as inspiration. This can be done by finding the lyrics to your favorite songs, writing them in a notebook or on paper, and then using them as inspiration for your art.
It can also be done by writing down the lyrics to a song you've never heard before. Then, try to find out what the song means and create an art piece based on it.
Word Art Journal
Word art journaling is a sort of art journaling in which words and text are used as the primary source of inspiration rather than graphics.
You can use quotations in this journal, just like in the quotes journal, and you can add some flattering comments that motivate you or write poems about your life experiences. Some people even blend the two techniques!
Mark Making Art Journal
Mark-making is the practice of sketching specific shapes, lines, and similar objects while observing your environment. It could be the shape of a leaf in your notebook or architectural elements in your city.
Later on, you can also look at different shapes of windows and doors and mark them. Use these markings to sketch in your art journals, especially if you have an intriguing and abstract mark.
Faces Art Journal
Face art journaling is a type of journal in which you draw faces in your journals. You can make a realistic photo of a face or make a face doodle.
Begin drawing circles for the heads in this manner. Put some creativity and play with shapes on your subject's eyes and lips.
Inspiration Board Art Journal
It's merely a collection of items that inspire you. For example, you can save magazine photographs, tickets, flyers, fabric scraps, paper clips, or anything else that inspires you at the time to use later to create your art journal pages.
Consider the colors, emotions, places, designs, other artists and their work, or anything else that can inspire you to do it more freely and creatively. You can save all of your inspiration in this art journal to find them whenever you need them.
Poetry Art Journal
Poems, like stories or quotes, can greatly describe our current mental or emotional state, and we connect to them. When you can relate to words, they give you new meaning.
Poetry art journals are similar to traditional writing journals or bullet journals, wherein poetry art journals only use blank pages or pages with grids or lines on them instead of plain lined paper. Some people like to write down phrases they hear while walking around town or at school, while others like to write poetry from books into their journals to read when they're anxious, known as "poem therapy."
Doodle Art Journal
Doodle art journals are an excellent way to express yourself while allowing your creative juices to flow. Doodle refers to drawing without a specific objective, and it can range from scribbling to sketching realistic portraits or caricatures!
Making a doodle art notebook is effortless and free of pressure. Furthermore, it is quite calming because you become so engaged in drawing those lines and generating small dots and circles that your focus and energy are directed toward that process.
Bucket List Art Journal
This may be similar to the vision board journal, but it has bigger goals. However, it still depends on how you perceive your goals in life.
A bucket list is like a dream list which contains a list of things you want to do before you die. For example, if someone wants to travel around the world but doesn't have enough time in their life to do so, they might make a bucket list that includes all of the places they or want to visit.
This is a safe place if you're too shy to tell your goals to someone. This journal may include goals for your career, things you want to do with your family, goals for self-improvement, and ways to help others.
Imaginary World Art Journal
This journal is also known as a "Surrealism Journal" since it contains bizarre drawings such as girls with wings, unusual creatures, goofy architecture, and much more. Consider it the polar opposite of reality, making it completely unrealistic and impossible. Some examples you can get inspiration from are Harry Potter, Lord of the Rings, Game of Thrones, and all of the Marvel heroes and movies.
Memory Art Journal
A memory art journal is a way to document your memories. It's a way to preserve the good times and keep them close. It's a way to record special events in your life, such as a wedding day, an anniversary, or even your child's birth.
Memory art journals are frequently shared online. However, some people keep their diaries strictly for themselves and do not share them with others.
For example, some individuals choose to include images of the event they are documenting. In contrast, others prefer to type everything out by hand and add photos and decorative elements. The idea is that everything has a purpose - there should be no filler content or elements that don't fit!
Mixed Media Art Journal
The idea behind mixed media art journaling is to combine different types of media in one piece of work. This could be painting, drawing, collage, photography, and more. The topics they cover in their journals can be anything they want: from fashion to food to music to travel — endless possibilities!
The purpose of mixed media art journaling is not only to create something beautiful but also to explore and experiment with different mediums. You can start using one or two types of media and then, over time, add more and more as you become more experienced in this type of art.
Remember that this art journal should have thicker paper that holds water well. Mixed media techniques rely on this kind of paper. Otherwise, the paper could tear, and you could lose the pages.
Dream Art Journal
A dream journal can be very helpful in remembering your dreams and helping you understand what they mean. This is significant for us since dreams can have genuine meaning for us at times. However, most of the time, these are often forgotten within a few minutes of waking up, so a dream art journal provides a space to document your dreams so you can review them in detail later.
A dream journal can be very helpful in remembering your dreams and helping you understand what they mean. It's also soothing and therapeutic, especially if you can recall specific details by writing down as much information as possible while it's still fresh in your mind.
Upcycled Art Journal FAQS
What is Repurposed Art?
Repurposed art is the use of found objects to create a new piece of art. The idea behind this type of art is that it is made from items you might find on your daily walks around town. The artist finds things that have been discarded or discarded by others and then repurposes them into something new and beautiful.
What is the Difference Between Art Journal and Junk Journal?
Junk journals are more about using supplies, such as scraps of paper and making something out of nothing. They can be a little more free form and artistic. While art journals are more about creating art, they can also be used to document the process of creating art as well as documenting your life.
How Many Pages Should an Upcycled Journal Have?
There are no hard and fast rules on how many pages a junk journal should have. It depends on how much you want to write, so it's up to you!
If you're just starting out and want to see what it's all about, start with a small book. If you're more familiar with the practice, then by all means get one with more pages!The most important thing is that you enjoy your journaling experience.
What are Smash Books?
Smash books are journals, scrapbooks and diaries that you can customize to suit your personal tastes. There are many different ways to make one from the traditional paper version to digital ones with apps.
What is the Difference Between an Art Journal and a Sketchbook?
A sketchbook is usually a blank book with pages that can be torn out and used for drawing or painting. Art journals have more structure than sketchbooks, but they still have the flexibility to allow for experimentation with different media and techniques. Some people like to use their art journals like sketchbooks, while others like to keep them more structured by using only certain types of media or pre-planned pages.
Conclusion
Art can also be a way to escape from the harsh reality and enjoy what we have in our lives. The purpose is not just to create beautiful things but also to show how much we have grown and developed and how we reflect our creativity through different art materials.
However, we always have this dilemma that we don't know what kind of material we should choose to do our art journals because there are so many out there! We try to explore them individually and see which ones are perfect for us. But sometimes it's not easy because it also takes time and money.
Do you think your imagination can help you find the best-upcycled materials for your art journals? Definitely, yes, with your imagination, anything is possible!
How was your experience working on your art journals? Leave some comments below!
]]>
https://glytterati.com/blogs/articles/diamond-painting-a-beginner-s-tutorial-with-sparkling-tips2023-05-04T16:02:51-07:002023-05-04T16:04:01-07:00Diamond Painting: A Beginner’s Tutorial With Sparkling TipsJoshLevi Soriano
Diamond painting is a creative and relaxing hobby that has been gaining popularity in recent years. It combines the meditative aspects of coloring with the satisfaction of completing a beautiful piece of art. Similar to cross-stitching, diamond painting involves using tiny resin “diamonds” to create a sparkling image on a canvas.
As a beginner, it can be overwhelming to know where to start with diamond painting. But fear not, this beginner’s tutorial will guide you through the basics and provide sparkling tips to help you create a masterpiece. From choosing the right canvas size to mastering the technique of placing the diamonds, this tutorial will cover everything you need to know to get started.
What is Diamond Painting?
Diamond painting is a fairly new and exciting hobby that has taken the crafting world by storm. It is a form of mosaic art that uses small, faceted diamonds or rhinestones to create a beautiful, sparkling design. The process is similar to painting by numbers, but instead of using paint, you use tiny, colorful diamonds to create your masterpiece.
The concept of diamond painting is simple. You start with a printed canvas that has a design on it, and you use a special adhesive to stick the diamonds onto the canvas. The diamonds are usually round or square, and they come in a variety of colors. Each diamond has a flat side and a faceted side, and the faceted side is what gives the diamond its sparkle.
Diamond painting is a relaxing and meditative activity that can be enjoyed by people of all ages and skill levels. It is a great way to unwind after a long day, and it can also be a fun and creative way to spend time with friends and family. Whether you are a seasoned crafter or a complete beginner, diamond painting is a hobby that is easy to learn and hard to put down.
Materials Needed
Before diving into the world of diamond painting, it’s important to gather all the necessary materials. Here are the three main components:
Diamonds
As the name suggests, diamonds are the most important element in diamond painting. These tiny gems come in a variety of colors and sizes, and are typically made of resin. It’s important to choose high-quality diamonds from reputable brands such as Dreamer Designs, that have a consistent shape, shine, and are five-dimensional. You don’t want any duds in your painting!
Canvas
The canvas is the foundation for your diamond painting. It’s usually made of a high-quality fabric that’s been printed with the design you’ll be painting. The canvas comes in different sizes and shapes, so choose one that fits your desired finished product. A larger canvas will take longer to complete, but will have more detail.
Tools
There are a few tools you’ll need to make your diamond painting experience smooth and easy. The first is a tray, which will hold your diamonds as you work. You’ll also need a pen-like tool called a stylus, which you’ll use to pick up and place the diamonds onto the canvas. Finally, you’ll need a piece of wax, which will help the stylus pick up the diamonds more easily.
With these three main components, you’re ready to start your diamond painting journey!
Diamond Painting: Preparing the Canvas
Unrolling the Canvas
Unrolling the canvas is the first step in preparing it for diamond painting. Begin by laying the canvas on a flat surface and gently unrolling it. Be careful not to apply too much pressure, as this can cause the canvas to crease or wrinkle. Take your time and use a light touch to ensure that the canvas remains smooth and flat.
Flattening the Canvas
Once the canvas is unrolled, it's time to flatten it out. Use your hands to gently press down on the canvas, starting from the center and working your way outwards. This will help to remove any remaining wrinkles or creases in the canvas. If you encounter any stubborn wrinkles or creases, you can try using a warm iron on the lowest setting to gently press them out.
Attaching the Canvas to a Flat Surface
Attaching the canvas to a flat surface is an important step in diamond painting, as it helps to keep the canvas taut and prevents it from shifting around while you work. There are several ways to attach the canvas to a flat surface, including using tape or clamps. Some diamond painters prefer to use a light adhesive, such as spray adhesive or double-sided tape, to keep the canvas in place.
Regardless of the method you choose, it's important to make sure that the canvas is securely attached and that it remains flat and taut throughout the diamond painting process.
Starting the Diamond Painting
Starting a diamond painting project can be both exciting and overwhelming for beginners. But with the right guidance and tips, anyone can create a dazzling masterpiece that will leave them feeling satisfied and proud. In this section, we will cover the first steps to get started on your diamond painting journey.
Choosing the First Diamond
The first step in starting a diamond painting project is choosing the right diamond to begin with. It is recommended to start with a smaller, simpler design to get the hang of the process before moving on to larger and more complex projects. To choose the first diamond, look for a symbol on the canvas and match it to the corresponding diamond in the kit.
It is important to note that some kits may have multiple diamonds with the same symbol, so it is crucial to keep track of the diamond's location on the canvas. One helpful tip is to use a whiteboard or a piece of paper to label each symbol and its corresponding diamond color.
Applying the Diamonds
Once the first diamond is chosen, it is time to apply it to the canvas. Peel back a small section of the protective film on the canvas to expose the adhesive surface. Use the diamond applicator tool to pick up the diamond by its flat side and place it onto the corresponding symbol on the canvas.
Repeat this process until the entire section is complete. It is important to work in small sections to avoid the adhesive surface from drying out. Once the section is complete, cover it with the protective film and move on to the next section.
Remember to take breaks and stretch your hands to avoid cramping. Diamond painting can be a relaxing and therapeutic activity, so enjoy the process and let your creativity shine!
Tips and Tricks
Now that you've got the basics down, it's time to dive into some tips and tricks to make your diamond painting experience even more enjoyable.
Organizing Your Diamonds
One of the most important things you can do to make your diamond painting experience smoother is to organize your diamonds. When you receive your kit, take some time to sort the diamonds by color and place them in small containers or bags. You can use a piece of paper or a tray to keep them separated and easily accessible. This will save you time and frustration when you're working on your painting.
Using Wax Correctly
Using wax is essential to picking up the diamonds and placing them on the canvas. However, it's important to use the wax correctly. Too much wax can make it difficult to pick up the diamonds, and too little can cause them to fall off. Start with a small amount of wax and add more as needed. You can also use a toothpick or tweezers to pick up the diamonds if you're having trouble with the wax.
Framing Your Finished Painting
Once you've completed your diamond painting, you'll want to display it proudly. Framing your finished painting is a great way to do this. You can purchase a frame that fits the size of your canvas or have one custom made. Make sure to use acid-free materials to prevent the diamonds from fading or discoloration over time.
By following these tips and tricks, you'll be well on your way to creating beautiful diamond paintings that sparkle and shine. Happy painting!
]]>
https://glytterati.com/blogs/articles/common-mistakes-to-avoid-when-designing-business-cards2023-04-11T00:46:45-07:002023-04-11T00:46:45-07:00Common Mistakes to Avoid When Designing Business CardsJoshLevi Soriano
Business cards are an essential part of any business or professional's toolkit. They are a quick and easy way to provide potential clients and partners with your contact information and make a lasting impression. However, designing a business card with a help of a business card maker, like Vista Create, is not as simple as it seems. It requires careful consideration of several factors, including layout, color scheme, font choice, and overall design. In this post, we will discuss some common mistakes to avoid when designing business cards to ensure that your card stands out and makes a lasting impression.
Mistake #1: Overcrowding the Card
One of the most common mistakes people make when designing business cards, for example, is overcrowding them with too much information. While it may be tempting to include all of your contact information, social media handles, and a long list of your services, this can overwhelm the recipient and make your card appear cluttered. Instead, focus on including only the most important information, such as your name, phone number, email address, and website. You can also include a tagline or brief description of your services or business to give the recipient an idea of what you offer.
Mistake #2: Poor Color Choices
Color is a powerful tool in design and can evoke certain emotions and associations in the viewer. However, choosing the wrong color scheme for your business card can have the opposite effect, turning off potential clients and partners. When choosing colors for your card, consider your brand's personality and the emotions you want to convey. For example, if your business is in the financial industry, you may want to use blue or green to convey stability and trustworthiness. On the other hand, if you are a creative agency, you may want to use brighter colors to showcase your creativity and energy.
Mistake #3: Inconsistent Branding
Your business card is an extension of your brand and should be consistent with your other marketing materials, such as your website and social media profiles. Using different fonts, colors, and logos on your card can confuse potential clients and weaken your brand's overall image. To avoid this mistake, stick to your brand's established guidelines and use the same fonts, colors, and logos on your card as you do on your website and other marketing materials.
Mistake #4: Choosing the Wrong Font
The font you choose for your business card can have a significant impact on its readability and overall design. Choosing a font that is too small or difficult to read can turn off potential clients and make your card appear unprofessional. Similarly, using a font that is too ornate or cursive can make your card difficult to read. When choosing a font, consider its readability and how well it fits with your brand's personality. Sans-serif fonts are typically more modern and easy to read, while serif fonts can have a more traditional and sophisticated feel.
Mistake #5: Neglecting the Back of the Card
Many people make the mistake of neglecting the back of their business card, leaving it blank, or only including their logo. However, the back of your card is an excellent opportunity to showcase your brand's personality and make a lasting impression. Consider including a call to action, such as a discount code or a link to your website. You can also include additional information, such as your mission statement or a list of your services.
Mistake #6: Using Low-Quality Images
If you choose to include images on your business card, it's essential to use high-quality images that are not pixelated or blurry. Low-quality images can make your card appear unprofessional and detract from your brand's overall image. If you don't have access to high-quality images, consider using stock images or hiring a professional photographer to take photos for your card.
Ideas to Consider When Designing the Back of Your Business Card
A call to action, such as a discount code or a special offer
A list of your services or products
Your business's mission statement or tagline
A short client testimonial or quote
A map or directions to your business's location
A QR code that leads to your website or social media profiles
Your social media handles or website links
An image or graphic that represents your business or brand
Your business's hours of operation or contact information for specific departments or employees.
Conclusion
Designing a business card is not as simple as it seems. It needs careful thought about a number of things, like the layout, colors, fonts, and overall design. By avoiding the common mistakes mentioned in this post, you can make a professional, eye-catching business card that accurately represents your brand and leaves a lasting impression on potential clients and partners.
]]>
https://glytterati.com/blogs/articles/how-to-thin-acrylic-paint2023-04-03T05:52:02-07:002023-04-03T05:52:03-07:00How To Thin Acrylic Paint: A Comprehensive GuideJoshLevi Soriano
Thinning acrylic paint can help you achieve a smoother, more even application, create different effects, and stretch your paint further. Here’s a step-by-step guide and tips to help you achieve the perfect consistency for your acrylic painting needs.
Are you new to acrylic painting and wondering how to thin your paint? Or have you been painting for a while but still need help getting the right consistency? Whatever the case, thinning acrylic paint is essential to your painting toolkit.
In this blog post, we'll go over the step-by-step process of how to thin acrylic paint and give you some tips on how to do it easily and effectively.
Why Thinning Acrylic Paint is Important
If you've ever painted with acrylics, you might have noticed that sometimes the paint doesn't go on smoothly or doesn't cover the canvas evenly. That's where thinning acrylic paint comes in handy! Adding a little water, acrylic medium, or thinner to your paint can make it more fluid and easier to spread.
Water is a popular choice since it's easy to find and cost-effective. But keep in mind that water can dilute acrylic paint intensity and adhesion. Some artists prefer using acrylic medium or paint thinners, specially designed to thin acrylic paints while preserving their color and adhesion.
It's important to start with a small amount of water and gradually add more as needed. If you add too much water at once, you may end up with too thin and difficult to work with paint. Start with a ratio of about 1:10, meaning one part water to ten parts paint.
Step 3: Mix the Water and Paint
Use your stirring stick or palette knife to mix the water and paint. Be sure to mix thoroughly to ensure that the water is evenly distributed throughout the paint. If you're using a paint palette, you can combine the paint and water directly on the palette. Transfer the paint to the container before mixing if you're using a container.
Step 4: Test the Consistency
Once you've mixed the paint and water, it's time to test the consistency. Dip your paintbrush into the thinned paint and apply it to scrap paper or canvas. The paint should flow smoothly and evenly off the brush without leaving any clumps or streaks. If the paint is too thin, add a bit more paint. If it's too thick, add a bit more water.
Step 5: Continue to Adjust
As you paint, you may find that the consistency of your thinned paint changes. This can happen as the paint dries on your palette or as you add more layers to your painting. If you find that your paint is becoming too thick, add a bit more water. If it's becoming too thin, add a bit more paint.
If you want to see how it is done in action, check out the video below:
How to Thin Acrylic Paint With Glue and Water
Do you know that you can also use glue to thin acrylic paint? Yes, you heard it right! Thinning with glue and water is done, especially for pouring paint. This makes the acrylic paint more fluid and easier to manipulate for various pouring techniques such as swipe, flip cup, or puddle pour. Let's see how the thinking with glue and water is done. Here is the step-by-step guide.
Choose a well-ventilated area and lay a protective covering on your work surface to prevent spills or splatters. Wear protective gear such as gloves, a smock, or an apron to avoid getting paint on your clothes.
Step 2: Add Your Acrylic Paint
Next, add your acrylic paint to the glue solution. Begin by adding a small amount of paint and stirring it into the glue mixture. Gradually add more paint until you reach your desired color and consistency. Remember that the more paint you add, the thicker the mixture will become.
Step 3: Mix Your Glue Solution
Start by mixing white glue (PVA glue) with water. The glue-to-water ratio will depend on your paint's desired consistency. A general guideline is to mix one part glue to one part water for a thin consistency or two parts glue to one part water for a thicker consistency. You can also use a measuring tool to achieve accurate ratios.
Step 4: Mix Your Paint
Mix the paint and glue solution thoroughly using a stirring tool (such as a palette knife or wooden stick). Stir until the mixture is smooth and there are no lumps or clumps.
Step 5: Check Consistency and Adjust as Needed
Check the consistency of your paint by dipping your brush into the mixture and testing it on a scrap piece of paper or canvas. If the paint is too thick, add more water to the mixture. If it is too thin, add more paint or glue until you achieve your desired consistency.
How to Thin Acrylic Paint for Airbrush
Now, let us discuss how to thin acrylic paint for airbrush painting. Many people prefer this method as it produces a more even and professional finish to their artwork. So, let's get started with our step-by-step guide!
Choosing a well-ventilated area and laying a protective covering on your work surface to avoid spills or splatters is essential. Wear protective gear like gloves and a mask to avoid inhaling paint fumes.
Step 2: Choose Your Thinning Medium
For airbrush painting, you'll need to thin your acrylic paint using either an airbrush thinner or water. Some airbrush artists prefer to use a thinner, specifically designed to thin acrylic paint while maintaining its consistency and pigmentation. However, if you don't have an airbrush paint thinner on hand, you can also use water as an alternative.
Step 3: Prepare Your Acrylic Paint
Now, pour your acrylic paint into the mixing container. Begin by adding a small amount of paint. You can add more paint until you reach your desired color and consistency. Keep in mind that the more paint you add, the thicker the mixture will become.
Step 4: Add Your Thinning Medium
Start by pouring a small amount of your chosen medium into a mixing container with acrylic paint. If you're using an airbrush paint thinner, follow the instructions on the label to achieve the correct ratio. If you're using water, a good starting point is a 1:1 ratio of water to paint.
Step 5: Mix Your Paint
Mix the paint and medium thoroughly using a stirring tool (such as a palette knife or wooden stick). Stir until the mixture is smooth and there are no lumps or clumps.
Step 6: Test Your Mixture
Before you start painting:
Test your mixture by spraying it onto a test surface like scrap paper or cardboard. If the mixture is too thick, add more medium.
If it's too thin, add more paint.
Adjust the consistency until you achieve a fine mist that's easy to control.
If you have a hard time following written instructions, you may check out the video below:
Tips for Thinning Acrylic Paint
Now that you know the basic process for thinning acrylic paint, here are some tips to help you do it easily and effectively:
Use distilled water. Tap water can contain impurities that may affect the quality of your paint.
Use a spray bottle to add water. This can help you easily control the amount of water you're adding.
Use a palette knife to mix your paint. This can help you mix your paint more thoroughly than a paintbrush.
Use a hairdryer to speed up drying time. Thinned paint can take longer to dry than regular acrylic paint, so using a hairdryer can help speed up the process.
Experiment with different ratios. The 1:10 ratio is a good place to start, but you may prefer a different ratio for your particular painting style or technique.
Thinning Acrylic Paint FAQ
How much media should I use to thin acrylic paint?
The amount of medium you should use to thin acrylic paint depends on the consistency you're trying to achieve. A good starting point is a 1:1 ratio of acrylic mediums to paint.
Can I mix different brands of acrylic paint with different mediums?
It's best to stick to the same brand of acrylic paint and medium for optimal results. Mixing different brands of acrylic paints and mediums can result in uneven color and texture.
What is the best medium to thin acrylic paint for airbrushing?
Airbrush thinner is the best medium to thin acrylic paint for airbrushing paints. It's specifically designed to thin acrylic paint while maintaining consistency and pigmentation.
Conclusion
Thinning acrylic paints is a crucial skill to have for any painter, whether you're a beginner or a seasoned pro. By following the steps outlined in this blog post and using the tips we've provided, you'll be well on your way to achieving the perfect consistency for your painting needs. Feel free to experiment with different ratios and techniques to find what works best for you.
So, what method worked for you? We like to hear your thoughts in the comment section below!
]]>
https://glytterati.com/blogs/articles/how-to-make-acrylic-paint-waterproof2023-04-03T00:38:15-07:002023-04-03T00:38:15-07:003 Simple Methods To Make Acrylic Paint WaterproofJoshLevi Soriano
Acrylic paint is a versatile and durable medium used on various surfaces. However, if left unprotected, it can be vulnerable to water damage, instantly ruining your hard work. Luckily, there are several methods you can use to make your acrylic paint waterproof, from sealing with varnish or wax to adding a waterproofing medium.
Acrylic paint is a popular medium for artists and DIY enthusiasts due to its versatility, vibrant colors, and quick drying time. However, one of its downsides is that it is not inherently waterproof, which can be problematic for specific applications such as outdoor murals or furniture.
Luckily, there are several ways to make acrylic paint waterproof and protect your artwork from the elements. This post will explore some of the most effective methods for waterproofing acrylic paint.
How Acrylic Paint Works
Acrylics are water-based paints with a pigment suspended in acrylic polymer emulsion.
When wet, they appear glossy and translucent but become opaque and relatively complex once they dry.
This fast-drying quality makes acrylics popular for artists, allowing them to work quickly and achieve results unattainable with other types of paint. However, acrylic paintings can be more susceptible to water damage than oil paints.
Why is Waterproofing Acrylic Paint Important?
If your acrylic paintings are displayed in humid environments or outdoors, they can quickly become ruined by rain, snow, or even mist. They can also fade over time when exposed to direct sunlight.
Therefore, waterproofing is necessary to protect your artwork and keep it looking fresh and vibrant for years to come. Waterproof acrylic paints need to be painted with acrylic sealer or varnish.
How to Make Acrylic Paint Waterproof
Acrylic paint is water-soluble, meaning it can be diluted with water and cleaned up easily with soap and water. However, several methods can be used to make an acrylic painting waterproof. Here are some of them:
Method 1: Using Varnish or Sealer
Another method is applying varnish or sealer over the acrylic paint layer. Several varnishes and sealers, such as polyurethane, acrylic varnish, oil varnish, and more, are available. These products form a protective layer over the paint layer, preventing water from seeping.
Let the first layer dry completely before applying another layer if needed.
Once you have applied the desired number of layers, let the varnish or sealer dry entirely.
After the final layer has dried completely, your project should be waterproof and resistant to water damage.
It's important to note that while these methods can make acrylic paint waterproof, they may also alter the appearance and texture of the paint. Testing these methods on a small area before applying them to a larger surface is always good.
Method 2: Use a Waterproofing Spray
You can also use a waterproofing spray to make acrylic paint waterproof. These sprays contain chemicals that create a waterproof barrier over the painted surface. When sprayed correctly, the waterproofing spray will create a clear and protective layer over the acrylic paint, preventing water from penetrating the surface.
Choose a well-ventilated area to spray your painting. Ideally, do this process outdoors or in a well-ventilated room.
Before spraying your painting, prepare your working space to avoid accidents or mishaps. Use newspaper or cloth to protect the surface you'll be working on.
Shake the can of waterproofing spray well before use. Be sure to read the instructions on the can carefully before you begin.
Hold the can of waterproofing spray at least 6 inches from the painting, spray a light, and even coat over the painted surface. Be sure to cover the entire surface of the painting evenly.
Allow the first coat of waterproofing spray to dry completely before applying a second coat. Depending on the brand of spray you use, this may take anywhere from 30 minutes to several hours.
Apply a second coat of waterproofing spray, following the same process as the first.
Allow the second coat to dry completely. Once it has dried, your acrylic painting will be waterproof and resistant to water damage.
Method 3: Using a Waterproofing Medium
Several waterproofing mediums are available in the market that can be mixed with acrylic paint to make it waterproof. While acrylic mediums are not waterproof, these still create a barrier that prevents water from penetrating the paint layer.
Choose the waterproofing medium that you want to use.
Squeeze out some acrylic paint onto your palette. You can use as much paint as you need, depending on the size of your project.
Add a small amount of the waterproofing medium to the paint. Mix it thoroughly with a paintbrush.
Test the mixture on a small area to see how it behaves. If you're happy with the result, you can paint your project. If not, you can adjust the medium you add until you get the desired effect.
Apply the paint mixture to your surface using a paintbrush. Ensure to apply the paint in thin layers, letting each layer dry completely before applying the next one.
If you need to add more layers, mix the paint with the waterproofing medium and apply it in thin layers.
Allow the paint to dry completely before exposing it to water or moisture. This will ensure that the waterproofing medium has had enough time to fully bond with the paint and create a water-resistant surface.
Tips to Maintain the Waterproof Acrylic Paint After Applying Sealer
While applying a varnish or a sealer to acrylic paint can make it waterproof, it doesn't mean that you don't need to maintain it. Here are some tips to help maintain the waterproofing of acrylic paint after applying a sealer:
Avoid exposing the painted surface to water for at least 24-48 hours after applying the sealer to ensure it has had enough time to fully cure and create a waterproof barrier.
Regularly inspect the painted surface for any signs of wear or damage. Even with a sealer, prolonged exposure to water or harsh weather conditions can cause the paint to wear away over time.
Avoid harsh chemicals or cleaners when cleaning the painted surface, as these can break down the sealer and cause it to lose its waterproofing properties.
Store your acrylic painting in a cool, dry place to prevent the paint from becoming brittle or cracking over time.
If the painted surface is regularly exposed to water or other harsh elements, consider applying an additional coat of sealer every 6-12 months to help maintain its waterproofing properties.
Waterproof Acrylic Paint FAQ
Is Acrylic Paint Waterproof?
No, acrylic paint is not waterproof. Although it does dry into a very tough and durable surface that can withstand water to a certain degree, leaving an acrylic painting in the rain or submerging it underwater will eventually cause the paint to start coming off and bleeding into whatever liquid it contacts.
How long does it take for acrylic paint to become waterproof?
Acrylic paint dries quickly, but it can take up to 24 hours to fully cure and become waterproof. It is important to wait until the paint is completely dry and cured before applying any waterproofing mediums or varnishes to ensure the waterproof layer is effective.
Is polyurethane varnish the best choice for waterproofing acrylic paintings?
Polyurethane varnish is a durable and long-lasting finish that can be used to waterproof acrylic paintings, but it is not always the best choice. Other varnishes, such as water-based polyurethane, acrylic varnish, or epoxy varnish, may be more suitable depending on the desired finish, level of protection, and compatibility with the acrylic paint used.
Conclusion
Acrylic paint is a versatile and popular medium that can be used for various applications. However, it is not inherently waterproof, which can be a problem for certain projects.
By following the steps outlined in this post and using the right finishing product, you can ensure that your painting will remain vibrant and protected for years.
]]>
https://glytterati.com/blogs/articles/best-sneaker-artists2023-04-01T04:06:13-07:002023-04-01T04:06:13-07:00The Best Sneaker Artists Making Waves In The Industry TodayJoshLevi Soriano
Sneakers are no longer just a piece of footwear but a cultural phenomenon that has captured the hearts of millions worldwide. From high-end designer collaborations to limited-edition releases, sneakers have become a canvas for creativity and a means of self-expression. We jotted down some sneaker artists making waves in the industry today.
Are you a fan of customized shoes? You may be wondering who are the people behind those intricate and jaw-dropping sneaker designs. In this blog post, we'll dive into the world of the best sneaker artists today.
Whether you're a sneakerhead, an art lover, or simply curious about the creative minds behind your favorite kicks, this list is for you. Join us as we explore the world of the best sneaker artists out there!
What is Sneaker Art?
Sneaker art refers to the customization and design of sneakers to create unique, personalized, and one-of-a-kind designs. The sneaker customization trend started in the 1980s, with basketball players adding their personal touch to their footwear to stand out on the court.
The trend then expanded, and artists began creating custom designs for people looking to stand out.
Collaborations and Partnerships
Sneaker art has significantly impacted fashion, sports, and pop culture. Brands such as Nike, Adidas, and Reebok have collaborated with sneaker artists to create limited-edition designs that sold out within minutes of release. These collaborations have created a new avenue for artists to showcase their work and reach a wider audience.
Athletes have also been getting in on the sneaker art trend, with many professional athletes commissioning sneaker artists to create personalized designs. This has created a new market for artists to tap into, with the potential for more collaborations in the future.
The Best Sneaker Artists to Watch This Year
1. Mache Customs
With over a decade of experience, Mache is known for his designs that often feature bold colors and intricate details, such as his "Cactus Jack" Air Jordan 1s. Famous celebrities and athletes have worn his custom sneakers.
Mache is known for his attention to detail, high-quality craftsmanship, and ability to create intricate designs on sneakers that are not typically seen on factory-produced shoes.
2. The Shoe Surgeon
Dominic Chambrone, aka The Shoe Surgeon, creates one-of-a-kind sneakers using only the finest materials. He is a renowned innovator and creative force in the footwear industry. As the CEO and founder of The Shoe Surgeon brand, he has gained worldwide recognition for his expertise in sneaker customization, sneaker design, and shoemaking.
3. Sekure D
Mathew Fabris, also known as Sekure D, is a Melbourne-based artist who turned his sneaker addiction into a full-time job in art and creative direction. Fabris draws inspiration from his love for graffiti, sneakers, comics, and cinema, which are the driving forces behind his original and distinctive style.
His artwork has been featured in numerous group shows and galleries worldwide, and he has collaborated with major companies such as Foot Locker, Jordan Brand, and Globe.
4. Dan Life
Dan Life is a true creative force in the world of sneaker design. His ability to turn simple sneakers into breathtaking art is remarkable.
His blinged-out designs have been worn by some of the biggest names in the entertainment industry, including Drake and Cardi B, cementing his status as a go-to designer for those who want to stand out from the crowd.
5. Kickasso
A former graffiti artist, Kickasso now creates custom sneakers for athletes and celebrities. He gained fame for his unique and eye-catching custom designs on sneakers worn by numerous celebrities, including athletes, musicians, and actors.
Kickasso's designs often feature bold colors, intricate details, and personalized touches, making them one-of-a-kind creations. Kickasso is known for his passion for his craft of painting and his dedication to creating unique designs that reflect his clients' personalities and interests.
6. Katty Customs
Katty Customs is a female sneaker customizer and artist specializing in giving white sneakers a splash of color. She is a renowned celebrity shoe designer and innovator in Torrance, California.
She has gained a reputation for her unique and artistic approach to customizing shoes, attracting many clients, including celebrities. She has collaborated with sneaker brands like Nike and Adidas to create custom designs incorporating pop culture elements and current events.
7. Steve Harrington
Steve Harrington is a Los Angeles-based artist who has collaborated with Nike to create a limited-edition sneaker that features his signature psychedelic designs. The collaboration between Harrington and Nike was highly successful and sold out quickly upon release.
In his latest collaboration with Nike, he customized the Air Force 1 and Air Jordan 1 sneaker, which has been a hit with Nike fans.
8. Differantly
Differantly is an art duo based in Paris, France, consisting of artists Emma and Stephane. They create a wide range of artwork, including shoe designs. They have collaborated with several major brands, including Adidas and Converse.
Differantly has made a name for itself in art and continues to inspire and engage audiences with its unique and thought-provoking artwork.
9. Dez Customz
Desmond Jones, also known as De Customz, is based in Houston, Texas, and has been creating custom sneakers for over 15 years. He is known for his attention to detail and ability to transform ordinary sneakers into works of art.
Some of his most popular designs include his custom Air Jordan 1s, which feature intricate designs and vibrant colors. He also creates custom designs for popular sneaker models, such as the Nike Dunk and the Adidas Yeezy.
Sneaker Artists FAQ
What makes a great sneaker artist?
A great sneaker artist has a unique and distinct creative vision, is skilled in sneaker design and customization, and can push the boundaries of what's possible in the industry.
What is a custom sneaker?
A custom sneaker is a sneaker that has been modified or redesigned in some way by an artist or designer to create a one-of-a-kind piece of wearable art.
Who can customize a sneaker?
Anyone with the skills and tools necessary to modify or redesign a pair of sneakers can customize them. This can include professional sneaker artists and designers, hobbyists, and DIY enthusiasts.
Conclusion
In conclusion, sneaker customization has become a cultural phenomenon, with sneakers serving as a canvas for creativity and self-expression. The best sneaker artists in the industry today have elevated the art of sneaker customization and set new standards.
Whether you are a sneakerhead, an art lover, or simply curious about the creative minds behind your favorite kicks, these artists are worth watching.
]]>
https://glytterati.com/blogs/articles/painted-shoes-ideas2023-03-22T02:26:43-07:002023-03-22T02:26:43-07:0016 Unique Painted Shoes Ideas To Inspire You TodayJoshLevi Soriano
Shoes protect our feet and express our personality and sense of style. While there are countless options for buying shoes, sometimes, finding the perfect pair for our unique style can be hard. Painting shoes can add a personal touch and create a unique pair.
Looking for a fun and creative way to express your style? Why not try painting your shoes? With just a few essential tools and some imagination, you can transform any pair of shoes into a unique and eye-catching accessory.
In this blog post, we've compiled a list of the best painted shoe ideas that will inspire you. And don't worry if you've never painted shoes before - we'll also cover the essential tools and techniques you'll need to start your shoe painting. Let's dive in!
1. Floral Vibes
Florals are always a trendy and classic pattern, and painted shoes are no exception. These hand-painted shoes will be perfect for spring and summer outfits. Take a plain pair of canvas shoes and add colorful flowers for a fun and feminine touch.
Use acrylic paint and a fine-tipped brush to create delicate petals and leaves. Consider using a light-colored background to make the flowers pop.
2. Galaxy Dreams
Galaxy prints have been trending for a while now, and it's easy to see why. They create a mesmerizing and otherworldly effect that can make any outfit stand out. To make galaxy shoes, you must blend shades of blue, purple, and black acrylic paint.
Add some white and silver speckles to represent stars and galaxies. You can use a sponge or a toothbrush to achieve the desired effect.
3. Splattered Paint
Try splattering paint on your shoes for a more abstract and edgy look. Depending on your preference, you can use various colors and patterns using a toothbrush or a paintbrush to flick the paint onto the shoes. You can also use tape to create crisp lines and prevent the paint from bleeding onto unwanted areas.
4. Polka Dots
Polka dots are playful, retro patterns that never go out of style. To make polka dot shoes, you can use a round sponge or stencil to create uniform dots. You can use contrasting colors for a bold look or a monochromatic palette for a more subtle effect. Pair these shoes with a flowy dress and high-waisted shorts for a vintage-inspired outfit.
5. Animal Print
Animal prints are a bold and fierce pattern that can make a statement on any pair of shoes. You can create a leopard, cheetah, or zebra print using acrylic paint and a fine-tipped brush. Use a light-colored background for a more realistic effect. You can also experiment with color combinations like pink and black or blue and white.
6. Cartoon Characters
If you're a pop culture fan, why not paint your favorite cartoon character on your shoes? Whether it's SpongeBob, Mickey Mouse, or Pikachu, you and your kids can create a fun and quirky design that shows your personality. You can use stencils or trace the character onto the shoes with a pencil before painting.
7. Ombré Effect
The ombré effect is a gradient technique that creates a subtle and sophisticated transition between two or more colors. You can use a sponge or a brush to blend the colors, starting from the lightest shade and moving toward the darkest. You can also experiment with color combinations like pink and purple or blue and green.
8. Tribal Patterns
Tribal patterns are bold and intricate designs that can add a touch of bohemian flair to your shoes. You can create a unique pattern with geometric shapes, lines, and dots. Use a fine-tipped brush and acrylic paint to create crisp lines and sharp edges. You can also use metallic paint to add some shine and texture.
9. Graffiti Style
Graffiti style is a popular urban art form that can be applied to shoes for a street-style look. You can use spray or acrylic paint and various colors to create a graffiti-inspired design. Use stencils or freehand your design for a more authentic effect. Consider adding some splattered paint or drips to create a more dynamic look.
10. Tie-Dye
Tie-dye is a fun and colorful technique that can add a retro and bohemian vibe to your shoes. You can use fabric dye or acrylic paint to create the desired effect. Rubber bands tie the shoes in different spots and dip them into the dye or paint. You can use various colors or a monochromatic palette for a more subtle look.
11. Abstract
Abstract shapes are versatile and creative designs that can add a modern and artistic touch to your shoes. You can use geometric shapes, circles, lines, and dots to create a unique and eye-catching pattern. Use contrasting colors for a bold effect, or stick to a monochromatic palette for a more minimalist look.
12. Pop Art
Pop art is a bold and colorful art style that can make a statement on any pair of shoes. You can create a pop art design using bright colors, bold lines, and comic book-style text. Use acrylic paint and a fine-tipped brush to create crisp lines and sharp edges. Consider adding some splattered paint or drips to create a more dynamic look.
13. Nature-Inspired
Nature-inspired designs are beautiful and calming patterns that can add a touch of serenity to your shoes. You can use leaves, flowers, trees, and other natural elements to create a unique and organic pattern. Use acrylic paint and a fine-tipped brush to create delicate details and textures. You can also experiment with different color palettes, like earthy tones or pastel shades.
14. Pop Culture References
Pop culture references are fun and playful designs that can showcase your favorite movies, TV shows, or musicians. You can use iconic images, logos, or quotes to create a unique and recognizable design. Use stencils or pencil the image onto the shoes before painting. Consider adding some splattered paint or drips to create a more dynamic look.
15. Glitter Glam
Try adding glitter to your shoes for a more glamorous and sparkling look. You can use glitter glue or loose glitter and a clear sealant to create a glittery effect. You can cover the entire shoe or create a gradient effect by applying more glitter to certain areas. You can experiment with colors and textures like holographic or metallic glitter.
16. Monogrammed Shoes
Monogramming is a classic trend that always stays in style, and now you can incorporate it into your shoes too! You can paint your initials or full name on the shoes or even a meaningful word or phrase. You can use stencils or freehand the design and choose any color combination you like. This is a great way to make a statement and add a personal touch to your shoes.
Common Tools You Need For Painting Shoes
Pair of Shoes
First things first, you need a pair of shoes to paint on. This can be any kind of shoe - canvas, leather, or even sneakers. Just make sure the material is clean and prepped before painting. You can use a shoe cleaner or rubbing alcohol to clean the shoes and then let them dry completely before starting to paint.
Paint
Acrylic paint is the most popular choice for painting shoes, as it dries quickly and is water-resistant. You can find acrylic paints at craft stores or online. You can also use fabric markers, paint markers, or even spray paint, depending on the effect you're going for.
Paint Brushes
Other tools you'll need include paintbrushes (various sizes). For detailed work and intricate designs, a fine-tipped brush is essential. A small round brush is perfect for creating small lines and details, while a flat brush is ideal for larger areas and filling in color.
A fan brush can be used to create texture and blend colors. It's important to clean your brushes thoroughly after each use to prevent the bristles from drying out and becoming stiff.
Masking Tape
Using stencils or masking tape can be extremely helpful when creating clean lines and shapes while painting your shoes. Masking tape is a versatile tool that you can use to protect the soles, laces, and other areas you don't want to paint.
Sealant
Finally, a sealant is the last tool you'll need to complete your painted shoe project. A sealant is a protective coating that helps to prevent the paint from chipping, cracking, or fading over time. Using a sealant is important to ensure your hard work and creativity last as long as possible.
Tips to Paint Your Shoes Effectively
Use a base coat
Before you start painting your shoes, using a base coat is a good idea. This will help the paint adhere to the shoes better and create a smoother surface. You can use a white or light-colored base coat if you're using bright or pastel colors or a black base coat if you're using darker colors.
Start with light colors.
If you're using multiple colors, starting with the lightest color is a good idea. This will help you avoid smudging or mixing colors unintentionally. Let each layer dry completely before moving on to the next color.
Use a fine brush for details.
Using a fine brush is best for painting details or small designs. This will give you more control and precision when painting. You can use a larger brush for larger areas or backgrounds.
Let each layer dry completely.
It's important to let each layer of paint dry completely before adding another layer or moving on to the next color. This will help prevent smudging and ensure the paint adheres properly to the shoes.
Use a sealant.
Once you're finished painting, it's important to use a sealant to protect your design and make it last longer. You can use a clear acrylic spray or a waterproof sealer. Make sure to follow the instructions on the sealant carefully.
Painted Shoe Ideas FAQ
What kind of paint should I use to paint shoes?
Acrylic paint or fabric paint is recommended for painting shoes. Both types of paint can be easily found at most art supply stores and come in a wide range of colors. Make sure to choose waterproof paint that will not crack or peel.
Can I use any type of shoes?
Most types of shoes can be painted, including canvas shoes, leather shoes, and even sneakers. However, choosing a shoe made from a material suitable for painting is important, as some materials may not hold the paint well or may crack and peel over time.
How long does it take to paint a pair of shoes?
The amount of time it takes to paint a pair of shoes will depend on the complexity of the design and the drying time required for each layer of paint. Some designs may only take a few hours to complete, while others may take several days to fully dry and cure.
Conclusion
Painted shoes are a fun and creative way to express your style and add a unique touch to your outfit. With these unique painted shoe ideas, you can experiment with different patterns, colors, and techniques to create a unique pair of customized shoes.
Whether you're into florals, animal prints, or pop culture references, there is a painted shoe idea that is perfect for you. So grab your paintbrushes and let your imagination run wild!
]]>
https://glytterati.com/blogs/articles/how-to-bronze-shoes2023-03-17T02:31:50-07:002023-03-17T02:31:50-07:00How To Bronze Shoes: A Step-by-Step GuideJoshLevi Soriano
Shoe bronzing is a unique way to preserve your special pair of shoes forever as a lasting keepsake. But the process can seem daunting if you don't know where to start. That's why we've compiled a list of essential tips and tricks to help you achieve a successful outcome.
Bronzing shoes is a great way to preserve them and give them a unique and eye-catching finish. Whether you want to bronze your favorite pair of sneakers, dress shoes, or baby shoes, the process is relatively simple and can be done at home with the right materials and techniques.
In this step-by-step guide, we'll walk you through the process of bronzing shoes, including the materials you'll need, tips for success, and common mistakes to avoid.
Things You’ll Need
Before we start, gathering all the materials you'll need for the process is important. Here's what you'll need:
Now that you gathered all the materials you need, you can start the process; however, bronzing your shoes is not just about applying bronze paint to the surface of your shoes. It requires some preparation and attention to detail to ensure the finish is even and long-lasting.
Here's a step-by-step guide to help you through the process:
Step 1: Prep your workspace
You want to avoid accidentally getting paint on anything else, so cover your workspace with newspaper or a drop cloth. This will protect your floors or table from any accidental spills.
Step 2: Clean your shoes
Before you start painting, make sure your shoes are clean and dry. You can use a damp cloth to wipe them down and remove any dirt or debris. This will help the paint adhere better to the surface of the shoe.
Step 3: Prepare Your Shoes
Use a deglazer to remove any existing finish or coatings on the shoes to help the bronze paint adhere better and ensure a smooth finish. Simply apply the deglazer to a cloth and rub it over the entire surface of the shoes.
Step 4: Prepare Bronze Paint
Next, you'll need to prepare your bronze paint. Make sure you choose a paint suitable for use on shoes and designed to stick to leather or synthetic materials. Give the paint a good stir to make sure it's well-mixed.
Step 5: Apply the Bronze Paint
Once you've prepared your shoes, it's time to apply the bronze paint. When painting the shoes, it's best to work in small sections and apply several thin layers of paint. This will help the paint to dry evenly and reduce the risk of drips or smudging.
Use a small paintbrush or sponge to apply the paint, making sure to work it into any creases or seams in the shoes. Allow each layer to dry completely before applying the next.
Step 6: Let the Shoes Dry
After you've applied the bronze paint, it's essential to let the shoes dry completely. This can take anywhere from a few hours to overnight, depending on the temperature and humidity in your environment.
You can use a fan or hairdryer in a low-heat setting to speed up drying. Just be careful not to overheat the shoes, as this can cause the bronze paint to bubble or crack.
Step 7: Apply a Second Coat
Once the first coat of liquid bronze has dried, apply a second coat to help ensure that the finish is even and uniform.
Follow the same process as in Step 3, applying the bronze paint with a paintbrush and covering the entire surface of the shoes. Let the second coat dry completely before moving on to the next step.
Pro Tip: The number of coats you apply will depend on the look you want to achieve, but it's essential to ensure even coverage to create a beautiful and lasting finish.
Final Step: Apply Finisher
Once you've painted the shoes to your satisfaction, you can apply a finisher to protect the paint and give it a glossy or matte finish. Simply follow the instructions on the finisher product and apply it evenly over the entire surface of the shoes. Allow it to dry completely before wearing the shoes.
Check out the video below for those who want to see the process in action.
Tips for Successful Shoe Bronzing
Although shoe bronzing may not seem daunting, there are several vital steps to ensure a successful outcome. Here are some of the tips to ensure excellent results:
Decide What Shoes to Paint With Bronze
Remember that bronze paint is best used in leather shoes. However, if you decide to paint your canvas shoes, you must be ready for the outcome, whether it turns out bad or perfect. In short, choose a shoe that you can afford to lose when the process messes up.
Use High-Quality Materials
Another tip is to use high-quality bronze paint. This will help to ensure a long-lasting and durable finish. Don't skimp on the materials, as this can lead to a subpar result.
Work in a Well-Ventilated Area
When working with bronze paint, working in a well-ventilated area is important to avoid harsh odor. Open a window or use a fan to circulate fresh air. But if you can find a no harsh odor bronze paint, it is much better as you don't have to wear any protective mask making you more comfortable when bronzing.
Take Your Time
The process of bronzing shoes can take some time, so be patient and don't rush through the steps. Each coat of liquid bronze paint must dry completely before moving on to the next step. Rushing can cause the finish to be uneven or the bronze paint to peel off.
Practice on a Test Surface
If you're new to bronzing shoes, practicing on a test surface can be helpful before applying the bronzed finish to your shoes. This can help you understand the process and correctly apply the bronze paint.
Common Mistakes When Bronzing Shoes
Applying Too Much Bronze Paint: This can lead to an uneven or clumpy finish. Be sure to apply a thin, even coat across the entire surface of the shoes.
Using Low-Quality Materials: Low-quality bronze paint can lead to a subpar result that may not last. Be sure to use high-quality materials for the best results.
Not Using Deglazer: Skipping the deglazing step can cause the bronze paint to not adhere properly to the surface of the shoes.
Not Letting the Shoes Dry Completely: Each coat of bronze paint must dry completely before moving on to the next step. Skipping this step can cause the finish to be uneven or cause the bronze paint to peel off.
Bronzed Shoes Aftercare Tips
After bronzing your shoes, it is essential to take proper care of them to ensure that the bronze coating lasts as long as possible. Here are some aftercare tips for your newly bronzed shoes:
Allow the shoes to dry completely: After painting them with bronze paint and applying a finisher, make sure the shoes are completely dry before wearing them. This will ensure the finish is fully set and won't smudge or come off.
Store the shoes properly: When you're not wearing them, store them in a cool, dry place. Avoid exposing the shoes to direct sunlight or extreme temperatures, as this can cause the paint to fade or crack.
Avoid getting the shoes wet: Water can damage the bronze coating on your shoes, so it's best to avoid wearing them in wet conditions or exposing them to water. If the shoes do get wet, make sure to dry them off thoroughly with a soft cloth.
Clean the shoes gently: To keep your bronzed shoes looking their best, it's important to clean them regularly. However, you'll want to avoid using harsh chemicals or abrasive materials that could damage the paint. Instead, gently wipe away dirt or debris using a soft cloth or brush.
Touch up the paint as needed: Over time, the bronze coating on your shoes may wear away in certain areas. To keep them looking their best, you can touch up the paint using a small paintbrush and the same bronze paint you used originally.
By following these simple aftercare tips, you can help to ensure that your bronzed shoes look great for as long as possible. So go ahead and show off your new, unique footwear.
Bronzing Shoe FAQ
How long does the bronze coating last on shoes?
The durability of the bronze coating depends on the quality of the materials used and the amount of wear and tear the shoe experience. Typically, the layer can last several months to a year with proper care.
Can I bronze any type of shoe material?
Bronzing works best on leather shoes because leather is a natural material with pores and texture, allowing the bronze paint to adhere to it effectively. However, you can also try it on materials such as suede or canvas.
Can I apply bronze to the entire shoe or only certain parts?
You can apply bronze to any part of the shoe you desire. However, starting with small areas such as the toe or heel is recommended.
Conclusion
Bronzing shoes are a great way to give your shoes a unique and eye-catching finish. With the right materials and techniques, the process is relatively simple and can be done at home. Follow each step carefully, take your time, and use high-quality materials for the best results.
With a little bit of practice, you'll be able to create a beautiful, long-lasting finish that will make your shoes stand out from the crowd.
]]>
https://glytterati.com/blogs/articles/how-to-paint-canvas-shoes2023-03-17T02:19:32-07:002023-03-17T02:19:32-07:00A Beginner's Guide To Painting Canvas ShoesJoshLevi Soriano
Are you tired of your plain canvas shoes and looking for a way to express your style? Painting your canvas shoes is an easy and inexpensive way to customize and make them unique. You can transform your shoes into bold and eye-catching accessories with a few essential tools and some creativity.
Canvas shoes are a great way to express your personality and style. However, sometimes plain canvas shoes can feel dull. If you want a fun DIY project, consider painting your canvas shoes!
It's a simple and inexpensive way to customize your shoes and make them truly unique. In this blog post, we'll go through the step-by-step process of painting canvas shoes, including the necessary tools.
Now that you have the necessary tools at hand, you can start the process. If you are still trying to figure out where and how to start, don't get hard on yourself; we will walk you through every step. So, without further ado, let's get started!
Step 1: Prepare your shoes
Before you start painting, you'll want to prepare your shoes by cleaning them thoroughly. This is important, especially if your shoes are full of dust, as it will affect the adherence of the paint.
To clean your shoes:
Use a damp cloth to remove any dirt or dust from the surface of the shoes.
After cleaning, do not apply or spray paint immediately, as a damp cloth may have left wet portions in your shoes.
Let them dry completely before moving on to the next step.
Step 2: Plan your design
If your shoes are ready for painting, you may proceed to plan your design. Planning will avoid mistakes during the process as well as messy working space. You can use a pencil to sketch out your design on the shoes or use painter's tape to create crisp lines and shapes.
Think about the colors you want and how they'll look together. You can also look for inspiration online or from other sources, such as art books or magazines.
Step 3: Mix your paint
The next step is mixing your paint. Although some paints do not need to mix, you may encounter some that need to. This step will depend on your paint choice.
If you're using acrylic paint, mix it with a fabric medium to make it more flexible and durable.
The fabric medium will also help the paint adhere better to the canvas. Before mixing the paint with the medium, read the instructions, as it will affect the whole painting process and, of course, the results.
Step 4: Start Painting
Now it's time to start painting! Don't forget to lay a piece of cloth on your working surface so the painting process won't get too messy. Gather your supplies and place them somewhere you can reach easily.
Use your paintbrushes to apply the paint to your shoes carefully. Be sure to paint in very thin layers, and allow each layer to dry before adding another. This will help prevent the paint from cracking or peeling over time. If you're using painter's tape, remove it carefully after the paint has dried.
Step 5: Add details
Once you've applied the base color(s), you can add details and accents to your shoes. This is where you can get creative and make your shoes stand out! Use different paintbrushes to create different textures and effects, such as stippling or blending.
Also, consider proper color blending, as it will affect the overall finish output. You can use stencils or stamps to add patterns or shapes to your shoes.
Step 6: Let it dry
After you've finished painting the shoes, let them dry completely. This can take several hours, depending on the thickness of the paint and the humidity. Be patient and don't rush the drying process, as this can cause the paint to smudge or smear.
Step 7: Seal the paint
If you want your painted shoes to last longer and be more wear and tear resistant, you can have acrylic sealer spray on them with a spray sealant. This will help protect the paint from fading or chipping over time. Be sure to choose a sealant appropriate for fabric or canvas materials.
And there you have it! A step-by-step guide to painting canvas shoes. You can transform your plain canvas shoes into a unique and stylish accessory with some creativity and patience.
If you want to see how to paint canvas shoes, check out this video:
Preserving Your Painted Shoes
Painting canvas shoes can be a fun and creative way to express yourself and add personality to your footwear. However, after putting all that time and effort into creating a unique design, you want to ensure your paint shoes last as long as possible.
Here are some tips on how to preserve your painted canvas shoes:
Allow the paint to cure fully: Let the paint on your shoes dry and cure completely before wearing them. Depending on the paint type, this can take several days or even up to a week. Rushing this step can cause the paint to smudge or peel off.
Apply a sealant: Once the paint has cured, apply a sealant to protect the paint from water, dirt, and other elements. You can use a clear acrylic spray or a fabric sealant. Make sure to apply the sealant in a well-ventilated area and follow the instructions on the product.
Avoid excessive bending: Canvas shoes can become distorted or creased if they are bent excessively, which can cause the paint to crack or peel. Avoid folding or bending your shoes, and store them in a way that preserves their shape.
Hand washes gently: If your painted canvas shoes get dirty, avoid throwing them in the washing machine. Instead, handwash them gently with mild soap and cool water. Be careful not to scrub too hard, and avoid using a dryer.
Store them properly: When not wearing your painted canvas shoes, store them in a cool, dry place away from direct sunlight. Avoid storing them in plastic bags or airtight containers, as this can cause them to become moldy.
Touch up as needed: The paint on your canvas shoes may fade or chip over time. To keep them looking fresh, touch up the paint as needed with the same type of paint and colors you used originally.
Painting Canvas Shoes FAQ
What type of paint is best for painting canvas shoes?
Using fabric paint or acrylic paint mixed with a fabric medium for painting canvas shoes is recommended.
Can I use regular acrylic paints for painting canvas shoes?
You can use regular acrylic or fabric paint for painting canvas shoes, but mixing it with a fabric medium is recommended to improve the durability and flexibility of the paint.
How long does the paint take to dry?
The drying time for the paint depends on the paint type used and the paint layer's thickness. It is recommended to follow the manufacturer's instructions for drying time.
How long will the paint last on the shoes?
The durability depends on paint quality, sealant type, and frequency of use. The paint can last several months to a year or longer with proper care.
Can I use leather paint for canvas shoes?
Yes, you can use leather paint on canvas shoes, but keep in mind that it may not adhere to the material as well as it would work on leather. Additionally, the canvas is more porous than leather, so you may need to apply several coats of paint to achieve the desired color and coverage.
Is the process of painting canvas shoes the same as painting leather and vinyl shoes?
While the general process of painting shoes can be similar across different materials, there may be differences in the preparation and application techniques required for canvas, leather, and vinyl shoes.
Conclusion
Painting canvas shoes is a fun and creative activity at home without buying expensive and complex tools. And with proper preservation techniques, you can enjoy your painted shoes for a long time.
Following the tips and tricks outlined in this article, you can keep your shoes looking fresh and vibrant while protecting them from wear and tear.
]]>
https://glytterati.com/blogs/articles/best-acrylic-paint-finisher2023-03-07T20:46:39-08:002023-03-07T20:46:39-08:009 Best Acrylic Paint Finishers For Artists and DIY Enthusiasts In 2023JoshLevi Soriano
It is no secret that acrylic paint finisher is important to artists and DIYers as it provides protection and enhances the project's appearance. If finding the right finisher seems daunting, we've compiled a list of the best acrylic paint finishers for artists and DIY enthusiasts.
We recommend the best products that we believe will offer value for our readers —learn more about our review process. If you buy through links on our site, we may earn a small commission at no extra cost to you.
Acrylic paint is a versatile and popular choice for artists, whether professionals or hobbyists. However, one of the biggest challenges with acrylic paint is getting the perfect finish, especially if you're using it on a surface that you want to have a smooth, glossy appearance. This is where a good quality acrylic paint finisher comes into play.
In this blog, we'll be looking at the best acrylic paint finishers available in the market. Whether working on a canvas, wood, metal, or any other surface, these finishers will help you achieve a flawless, long-lasting finish.
AFFORDABLE: You can get a high-quality finish without breaking the bank.
COVERS THE SURFACE WELL: Provides excellent coverage without needing multiple coats.
GREAT FINISH: The paint dries to a glossy and smooth finish that enhances the overall look of your shoes.
EASY TO WORK WITH: The paint is easy to apply, making it ideal for those new to shoe customization.
NO HARSH ODOR: Allows you to use it comfortably in a small space.
What We Don't Like
Full drying time may take a while.
What Our Editors Say
"After painting our shoes, we noticed the appearance was not so lively, so we decided to opt for the Angelus Brand Acrylic Leather Paint Finisher. We were blown away by the results. The paint covered the surface of our shoes evenly and dried them to a high-gloss finish, making them look brand new.
Not only was the paint easy to work with, but it also had a pleasant scent compared to other acrylic paints we have used in the past. We are extremely satisfied with the final result and highly recommend this product to anyone looking for a high-quality acrylic paint finisher for their shoes."
VERSATILE: Use it on various surfaces, including leather, vinyl, canvas, and more.
EASY TO USE: This makes it suitable for artists of all levels.
LONG-LASTING PROTECTION: Provides a protective layer that helps to keep your artwork or project looking good for a longer period.
SATIN FINISH: Provides a subtle sheen that enhances the appearance of your artwork, giving it a polished, professional look.
NON-YELLOWING: Ensures that the vibrant colors in your artwork will remain bright and vivid over time.
What We Don't Like
The bottle will only last for a few uses.
You need to wear a face mask when using the product.
What Our Editors Say
“We love this acrylic finisher as it provides a medium shine that enhances the appearance of our artwork without being too overpowering. This made our masterpieces more understated and elegant looking. Another thing we love about this product is we can easily wash this off with a brush using soap and water to seal acrylic paint.
Despite its strong odor, it is a minor inconvenience compared to the benefits it provides. Overall, we recommend this finisher to anyone looking for a high-quality, long-lasting, and versatile solution for their artwork.”
WORKS FOR RECYCLING LEATHER PRODUCTS: Makes your leather shoes, handbags, or any leather looks new.
RELIABLE CUSTOMER SERVICE: You can reach the company if you need product replacement
SUPPLY LASTS: One bottle will be more than enough coat for multiple projects, making it a cost-effective solution.
EXCELLENT VERSATILITY: You can use it on any leather things, such as belts, shoes, handbags, saddlery tack, upholstery, boots, and more.
What We Don't Like
It may need multiple coats to achieve a satin-high glossy finish.
It may crack over time.
What Buyers Say
"This product is incredible!! I could not be more impressed with the way it has worked. The finish is beautiful. I will make sure I always have a bottle in stock. Thank you for making such a wonderful finisher that works on many surfaces, including leather."
EASY APPLICATION PROCESS: Makes it simple to regularly maintain your leather items, so you can keep them looking and feeling great for years to come.
WATER RESISTANT: Helps to protect the leather from water damage, preserving its color and texture.
NO POLISHING NEED: Unlike similar products, you don't need to bump the surface to achieve great results.
PROLONGED LEATHER ITEMS LIFE: Repair and restore the appearance of your leather items, making them look new again.
What We Don't Like
Essential instructions are not indicated on the bottle.
More of a glossy finish than matte.
What Our Editors Say
"This is another acrylic finisher that changed the game for us! The Angelus 620 Matte Acrylic Finisher, Clear, is a must-have for anyone looking to get a long-lasting matte finish on their leather projects. We love how easy it is to apply, simply brush it on, and you're done.
It's water resistant, which is great for any items that may come into contact with water. No polishing is required! We were impressed with how this finisher has helped prolong the life of my leather items, keeping them looking great for longer."
WORKS ON VARIOUS MIXED MEDIA: Works not only for leather projects but also with charcoal drawings.
COMPATIBLE WITH MOST SURFACES: Works with most surfaces, including wood, plastic, and meta, making it a great all-around finisher for your art and craft needs.
AFFORDABLE: Makes it accessible to artists and crafters of all levels and budgets. You don't have to break the bank to get a high-quality, long-lasting finisher that delivers great results.
LONG-LASTING PROTECTION: You can keep your projects looking and feeling great for years.
QUICK DRY: It makes applying multiple coats easier for added protection if desired.
DRIES CLEAR: Ensures that it won't alter the look or color of your projects.
What We Don't Like
You need to work outside because of its strong odor.
Not suitable to use with kids around
What Our Experts Say
According to The Krylon, Kimberly Shaw, the editor at Definitions Wiki, "Triple Thick Crystal Clear Glaze is affordable for those looking for a durable and long-lasting finish without breaking the bank."
COMES IN A SPRAY CAN: You can easily apply a thin, even layer over large surfaces.
NON-YELLOWING: Helps to maintain the original appearance of your projects.
NO HARSH ODOR: This makes it a safe and comfortable choice indoors or in other enclosed spaces.
CAN WITHSTAND WATER: You can ensure that your project is safe from damage caused by spills, splashes, or other sources of moisture.
FAST DRYING: Allow you to apply several coats in a single day, allowing you to complete your project more quickly.
FINE MIST SPRAY: Provides a more even and controlled application, resulting in a smoother, more uniform finish.
What We Don't Like
You may need to apply 4 to 5 coats to get desired results.
What Buyers Say
"Third time buying this brand of acrylic spray and gotta say... couldn't love it MORE! Its application is flawless right until the last drop. And the uses I have found for it are truly endless! Whether coating a painted pot or an art project, this stuff has surprisingly become a 'must have on-hand' supply for my household."
WORKS ON MANY SURFACES: You can use it on leather, canvas, wood, and more.
CLEAR AND GLOSSY FINISH: Makes your project stand out without altering its appearance.
NO LONG-HOUR WAITING: You can apply it on a freshly painted surface.
EASY TO USE: You can apply it without using an expensive airbrush and other supplies.
WATERPROOF: Bring peace of mind that water or moisture won't ruin your project.
IMPROVES COLOR VIBRANCY: Enhances the color vibrancy of your acrylic paint, making it look even more vibrant and eye-catching.
What We Don't Like
A bit expensive.
What Our Editors Say
We're blown away by how well it worked on our shoes. The colors look more vibrant, and the glossy finish is what we wanted. It's easy to use!
Even some of our family members who had never used anything like this before could use it perfectly. That's why we bought three more bottles for our future projects. It's just that good!"
WATER-BASED: You can wash out the finisher using soap and water.
LONG-LASTING RESULTS: You can ensure it won’t crack or peel over time.
THICK CONSISTENCY: Provides good coverage with fewer coats to get the desired results.
COST EFFECTIVE: You can use it for repairing leather flaws, making it a great choice for those looking to save money on leather repair costs.
WORKS GREAT FOR LEATHER: Provides a glossy finish on various leather items such as leather shoes, bags, or jackets.
What We Don't Like
The bottle could be bigger.
What Our Editors Say
"What draws us in with this product is that we can use it immediately on our freshly painted projects! That's something only some similar products can do; some of them can even take a whole night before you can apply a finish. And we love not having to buy a different product for our leather items.
It works on all of them! The results were amazing; they made our things look brand new. The only downside is that it comes in a small bottle, so we'll have to buy more for future projects, but that's fine with us."
EXCELLENT GLOSSY FINISH: Provides a true glossy shine when applied on leather items.
SMOOTH AND EVEN FINISH: You can notice little to no residue when dried.
SUITABLE FOR DIYers: This makes it a must-have supply for people without experience with using an acrylic finisher.
GREAT VERSATILITY: You can use it for leather shoes, bags, and other leather items.
TRANSPARENT: Provides a clear finish when dried, making it ideal for preserving the natural color of the leather.
What We Don't Like
More expensive than other similar products.
What Buyers Say
"Works great! If you're looking into customizing shoes to sell or even just customizing your shoes, this product works great! Used on multiple shoes and never been disappointed, leaves a high gloss finish just like it's supposed to."
After weighing each product, we conclude that the Angelus Brand Acrylic wins this round-up. With its versatility and brand reputation, it is clear that this product is the best overall. Furthermore, it stands out among other brands because of its low price and great quality.
Best Acrylic Paint Finisher Buying Guide
Using a high-quality finisher is a great option if you're looking to protect and enhance your acrylic paintings. However, with so many different products on the market, knowing which one to choose can take time and effort. Here are some things to consider when looking for the best acrylic paint finisher:
Compatibility with Acrylic Paint
Look for products that are specifically designed for use with acrylic paints. This will ensure that the varnish is formulated to work well with the paint and provide long-lasting protection.
Quality of the Product
Is the product crack-resistant? Is it water resistant? To make sure about the product you are getting, give yourself some time to read reviews from true users.
Type of Finish
Decide whether you want a matte, satin, or glossy finish for your painting. A matte varnish can help to reduce the appearance of shiny reflections, while a gloss spray varnish can help to create a more reflective surface.
It is important to decide what you want the outcome, so you will be satisfied when you get the desired results. Pay attention to the label on the bottle to ensure you're getting the right product. You can also read reviews so you can have a reference.
Drying Time
Some finishers take 1 to 2 days to get dry, which is not suitable if you need to rush your project. Look for one that dries overnight or in just minutes. You can also find that out by reading reviews from buyers and experts.
The Surface You Are Applying To
When selecting an acrylic paint finisher, it's important to start with the surface you are applying to. If the surface you are applying the acrylic paint finisher to is leather, it's important to choose a product specifically formulated for use on leather. Look for finishes that are flexible and won't crack or peel.
When applying acrylic paints on canvas, choosing an acrylic paint finisher compatible with the paint and the canvas is important. Look for finishes that are archival quality, meaning they won't yellow or crack over time, and consider whether a glossy or matte finish is more appropriate for the artwork.
Your Budget
Make sure you're getting your money's worth. Just because something is pricey doesn't necessarily mean it's your best choice. You might come across expensive acrylic finishers that don't live up to their hype.
On the flip side, you might find budget-friendly options that are just right for your needs. So, before making a purchase, take some time to do your research!
Acrylic Paint Finisher FAQ
What is the difference between acrylic paint finisher and acrylic paint varnish?
Acrylic paint finishers and varnishes are both acrylic paint sealers. They are used to provide protection and enhance the appearance of acrylic paintings. However, there are some key differences between the two.
Acrylic paint finishers are a clear coating formulated to apply over acrylic paints. On the other hand, acrylic paint varnishes are specifically formulated to be used as a final protective coating over an acrylic painting.
Can an acrylic paint finisher be used on other surfaces besides canvas?
Yes, acrylic paint finishers can be used on various surfaces besides canvas, including wood, metal, and plastic. However, choosing a finisher compatible with the surface you are applying is important. This is to ensure you are getting the results you want to achieve.
How do I apply an acrylic paint finisher?
The application method for an acrylic paint finisher will depend on the product you are using. Some finishers are designed to be brushed, while others are sprayed. Be sure to read the manufacturer's instructions carefully before applying the finisher, and consider using protective equipment like gloves and a mask.
How long will an acrylic paint finisher last?
The lifespan of an acrylic paint finisher will depend on various factors, including the type of finisher used, the environmental conditions the painted surface is exposed to, and the quality of the underlying paint. Generally, a high-quality acrylic paint finisher can protect for several years.
Why Trust Glytterati?
Our team of editors is passionate about art and craft projects, so we only recommend products that we genuinely believe in. We provide honest, unbiased reviews of the best art supplies, and we often consult with industry experts to make our content professional and friendly, even for beginners. So if you're looking for new ways to improve your creativity, we can help!
]]>
https://glytterati.com/blogs/articles/best-nail-art-striping-tapes2023-03-07T20:06:43-08:002023-03-07T20:06:43-08:009 Best Nail Art Striping Tapes in 2023: Get Salon-Quality Nails at HomeJoshLevi Soriano
Striping tape is a must-have for anyone looking to create intricate nail art designs. However, finding the best one can be challenging because of so many options on the market. To help you, we have rounded up the top picks for the best nail art striping tape available.
We recommend the best products that we believe will offer value for our readers —learn more about our review process. If you buy through links on our site, we may earn a small commission at no extra cost to you.
Nail art has come a long way in recent years, and one of the most popular techniques for achieving professional-looking results is striping tapes. These thin, adhesive tapes are available in a wide range of colors and patterns, from thin lines and delicate patterns to bold and colorful designs.
But with so many options on the market, it can be difficult to know which striping tapes are the best for your needs. In this post, we'll take a closer look at some of the best nail art striping tapes available. Whether you're a professional nail artist or just looking to add something extra to your manicure, these tapes will take your nails to the next level.
COMES WITH NAIL ART TOOLS: Includes 2 pcs nail tape roller dispensers and tweezers, allowing you to use the nail art set right out of the box.
128 PCS NAIL TAPES: Gives you the freedom to create unique and intricate nail art designs.
WIDELY USED: You can use these tapes for various occasions, whether it's for a special event, party, or just for everyday wear.
BEGINNERS FRIENDLY: Features a self-adhesive and easy-to-use design, perfect for those new to nail art.
What We Don't Like
Some colors are duplicated.
What Our Experts Say
As Catherine Brock, Writer/Editor of The Budget Fashionista, stated, "the striping tape line from FANDAMEI is one of the best kits you can buy if you do a lot of nail art. It comes in many different colors, which can be used to add art to your nails or as a guide for detailed and intricate nail designs.
This particular line also comes with tweezers and a dispenser for easier application. And from a budgeting perspective, it comes in at around $5, which in my opinion, is of great value for 128 rolls of colored tape and accessories.
VARIETY OF COLORS AND SIZES: Allows you to easily find the perfect tape to suit your needs and preferences.
COMES IN DIFFERENT WIDTHS: You can use these tapes for fine lines or wider designs.
VERSATILE: You can use these strips to create phone cover designs, body art, and of course, nail art.
SELF-ADHESIVE: Eliminates the mess and hassle of using glue, making it more convenient to use, especially for beginners.
What We Don't Like
May rip easily while unrolling
Finding the edge may be challenging
What Our Experts Say
According to Tom Miller of FitnessVolt, "Vonrui Nail Art Stripping Tape Lines. I am certain that holographic nail strips are fashionable and provide a charming and lively appearance. This set is enormous! It includes 36 nail striping tapes in widths of 1mm, 2mm, and 3mm.
This package contains all the fundamental colors necessary to modify the overall appearance of your nails. Using all three thicknesses of tape will result in a lovely design that requires no further work."
EASY TO USE: Makes it a convenient option for any level of experience.
STRONG ADHESIVE: Ensures your lines or designs stay in place and remain crisp and clean.
ELEGANT COLOR: The gold and silver striping tape gives your nail designs a luxurious and premium look.
AFFORDABLE: Comes in a roll of a large quantity of tapes at a reasonable price, making it accessible to a wide range of customers.
NO RESIDUE: Makes it a great choice for temporary and extended use.
What We Don't Like
The set includes only 2 color variations
Easily gets torn when rolling out
What Our Editors Say
The good thing about this striping tape product is the strong adhesive. Although the thickness is wider than other options on the market, it works perfectly on our nails. We also like that it is affordable and easy to cut and shape, making it suitable for beginners.
The gold and silver color options added a touch of elegance to our designs. The only thing we've noticed is the tape gets torn easily, resulting in some wasted tape. However, it's a matter of some wasted tape. However, it's a matter of being more careful and taking the time to handle the tape properly.
WORKS FOR VARIOUS DESIGNS: You can use it for designing your nail art, creating nail patterns, and highlighting.
EXCELLENT VERSATILITY: You can use these tapes with UV Gel, acrylic nails, and nail polish.
SAVES YOU MONEY: You can achieve a salon-grade nail without going to nail salons.
What We Don't Like
Extra care is needed when applying to your nails
Lose its adhesive properties over time
What Our Editors Say
We love this product because, unlike other options that are only available in 2 colors, this one has a wide range of colors. This allows us to create limitless nail patterns and designs. The twinkledT striping tapes are also easy to hang with, making them perfect for personal and professional use.
We also love that we dont need to suffer with messy glues to achieve a professional and polished look. Overall, the twinkledT striping tapes are a fantastic choice for anyone looking for a high-quality, easy-to-use, and cost-effective striping tape that can help you achieve a professional and polished look.
HOLDS WELL ON NAILS: Makes them perfect for professional and DIY nail art projects.
EASY TO ADHERE: You can easily apply these striping tapes with precision.
EASY TO REMOVE: Allow you to clean and change the design quickly.
WIDE COLOR SELECTION: Makes it easy for you to find one that suits your needs.
ADHERES TO VARIOUS NAIL TYPES: You can use it with UV Gel polish, regular nail polish, acrylic nails, and more.
What We Don't Like
Thinner than other same products
What Buyers Say
"These strips are great! So much can be designed on the nails. They hold well and look very good. The colors are strong and consistently the same on the roll (no streaks). I am very satisfied!"
COMES IN PRE-CUT, NOT ROLLS: Makes it easy to handle and apply, making it a convenient option for both professionals and DIYers.
NO MESSY PROCESS: You can easily adhere the tape to the desired surface without glue.
MATCH TO ANY NAIL TYPES: You can use it with fake nails, acrylic nails, and more.
NO COMPLEX TOOLS REQUIRED TO USE: Allow you to use tweezers when applying the tapes.
What We Don't Like
Wrinkle when not properly applied.
Easily peel off when exposed to water.
What Our Editors Say
What really stands out about this product is the ease of use. Unlike other similar products, these tapes don't come in rolls. We can easily pull the tapes from its sheets using tweezers, saving us time and effort.
We also like that we can achieve salon-grade nails without breaking the bank. Moreover, each sheet has individual bags making it perfect for gifting, which is a big plus for us!
NOT IN ROLLS: Allow you to easily cut the tape to any size or shape you need.
EASY TO USE: With the easy pull tabs, you can easily apply the tape to your nails without the hassle of cutting it from a roll.
STICK ON NAILS: Ensures your design stays in place and looks flawless all day.
MIXED COLORS: Allow you to mix and match to create unique and colorful designs.
GLITTER ZEBRA 3D STRIPS: Adds a touch of sparkle to your nail art and gives a unique dimension to your designs.
What We Don't Like
Not for those looking for thinner strips
What Buyers Say
"I was in the market for something just like this. I wanted strips in varying sizes and just that. I'm so happy with these! They come in an assortment of gold, rose gold, white, silver, black, and holographic silver and gold.
They are very easy to peel off the sheet and adhere very nicely. If you handle it too much, it will not stick as well, but after a top coat, you're fine. I highly recommend them, and they are great for any skill level/age."
VARIOUS SIZES IN A SET: Allows you to select the appropriate size for your nail art.
MULTI-PURPOSE: You can use these tapes for nail art and crafts.
ASSORTED COLORS: Give you the creative freedom to match the tape to your nail art design.
SHINY DESIGN: Adds a touch of sparkle and shine to your nails, making them stand out and look more polished and professional.
What We Don't Like
May peel after a few days.
What Our Editors Say
"We love this product because of the wide range of shiny color selections. We don't have to buy a separate color whenever we want to add a pop of color to our nails. It's cost-effective and time-saving. The multi-purpose use of the tape for nail art and crafts makes it even more versatile, making it a great product for professional and personal use.
And most importantly, the affordability of this product is perfect for anyone starting without breaking the bank. Whether you're a professional nail artist or enjoy doing your nails at home, this product is a must-have in your collection."
Final Verdict
Considering various factors such as size, color, quality, multi-purpose use, and affordability, we have determined that the best nail art striping tape is FANDAMEI 128PCS Striping Tapes Line. This set offers a wide range of assorted colors allowing you to match the tape to your nail art design or craft project.
The compatibility of the tape for UV Gel, Acrylic nail art, and nail polish makes it even more versatile, making it a great product for both professional and personal use. And most importantly, the set is affordable, making it accessible for everyone, and a great value for the money.
Nail Art Striping Tape Buying Guide
Having so many options can make it difficult to choose the right set of striping tapes. Here are a few things to consider when making your purchase:
Quality
When buying nail art striping tape, it is important to consider quality for several reasons. A higher-quality tape will be more durable and less likely to tear or fray while in use. This means that it will be easier to work with and create clean, precise lines. A higher quality tape will also be more adhesive, reducing the risk of the tape peeling off while the nail polish is still wet.
Adhesive Strength
It is important to consider the adhesive strength of nail art striping tape because it will affect the tape's ability to stay in place during the nail art process. If the adhesive is not strong enough, the tape may start to peel off or move while you are working, causing the lines to become uneven and the design to be ruined.
Additionally, if the adhesive is not strong enough, the tape may not stay in place long enough for the nail polish to dry, which can cause smudging and other issues.
Width
You should also consider the width when buying striping tapes because it will affect the size and type of designs. The thin tape is great for creating fine lines, details, and intricate designs. It's also great for creating French tip designs, as well as for creating thin dividing lines in an ombre or gradient design.
The medium tape is ideal for creating wider lines, such as those used in geometric designs, or for creating bolder accent lines. If you are working with large blocks of color or need a background for other designs, the large one is the way to go.
Your Nail Art Tone
According to Will Copp, owner of Knox Concrete Contractors, "the tone of your nail art should be one of the first things you think about when choosing a tape. Some strips look great with bright colors, while others work better with more subtle shades."
The color of the tape can greatly affect the overall appearance of your finished nails. If the color of the tape does not match or complement the color scheme of your nail art, it can detract from the overall look and make it appear unprofessional.
Ease of Use
"Another important factor to consider is how easy the tape is to apply. Some tapes are very sticky and require a lot of effort to apply evenly, while others are much easier to use. Finally, ensure the tape is durable and holds up in harsh conditions.
Some strips can be difficult to remove if they start to peel or crack, so choose one that will withstand wear and tear."
Price
Finally, you should also consider the price. While it may be tempting to go for the cheapest option, it's important to remember that you often get what you pay for when it comes to nail art supplies.
Nail Art Striping Tape FAQ
What is nail art striping tape?
Nail art striping tape is a type of tape that is used to create precise lines and designs on nails. It is made of a thin, adhesive material that can be cut into different widths and shapes.
How do I use nail art striping tape?
To use nail striping tape, apply a base coat to your nails. Then, cut the tape into the desired shape and size, and apply it to your nails. Finally, apply a top coat to seal the design.
Can I use nail art striping tape on natural nails?
You can use nail art striping tape on natural nails. It is a great way to create precise designs without using nail polish.
Is nail art striping tape reusable?
It depends on the brand and quality of the tape; some are reusable some are not. It's best to check the product information before purchasing.
Are there different types of nail art striping tape?
Yes, there are different striping tape lines available, such as metallic, holographic, and glitter tapes. Some tapes are also available in straight lines and widths to accommodate different design needs.
Why Trust Glytterati?
Our team of editors is passionate about art and craft projects, so we only recommend products that we genuinely believe in. We provide honest, unbiased reviews of the best art supplies, and we often consult with industry experts to make our content professional and friendly, even for beginners. So if you're looking for new ways to improve your creativity, we can help!
]]>
https://glytterati.com/blogs/articles/best-nail-art-dotting-tools2023-02-27T20:52:44-08:002023-02-27T20:52:44-08:007 Best Nail Art Dotting Tools in 2023: A Guide to the Best PicksJoshLevi Soriano
Dotting tools are essential for any nail artist looking to create stunning and intricate designs. These small tools are used to create dots of various sizes and can be used to create everything from simple polka dots to more complex and detailed designs. Whether you're a beginner or a professional, having high-quality dotting tools in your nail art arsenal is a must.
We recommend the best products that we believe will offer value for our readers —learn more about our review process. If you buy through links on our site, we may earn a small commission at no extra cost to you.
If you're a nail art enthusiast, you know that having the right tools is essential for creating beautiful designs. A dotting tool is one of the most important tools in your nail art arsenal. Dotting tools are used to create small dots and patterns on your nails, and they come in various sizes and designs.
In this blog post, we're going to highlight some of the best dotting tools on the market and what makes them stand out. So whether you're a beginner looking to try your hand at nail art or a professional looking to take your designs to the next level, these dotting tools are a great investment.
EXCELLENT VERSATILITY: You can use it for manicures, pedicures, and arts and crafts.
INCLUDES VARIOUS TOOLS IN A SET: Allow you to easily create intricate designs and patterns to express your creativity and achieve professional-looking results.
PERFECT FOR SALON AND HOME USE: Making it a great option for both seasoned nail technicians and those who enjoy experimenting with nail art as a hobby.
WORKS WITH DIFFERENT NAIL TYPES: You can use this set on a variety of nail types, including natural nails, false nails, acrylic nails, and even rhinestones, providing endless possibilities for creative expression.
What We Don’t Like
The brush handle is a bit flimsy.
Some of the brushes included have wide bristles making it difficult to achieve precision and control when working on small or intricate designs.
What Our Editors Say
When choosing the best dotting tool set, we always want to look for a set that offers versatility and a variety of tools. It should be able to be used for multiple types of nail art and crafts and have a variety of brush and dotting pen sizes and shapes. And that is what we love about this set.
It comes with a variety of nail art tools, including 5 dotting pens and 15 nail art brushes. With this complete set of tools, we dont need to go to a salon to have a professional-looking nails.
DUAL ENDED TIP: Allow you to easily switch between a fine and a larger tip, adding an extra level of convenience and making the set even more versatile.
COMES WITH STYLISH HANDLE: This makes it a great gift option for any nail art enthusiast.
ERGONOMIC HANDLE: Allow you to comfortably hold and use it for extended periods without causing any discomfort.
CURVED DOTTING TIP: Allows for more control and precision when making dots and circles, making it easy to achieve even and consistent results.
What We Don’t Like
It could be better if the set included brushes
A bit expensive for what it offers, as you can find similar sets with more tools at a lower price point.
What Buyers Say
"Great quality and feel very nice in hand. Love them! Fast shipping, considering how far they traveled! Thank you. Love the high quality, exactly as described."
AFFORDABLE: A great option for those on a budget who still want to achieve professional-looking results without breaking the bank.
PERFECT FOR HOME USE: Allows you to achieve consistent and even results in the comfort of your home.
ALUMINUM ALLOY DOTTING BALLS: Ensures that they maintain their quality and perform well even after prolonged use.
WORKS FOR CREATING MANY DESIGNS: Allows you to create various nail art designs, including marbling design, blending colors, and creating swirls and textured finishes.
What We Don’t Like
The handle needs extra care as it could break when dropped or bumped.
The set includes only one dotting tool.
What Our Editors Say
What we like about this dotting tool is the affordable price making it suitable for beginners who like to try nail art. With the different dotting ball sizes in the set, we dont even need to buy different dotting tool sizes just to achieve the designs we like.
Furthermore, the dotting tool comes with a comfortable grip and a lightweight design, making it easy to hold and control. Overall, this dotting tool is a great investment for anyone who loves to experiment with nail art and wants to create beautiful designs without breaking the bank.
COMFORTABLE HANDLE: Unlike the plastic handle, the wood handle of the dotting tool provides a comfortable grip for extended use.
ASSORTED SIZES: Allows you to create a range of dot sizes and shapes in nail art design, making it versatile and perfect for different projects.
STURDY WOOD HANDLE: Provides a solid base for creating detailed and accurate designs.
EASY TO USE: It can be used by both beginners and professionals.
What We Don't Like
REQUIRE REGULAR CLEANING: Unlike plastic handles, wood dotting tools require regular cleaning to prevent the buildup of dirt and bacteria
What Our Editors Say
We like this product because unlike other dotting tools with plastic handles, these don't slip off our hands while in use. The wooden handle provides a comfortable and secure grip, making it easier to control and maneuver the tool.
We also love the different sizes of the dotting balls, which are perfect for a variety of nail art designs. The assortment of sizes allows us to easily create detailed and intricate designs. The natural look of the wood handle also gives a rustic touch to our nail art creations.
WORKS FOR MANY PROJECTS: Aside from nail art, you can use it with rock painting, mandalas, pottery making, and baking.
GREAT FOR GIFTING: The stylish handle design makes the dotting tools great to gift for any occasion.
GOOD QUALITY YET INEXPENSIVE: A great investment for those just starting their nail art career.
DURABLE HANDLE: You can ensure they will last long, even with frequent use.
What We Don't Like
It could be better if some other nail art tools were included in the set.
What Our Editors Say
We like these dotting tools because the set features a unique 3D design handle that allows for easy grip and control while in use. The set also includes 5 different dotting tools, each with a different size of dotting ball, ranging from small to large, making it versatile for different projects and applications. The different sizes also help us create fine details and intricate patterns. The quality of these dotting tools is comparable to that of more expensive dotting tools on the market, making them a great value for the cost.
WIDE RANGE OPTIONS: Allow you to use these dotting tools with different designs, from small dots to large dots.
STYLISH 3D HANDLE DESIGN: The 3D handle design is stylish, comfortable to hold, and easy to grip, providing added control and precision while in use.
DUAL ENDED TIP: You dont need to purchase separate tools for different size dots, and it saves you money in the long run. It also makes it easy to switch between different dot sizes while working on a project, saving you time and increasing efficiency.
EASY TO STORE: The compact size of these dotting tools makes them easy to store in your art supplies collection, and the plastic material makes them lightweight and easy to transport.
What We Don’t Like
More expensive than other dotting tools that are available in the market
What Our Editors Say
What we love about this dotting tool set is its versatility and range of options. We love that we don't need to buy different sizes of dotting balls because they feature a dual-ended tip that is ready to use right out of the box. The 3D handle design is stylish and provides added control and precision, making it suitable for a nail artists of all skill levels.
While this set of dotting tools is high-quality and versatile, it may be priced higher than other similar products on the market. This may be a concern for some shoppers who are looking for a more budget-friendly option. However, it is important to remember that the unique 3D handle design, dual-ended tip, and safe plastic material may justify the slightly higher cost.
Final Verdict
Having the right tools and products is essential when creating beautiful nail art. Fortunately, you don't have to go to the nail salon to achieve professional-looking results. You can create intricate and stunning designs at home with a good quality set of dotting tools.
The best overall Nail Art Gel Design Dotting Drawing Tools Set can provide you with all the benefits mentioned above. This product can deliver a salon-grade result without breaking the bank. The set usually includes various dotting tools in different sizes, allowing you to create dots of various sizes and shapes with minimal effort.
Nail Art Dotting Tool Buying Guide
The Tone of Nail Art
According to Alex Federo, Co-Owner of FTW Concrete Contractors, "it is important to consider the tone of your nail art design when choosing a tool and the type of tip that will best execute your desired look. Some people prefer tools with small triangular tips because they find them easier to control and use in tight spaces.
Dotting tools with round tips are typically preferred by those who prefer a more fluid style of nail art. If you want to create a very subtle look with matte nail art, then a fine-tip or brush-type dotting tool is perfect. If, on the other hand, you want to create a more dramatic look with brighter colors, then a larger brush is necessary.
The Dotting Tool Materials
As stated by Alex Federo, "it is also important to consider the material of the tool before making a purchase. Tools made from metal or plastic are generally stronger than those made from other materials, but they can also be more difficult to grip. Ultimately, it is up to you to decide which type of nail art dotting tool best suits your specific needs and aesthetic preferences.”
According to Kerry Lauders, Mental Health Officer at Startups Anonymous. The best nail art dotting tools are those that are salon-grade, durable, and safe for nails. Many dotting tools are made from wood, metal, or plastic; some of these materials can be harmful to the nails if used regularly.
Choosing a dotting tool made from a safe material, such as plastic, is important. This is because wood can accumulate bacteria when not properly cleaned, and metal can rust and corrode, harming your health.”
The Size Matters
According to Kerry Lauders, “the size of the dotting tool is also important. Some dotting tools are small, while others are large. The size of the tool will determine the size of the dot created. It is important to choose a dotting tool that is the right size for the task at hand.”
Price
Finally, the price of the dotting tool is important. Some dotting tools are
more expensive than others. It is important to choose an affordable dotting tool that fits within the budget.
Nail Art Dotting Tools FAQ
How do I choose the right size dotting tool for different nail art designs?
When choosing the right size dotting tool for different nail art designs, consider the size, level of detail, type of design, and size of your nails. Experimenting with different sizes of dotting tools will help you find the best size for your specific nail art designs and preferences.
Are there any specific techniques or tips for using dotting tools to create professional-looking nail art?
Yes, there are specific techniques and tips for using dotting tools to create professional-looking nail art. For example, you can use the dotting tool to create different-sized dots, blend colors, create marbled effects and make flowers and other designs.
Can dotting tools be used for other crafts or art projects, or are they exclusively for nail art?
Dotting tools are versatile and can be used for various crafts and art projects, such as creating designs on pottery, making jewelry, and creating detailed designs on fabric. They can be used to create dots and designs on a variety of surfaces and materials, not just nails.
Why Trust Glytterati?
Our team of editors is passionate about art and craft projects, so we only recommend products that we genuinely believe in. We provide honest, unbiased reviews of the best art supplies, and we often consult with industry experts to make our content professional and friendly, even for beginners. So if you're looking for new ways to improve your creativity, we can help!
]]>
https://glytterati.com/blogs/articles/best-varnish-for-acrylic-paintings2023-02-27T20:02:57-08:002023-02-27T20:02:57-08:0010 Best Varnish for Acrylic Paintings In 2023: Reviews & Buying GuideJoshLevi Soriano
Acrylic paintings are a versatile and dynamic art form that can add color, texture, and character to any space. We've compiled a list of the best varnishes for acrylic paintings. From drying time and finish type to durability and compatibility, you'll find it here.
We recommend the best products that we believe will offer value for our readers —learn more about our review process. If you buy through links on our site, we may earn a small commission at no extra cost to you.
Acrylic paintings are a popular medium for artists, known for their vibrant colors, versatility, and fast-drying properties. However, it's important to apply a varnish to ensure that your artwork is protected and preserved over time. With so many options available, choosing the best varnish for your acrylic paintings can be overwhelming.
In this blog, we'll take a closer look at the different types of varnish, the pros, and cons of each, and offer tips for selecting the right varnish for your acrylic paintings.
ADDS VIBRANCY TO PAINT: This makes your art stand out and look even better.
EASY TO CLEAN: Makes maintenance a breeze, leaving you with a flawless finish every time.
WORKS ON MOST SURFACES: You can use it on various surfaces, including canvas, metal, wood, and more.
IMPROVE IMPERFECTIONS: Gives your art a smooth and flawless finish.
EXCELLENT VERSATILITY: You can mix it with acrylic or as a clear coat alone.
ACID-FREE: This helps to prevent your art from yellowing, fading, and deteriorating over time.
What We Don't Like
A bit tacky but reworkable
It may leave streaks when applied with an improper brush.
What Our Editors Say
"We have always been looking for top-notch art supplies that deliver quality and affordability. And we have to say, Sargent Art 22-8808 16-Ounce Acrylic Gloss and Varnish has exceeded our expectations! From the moment we started using this acrylic varnish, we appreciated the ease of application and the acid-free formula.
We also noticed that it protected our art and improved its vibrancy. But that's not all! This is also incredibly easy to clean and maintain, making it one of our favorite art supplies."
NON-YELLOWING: Ensures that your surfaces will remain vibrant and bright for years.
LONG LASTING: You won't have to reapply the product frequently, saving you time and money.
NO CRACK GUARANTEED: It gives you peace of mind knowing that your surfaces are protected from damage and will maintain their appearance
EASY APPLICATION: Saves you time and effort in completing your projects.
What We Don't Like
Drying time may take 3 to 5 days.
It may not be compatible with other matte paints.
What Buyers Say
"I've used this varnish for my oil and acrylic paintings and my paintings. So far, it has gone on well and has not yellowed. It goes a long way, so you don't have to use it very much. I put on several coats also. I love it."
DRIES CLEAR: You don’t have to worry about your paintings getting altered by a yellow or cloudy cast from the varnish.
PROTECTS YOUR ARTWORK: By providing a durable and chip-resistant surface, this varnish helps to preserve your artwork for years to come.
EASY TO SPREAD: You can save time and effort during the application process
NO BUBBLES: Eliminates the need for time-consuming touch-ups or reapplication.
NO BAD SMELL: Provides a more enjoyable varnishing experience and less disruption to your workflow.
VERSATILE: Allow you to mix it with some gloss varnish for an even more layered sheen finish for your acrylic paints.
What We Don't Like
Leaves brush marks
No instructions
What Our Editors Say
“Some acrylic varnish turns yellow overtime, but this one is different. We have encountered some reviews about is getting clody when applied, but fortunately it didnt happened to our paintings. And that is one of the reasons why we chose to use this product.
It turned our acrylic paintings into a beautiful work of art that stood the test of time. The application process was also smooth and the end result was a clear, that made us buy more for future use.”
EASY TO APPLY: You don't need to use any special tools to apply it.
HIGH GLOSS FINISH: Creates a protective layer that helps to seal and preserve your painting, increasing its lifespan.
QUICK DRY: It reduces the risk of any damage during the drying process.
WATER-BASED: You can clean your hands and tools with soap and water.
WEATHER-RESISTANT: You can ensure that your acrylic paints will not get wet when exposed to rain.
What We Don't Like
May need several layers for optimal results
It may smear when applied to a not fully dry-surface.
What Buyers Say
"I wasn't expecting to like this as much as I did. I've already used it on two paintings, and I only have good things to say about it. It makes my paintings pop and look so shiny. I'm definitely going to need a bigger bottle next time, haha. It only took about 20 mins for the varnish to dry on a 12x16 canvas. I 100% recommend this brand!"
FINE MIST: You can ensure an even and consistent application.
NO DISCOLORATION: This allows you to preserve the original appearance and quality of the art piece.
INVISIBLE MATTE SURFACE: This won't ruin the glossy finish of your artwork.
DUST AND MOISTURE RESISTANT: Ensures that your artwork remains in its original condition for years to come.
What We Don't Like
It may not work with watercolor.
It will not work with alcohol-based ink.
What Our Editors Say
"We were initially skeptical about using this matte varnish because we thought that since it is designed to spray, it might cause drips or leave a glossy finish that would detract from the natural beauty of our art pieces. However, after trying it out, we were pleasantly surprised by its performance.
The fine mist spray created an even and uniform coverage without drips, and the matte surface was completely invisible, leaving our art looking just as it did before. We also like that this product does not cause discoloration or yellowing; it gives us peace of mind knowing that our art will be protected and preserved for years to come."
EASY TO USE: You can easily use it without prior experience.
DRIES FAST: You can prevent smudging and any damage during application.
EVEN COVERAGE: Ensures that your art will be fully covered and protected for the years to come.
WORKS WITH WATERCOLOR:
UV RESISTANT: Gives you peace of mind that your artwork is from fading or discoloration due to exposure to sunlight.
What We Don't Like
The varnish has a strong odor.
What Buyers Say
"I always make sure to have at least 2 cans of Golden Acrylic Glossy Spray Varnish around because of how much I love using them to seal my acrylic paintings. It's super easy to use (make sure to do it in a well-ventilated space!) and dries fairly quickly."
EASY TO APPLY: It glides smoothly on the surface, making it easier to apply even for beginners.
GREAT COVERAGE: Provides even coverage and helps to hide imperfections and blemishes, leaving a flawless finish.
EXCELLENT CONSISTENCY: Allows for mixing and blending with ease.
QUICK DRY: Allows you to get on with your day without worrying about smudging or transferring.
EASY TO DISPENSE: Comes with a flip-top cap that makes it easy to control the amount of product used, reducing waste and saving you time and money.
TRANSPARENT FINISH: It leaves no discoloration when dry making your art preserved.
GOOD ADHESIVE STRENGTH: Ensures that it stays put for a long time without fading or smudging.
What We Don't Like
The bottle is not filled to the top.
It may leave some streaks when not applied properly.
What Our Editors Say
“We just can't get enough of Sargent Art Varnish! It makes varnishing acrylic paintings so effortless. The smooth application and flawless finish are a dream come true. And the consistency is just perfect - not too thick or too thin, which makes working with it a breeze.
The quick dry formula saves us a ton of time, and the flip-top cap ensures we don't waste any product. If we have more projects to work on, we would definitely choose Sargent Art Varnish again and again."
WATER-BASED: You don't have to use special cleaners to wash out the varnish from your hands.
FLAWLESS FINISH: Leaves no streaks, increasing the value of your artwork, and making it more attractive to potential buyers and collectors.
WORKS WITH VARIOUS MIXED MEDIA: You can use it with various mediums, including oil and acrylic.
FAST DRYING: Allows you to move on to the next step in your creative process without long wait times.
LESS ODOR: This makes it a great choice for artists sensitive to strong fumes.
What We Don't Like
The bottle is hard to open.
It may be hard to clean off from the brush if left unclean for longer.
What Buyers Say
"Quick drying and coats evenly. What more can an artist ask for? The solution spreads easily (use a disposable brush, though). Makes my oil paintings look way more professional."
INTERMIXABLE: You can mix it with other colored paints
WATER-RESISTANT: Makes it suitable for outdoor painting set-up.
LARGE BOTTLE: Comes in a 100ml bottle, making it lasts for multiple applications.
WORKS FOR MOST SURFACE: You can coat surfaces, including clay, wood, paper, leather, metal, and cloth.
COST EFFECTIVE: Provides a glossy finish in just one coat without needing multiple layers.
What We Don't Like
The cap is not a flip-top design.
What Our Editors Say
"We're big fans of outdoor painting, and this varnish ticks all the boxes for us. No more worrying about rain ruining our masterpieces! Plus, it's super versatile and works on a variety of surfaces.
The only downside is that the cap isn't the most convenient, but that's a small complaint when considering all the benefits. With a big bottle and one-coat application, it's easy to see why we consider this one of the best varnish products around."
SAFE TO USE: The varnish has no harmful substances, making it safe for everyone, including children and pets.
EASY TO CLEAN: You can use a wet cloth to clean the varnish, which makes cleaning a breeze.
WATERPROOF: Ensures your paintings will stay protected from the elements.
PROTECTION GUARANTEED: Ensures that your paintings will last for years to come.
AFFORDABLE: Makes it accessible to artists and hobbyists of all levels
What We Don't Like
May need to apply two or more coats to achieve the desired results
What Our Editors Say
“This varnish has been a game-changer for us! Not only does it have a cool purple label on the bottle, but it's also super versatile and works great on our acrylic paintings and our wood crafts. And the best part? It's super affordable compared to other similar products on the market.
We even bought a big bottle that lasted us for several projects! We're also thrilled to use it safely with our kids - which is super important since we love doing art projects together. It's great to know that our products are safe for them.”
Final Verdict
In conclusion, Sargent Art 22-8808 16-Ounce Acrylic Gloss and Varnish stands out as the best overall choice in the roundup due to its amazing features. Not only does it add vibrancy to your paintings, but it also makes maintenance a breeze with its easy-to-clean formula.
This versatile varnish works on a variety of surfaces and can even be used to improve imperfections, giving your artwork a smooth and flawless finish. With all these benefits, it's no wonder why Sargent Art 22-8808 16-Ounce Acrylic Gloss and Varnish is the best overall choice.
Best Varnish for Acrylic Paintings Buying Guide
With so many options on the market, it's important to understand what to look for to ensure you make an informed decision that will help you achieve the desired outcome for your artwork. Here are some of the important factors:
Compatibility
If you want to ensure that your artwork remains vibrant and protected for years to come, you should choose a varnish specifically formulated for acrylic paint. Incompatible varnish can cause the paint to turn yellow, crack, or become brittle over time, compromising the appearance and longevity of your artwork.
Type of Varnish
According to Bill Morgan of Studyinghood, “when it comes to choosing the best varnish for your acrylic painting, there’s a wide range of options to consider. For example, spray varnish is the most popular type of varnish used for acrylic paintings. It’s easy to apply, dries quickly, and provides excellent protection against dust, dirt, and UV rays.
Brush-on varnish is a great way to achieve a matte or glossy finish depending on your preference. It’s particularly useful for detailed areas of your painting that require more precision. The downside is that it can take a longer time to dry than spray varnish and can be messier to apply.
Type of Finish
When choosing a varnish for your acrylic painting, the type of finish is a big deal. Do you want it matte or glossy? This is important because it can completely change the look of your artwork. You can choose two types of acrylic varnish: acrylic resin varnish and acrylic polymer varnish.
If you want a glossier, stronger, and clearer finish, acrylic polymer varnish is the way to go. On the other hand, if you want a high-gloss finish, you should go for an acrylic resin varnish.
Drying Time
When choosing a varnish for your acrylic painting, don't forget to think about the drying time. Some varnishes dry fast, while others can take a while to dry, up to several days. Make sure you choose a varnish with a drying time that works for you and your schedule.
And be patient! It's important to give the varnish enough time to dry completely before touching your painting or exposing it to any dirt or other elements.
Durability
When buying varnish for your acrylic painting, it's important to consider how long you want it to last. Durability is a key factor to consider because it affects the longevity of your artwork. A durable varnish will help protect your painting from dust, fading, and yellowing over time, preserving its beauty for years to come.
On the other hand, a varnish that is not durable may not be able to withstand the test of time and could deteriorate, leaving your painting vulnerable to damage. So, choose wisely!
Cost
Cost is always a consideration when making any purchase; varnish for acrylic paintings is no exception. While you want to ensure you're getting a high-quality product that will protect and enhance your artwork, you also don't want to break the bank.
Don't compromise on quality for the sake of cost, but don't overspend on features you don't need either. Do your research and find the right balance of cost and quality for your varnish needs.
Acrylic Painting Varnish FAQ
What is the difference between acrylic resin varnish and acrylic polymer varnish?
Acrylic resin and polymer varnishes are both commonly used to protect and enhance acrylic paintings. However, there are some key differences between the two. In general, acrylic resin varnishes are more glossy, durable, and transparent than acrylic polymer varnishes.
On the other hand, acrylic polymer varnishes have a more subtle, satin finish and are better suited for paintings with a more textured or impasto surface. They are also easier to work with and less likely to yellow over time.
What is the difference between gloss and satin varnish acrylic painting?
A glossy finish enhances the vibrancy of colors, while a matte finish softens the color tones and reduces glare. A satin finish, on the other hand, is a compromise between glossy and matte. You can mix matte and gloss varnishes to achieve a semi-gloss appearance.
Which varnish is better glossy or matte?
The better varnish depends on the desired outcome for your acrylic painting. However, glossy varnish is often chosen because it makes colors appear more vibrant, while matte varnish will reduce glare and soften colors.
Why Trust Glytterati?
Our team of editors is passionate about art and craft projects, so we only recommend products that we genuinely believe in. We provide honest, unbiased reviews of the best art supplies, and we often consult with industry experts to make our content professional and friendly, even for beginners. So if you're looking for new ways to improve your creativity, we can help!
]]>
https://glytterati.com/blogs/articles/how-to-paint-on-plexiglass2023-02-27T05:35:28-08:002023-02-27T05:36:47-08:00A Guide To Painting On Plexiglass - Tips And Ideas!JoshLevi Soriano
Plexiglass is transparent, durable, and shatterproof, making it an incredibly amazing option for painting. You can even get kids to paint on plexiglass sheets without worrying about them getting hurt. Here are some tips for painting on plexiglass.
Colors have a positive impact on mood. It instantly uplifts your spirit and sparks the vibrance of creativity into your dull day. Different types of colors and painting techniques make this activity even more exciting. Painting on transparent canvas further elevates the experience.
Plexiglass is typically used for painting purposes. It is transparent, durable, and shatterproof. All these qualities make plexiglass an incredibly amazing option for painting. It is even kid-friendly. You can get your kids to paint on plexiglass sheets without worrying about them getting hurt. So let's discover some effective tips for painting on plexiglass.
How to Paint on Plexiglass
Like any other DIY project, you need to prepare the plexiglass sheet for painting purposes. Here is what you will need to proceed:
Sandpaper
Sponge
Soap and water
Acrylic primer
Acrylic paint
Paint Brushes
Acrylic or Plexiglass sheet
Some old newspapers
Waterproof sealant
1. Preparing the Surface
Plexiglass sheets are incredibly smooth that you need to roughen the surface in order to get it ready for painting. Use sandpaper for this purpose. Softly rub the plexiglass surface with the sandpaper. Make sure to sand the entire surface of the acrylic sheet or the paint won't adhere well to the surface.
After sanding the plexiglass sheet, you’ll need to clean it up. Take a dry sponge first and remove the plexiglass particles from the surface. Follow this step by cleaning the plexiglass surface with a soap and water solution. Use lint-free cloth for this cleaning purpose. Leave the sheet to dry afterward.
2. Putting the Primer
It's important to prime the plexiglass surface before painting. The primer helps create a nice sticky surface for the paint to adhere to.
For the spray primer, shake the bottle first and then apply the primer on the surface from a suitable distance. Make sure to uniformly distribute the liquid primer over the surface. Apply one coat to the surface and let it dry.
Sometimes the plexiglass surface is not completely smooth, thus additional coats of primer are required to set the surface for painting. Spray on the second coat of primer only after the first coat has completely dried.
The required primer coats also depend on the type of primer you are using. Make sure to check the manufacturer's instructions to specify the number of coats.
3. Paint and Have Fun!
After the primer is dry, your canvas is all set for the paint action. If you are using spray paints, make sure to shake them well before use and hold the nozzle at a 45-degree angle and at least 8 inches away from the sheet.
Note the opacity of the paint. If one layer of color is not dark enough, you may have to apply multiple layers of paint. Choose the paint coats according to your desired opacity. For brush painting, you can choose any colors and just add the strokes of paint to the acrylic sheet canvas.
You can also create a base color by spray painting and then elevate it by painting any illustration with brush strokes on it. You can also take the abstract route just by adding different colors to the canvas. Make sure to wait for the paint to dry before adding the next layer or stroke to avoid smudging.
4. Apply the Waterproof Sealant
Waterproof sealant is a transparent seal that adds a layer of protection to the painting. It keeps the paint in place and helps enhance the durability of the painting. The sealant also prevents discoloration if you want to display the painting outdoors.
Applying a sealant is a totally optional step and it depends on your use. If you intend to showcase your painting, it's recommended to add sealant to the surface. Take a good commercial sealant and add a coat of the sealant to your artwork. Apply at least one layer. You can add another layer of sealant if needed.
The sealant keeps the paint from getting in direct contact with harmful environmental factors and keeps your masterpiece shining for years.
Pro Tips For Painting On Plexiglass
Here are some additional tips for painting on plexiglass like a pro.
Water-based paints are better for use on acrylic surfaces than solvent-based paints. So go for water-based acrylic paints.
Make sure to note the drying time of the paint. It may vary depending on the type of paint you are using.
Use masking tape to create straight lines and even partitions in your painting.
Use a clear polyurethane-based sealant to achieve a glossy and smooth appearance.
Conclusion
Painting on Plexiglass is a great experience. The colors spread over clear sheets add a unique wow factor to the painting attempt.
You don't need to especially prepare the plexiglass sheets for painting. Just take the plexiglass sheet, draw the outline of the preferred design, or go with an abstract style and create a masterpiece. You can also display your painting on plexiglass as a DIY decor element. So go ahead and refine your inner artist!
]]>
https://glytterati.com/blogs/articles/best-shoe-markers2023-02-24T22:05:30-08:002023-02-24T22:05:30-08:008 Best Shoe Markers in 2023: Add Some Color to Your KicksJoshLevi Soriano
When customizing your footwear, having high-quality shoe markers is essential. Not only do they allow you to add a personal touch to your shoes, but they also give you the freedom to create unique designs that reflect your style. We've researched and reviewed the top shoe markers to help you make an informed decision.
We recommend the best products that we believe will offer value for our readers —learn more about our review process. If you buy through links on our site, we may earn a small commission at no extra cost to you.
DUAL-ENDED TIP: You can easily switch between larger and smaller details while drawing.
WORKS ON VARIOUS PROJECTS: You can use them with many items, such as clothes, bags, and more.
CHISEL TIP: You can use it for drawing, writing, shading, and blending.
DON'T BLEED: You can achieve a professional, crisp finish with every project.
What We Don't Like
The paint may fade after several washes.
What Our Editors Say
“These cute markers got a spot in our hearts because they were easy to use and had a nice selection of colors and tips. We also love the dual-end bullet and chisel tips, which produce bold and precise lines.
We bought these markers for our kids for them to decorate their shoes, but these markers have multiple uses. We found ourselves using them for a variety of different projects. From decorating school notebooks to personalizing bags and clothes, these markers have proven to be a versatile and convenient tool for all our creative endeavors.”
REPLACEABLE NIBS: You can easily switch out different nibs for different writing styles, from broad strokes to fine lines.
REFILLABLE INK: It saves you money as you dont need to buy another set frequently.
EASY TO BLEND COLORS: Gives a smooth, professional result.
CONSISTENT INK FLOW: The colors will remain vibrant and won't blot or smudge
What We Don't Like
A little bleeding
Way more expensive than other similar shoe pens
What Our Experts Say
According to Mark of ParentalQueries, "they come in various colors, and the ink adheres to almost any shoe material, dries quickly, and doesn't fade or smudge. They offer a great range of shades, from light pastels to bold neon hues. Once I upgraded to Copic markers, I was amazed at the level of detail and accuracy that I could achieve with my shoe designs."
EXCELLENT VERSATILITY: You can use it on various surfaces, including leather suede, fabric, and soft foam.
CONCEALS ANY STAINS: Leaves no stain visible on the surface and effectively hides any previous discoloration.
ACRYLIC BASED PAINT: Provides durability and resistance to fading, chalking, and peeling.
EXCELLENT COVERAGE: You only need a single coat to achieve full coverage and a flawless finish.
What We Don't Like
Requires long hours to let the paint sit and dry
Covers only 2 to 3 shoe
What Our Editors Say
The first time we saw these Wilkins Premium paint pens, we were skeptical because, among other shoe paints, this comes with only one in the set. However, that one marker packs a punch! We discovered that the Wilkins Premium Midsole Marker is perfect for customizing canvas shoes because it's water resistant.
We could wear our shoes even when raining outside without worrying about the paint becoming ruined. The ink is also very pigmented, so we don't need multiple coats to cover imperfections. Having this marker at hand, we never have to worry about not being able to repair any scuffs or scratches on our shoes and restore them to their original color.
INCLUDES MOST USED COLORS: Allows you to customize your shoes and match any color scheme or design.
MULTI-PURPOSE: You can use this marker not only for shoes but also for cloth and upholstery.
SAFE FOR KIDS: With the non-toxic formula, your kids can enjoy painting their shoes on their own.
NO HEAT NEEDED: Allow you to restore and customize your shoes without needing additional equipment or tools.
PORTABLE: You can easily store these markers and bring them anywhere.
What We Don't Like
No white marker is included in the set
The ink bleeds
What Buyers Say
"I was surprised by these fabric markers. They do not leave blobs, and they appear to blend well. The color selection is good just wish there was also a white marker to blend and lightens other colors. The markers are super easy to use."
NO DUPLICATE COLORS: You'll never get stuck with the same color again, allowing you to unleash your creativity without any limitations.
EQUIPPED WITH DUAL TIP: Allow you to create fine details and broad strokes with ease.
GREAT FOR BEGINNERS: With the 30 unique colors, beginners can explore different color combinations.
COST EFFECTIVE: This no-fade shoe marker can save you money in the long run, as you won't have to reapply or touch up your designs constantly.
What We Don't Like
The paint may bleed on thin fabric
Not suitable for leather shoes
What Buyers Say
"Good markers. I was able to create some shoe art which came out really well. The paint applies neatly, doesn't bleed, dries fast and clean does not smear on rain either. Recommend them for sure, and it's a good price for the amount you get."
QUICK DRY: Saves your time and allows you to move on to your next project or wear your shoes sooner.
NO SMUDGE: Ensures that your designs will come out clean, eliminating the need for touch-ups or corrections.
NO HEATING NEEDED: You can use it anywhere without needing complex tools, making it convenient.
WORKS ON MOST FABRIC SURFACES: You can use these markers on most fabrics without any hassle, whether it's cotton, polyester, or something else
What We Don't Like
Limited color selection
The thin tip is a bit soft
What Our Experts Say
As stated by Mark, a health and mental specialist at Great Brain Experiment, "the Sharpie Permanent Markers are also a great option because they are affordable, safe, and versatile. They also provide good coverage and are water resistant."
Mark from ParentalQueries also said, "these paint pens come in various colors, and the ink is easy to apply, dries quickly, and doesn't fade or smudge. Plus, the price is affordable for the quality that you get.
ENVIRONMENTAL-FRIENDLY: You can design your shoes without contributing a bad impact on the environment.
CONTAINS 18 COLORS IN THE SET: Gives you the freedom to choose the colors that suits your taste.
WON'T EASILY FADE: Saves money and effort by not needing to repaint your shoes frequently.
GOOD CUSTOMER SERVICE: You can reach them anytime to solve your problem with the product.
CONSISTENT INK FLOW: Makes your designs smooth and even finish.
What We Don't Like
The fine tip could be more pointed to achieve thinner strokes.
What Buyers Say
"Zeyar Paint Marker Pens are really easy to use. They are quick to dry. Love that they are watered-based, and they are really going to help me with simple art. I would definitely recommend it!"
WRITES ON ANY SURFACE: You can use these water-based paint markers with shoes and any surfaces, including metal and glass.
WATER-BASED PAINT: You can wear your shoes soon after designing them
EXCELLENT COVERAGE: Conceals scuffs, scratches, and other imperfections on your shoes with just one coat.
TRUE OPAQUE COLORS: Unlike similar products, the colors are true and opaque, providing a vibrant, true-to-color finish that won't fade or wash out easily.
What We Don't Like
Does not come with a case
Limited colors
What Our Editors Say
"We have used different shoe marker pens in the past. We encountered some brands that didn't offer true pigmented colors. But this one is different as the color remains even after several washes.
We are also impressed with this versatile set, as it can be used on various materials, not just shoes. Moreover, with excellent coverage and water-based paint, we can easily mix and match the colors to create unique designs. Whether you're a professional shoe designer or want to add color to your sneakers, this set is a great choice."
Final Verdict
In conclusion, the US Art Supply Super Markers 20 Unique Colors Dual Tip, is the best overall shoe marker set because it offers a wide range of pigmented color markers. Unlike other shoe markers, it has dual ended tip making it versatile for different applications and providing fine or broad line widths.
Whether you are a professional artist, hobbyist, or just looking for a fun DIY project, the US Art Supply Super Markers will not disappoint. They offer superior quality, longevity, and versatility that make them the best overall shoe marker set on the market.
Best Shoe Markers Buying Guide
Having a high-quality shoe marker is like having a magic wand for your shoes. It allows you to add a personal touch to your footwear and create unique designs that reflect your personality. However, with so many available options, it can be tricky to know which shoe markers to choose.
That's why it's important to consider several factors when buying shoe markers. Here are some of the essential factors to look for:
Pigmented and True-to-Color Markers
Ensure the markers have a wide range of pigmented colors and that the colors are true to what is advertised. This is important because you want the color of your shoes to remain consistent and not fade after a few washes.
True-to-color markers are also important because you want the color of your shoes to match your chosen color. If the color of the marker does not match the color advertised, it can be difficult to achieve the desired look for your shoes.
Material Compatibility
Check that the markers can be used on the type of material your shoes are made of, whether it's leather, canvas, or fabric. Some shoe markers just wouldn't stick to certain materials, like leather or canvas. That's why it's important to check the material compatibility before buying shoe markers.
Also, it's worth noting that some markers might be suitable for certain materials but not others. You don't want to waste money on markers that won't work on your shoes. It's good to check the instructions on the packaging to make sure the markers are suitable for your shoes.
Water-Based
Finding a water-based and quick-drying shoe marker is a key factor when buying shoe markers because it ensures the markers are easy to use and the final product is clean and smudge-free.
Water-based markers are generally easier to clean than solvent-based markers and don't produce harmful fumes. This makes them safer to use and better for the environment. Additionally, water-based markers are often easier to control and can be more precise in application.
Quick-Drying Shoe Marker
Quick-drying markers are also important because they prevent smudging or rubbing off. If a marker takes too long to dry, it can be difficult to create designs without accidentally smudging the wet ink. Quick-drying markers also allow multiple layers to be applied without waiting for the previous layer to dry, making the process more efficient.
Versatility
Having a versatile marker gives you more options and allows you to be more creative. It also means that you don't have to keep buying different markers for different projects, saving you money in the long run. Moreover, a versatile marker often has a wide range of color options, allowing you more freedom in your designs and creativity.
Shoe Markers FAQ
How can I prevent the markers ink from fading?
It will help if you will use high-quality, specialized shoe markers or paint that is specifically formulated to be resistant to fading. You can also apply a clear sealant or varnish over the design to protect it from fading. This will help to protect the ink from exposure to sunlight, water, and other elements.
It's important to note that even with these precautions, the color may still fade over time due to the natural wear and tear of the shoes, and it's recommended to reapply the design or varnish if needed.
What can I use to clean my shoes after painting?
It is not necessary to clean your shoes right after painting them. It is best to allow the ink to sit and dry before washing your shoes. However, after several days have passed and you think your shoes need cleaning, you can use a mild detergent or soap and water. Avoid using harsh chemicals or abrasive materials that can damage the paint or the shoe.
Can I use regular markers for shoe design?
While regular markers may work for some basic shoe designs, they may have a different level of pigmentation or longevity than specialized ones. It is recommended to use specialized shoe markers for professional quality and longevity.
Which is better for shoes? Acrylic paints or markers?
Which is better for shoes? Acrylic paints or markers?
If you want to add a pop of color to your canvas shoes, fabric paints or shoe paint would be perfect for the job. Water-based acrylic paints are water-based and can be used to blend colors and create gradations. However, acrylic shoe paints can be messy and require additional supplies.
Markers, on the other hand, are more convenient and easy to use; they are also easy to clean. They are also generally more portable, so you can take them with you and make changes to your shoes whenever and wherever you want. However, markers can be more expensive than paint, and the ink may fade quickly over time.
Why Trust Glytterati?
Our team of editors is passionate about art and craft projects, so we only recommend products that we genuinely believe in. We provide honest, unbiased reviews of the best art supplies, and we often consult with industry experts to make our content professional and friendly, even for beginners. So if you're looking for new ways to improve your creativity, we can help!
]]>
https://glytterati.com/blogs/articles/best-bronze-paints-for-shoes2023-02-23T23:45:26-08:002023-02-23T23:45:26-08:0010 Best Bronze Paints for Shoes In 2023: Reviews & Buying GuideJoshLevi Soriano
Are you ready to add some shimmer to your shoes? Bronze paint is a great way to give your footwear an instant upgrade. But with so many options, it can take time to choose the best one. That's why we've done the work for you and handpicked some of the best bronze paints available on the market.
We recommend the best products that we believe will offer value for our readers —learn more about our review process. If you buy through links on our site, we may earn a small commission at no extra cost to you.
Are you looking to revamp your old and worn-out shoes with a fresh coat of paint? Then, you must be on the hunt for the best bronze paint that will bring new life to your shoes. Choosing the right paint can be a daunting task with so many options available in the market.
In this blog post, we will take a deep dive into the world of bronze paint and guide you through everything you need to know when choosing the best bronze paint for your shoes. From the factors to consider to the frequently asked questions and more, we've got you covered. So, sit back, relax, and get ready to learn all about the best bronze paint for shoes.
WORKS FOR MOST SURFACES: You can use it not just for canvas shoes but also for many surfaces such as wood, plastic, metal, and more.
FADE RESISTANT: Ensures that the color stays vibrant and true over time.
QUICK DRY FORMULA: Allows a speedy and efficient application process without waiting long periods between coats.
SHINY METALLIC LOOK: gives a lovely touch to your shoes that is sure to impress.
What We Don't Like
Not best for leather shoes
What Our Editors Say
“This product is something you won't regret when you try it. We were so impressed with how it works on our canvas shoes. It brought life to our old shoes that we never thought would look new again. What also made this one our favorite is the quick drying time.
Unlike similar products, this only took us 30 mins to dry completely and be ready for a second coat if needed. This product exceeded our expectations and has become our go-to choice for all our painting needs.”
VERSATILE: You can use it with canvas sneakers and leather shoes.
NO SPECIAL TOOLS REQUIRED TO APPLY: You can even use a soft sponge for application.
NO HARSH ODOR: You can paint multiple pairs of shoes all day without worrying about your lungs being exposed to fumes.
EASY TO USE: You can use it without prior painting experience.
CRACK & SCRATCH RESISTANT: You can ensure that it won't chip over time.
What We Don't Like
You can only coat 1 to 2 pairs of shoes, depending on size.
It may require multiple coats to achieve desired results.
What Our Editors Say
“No matter how expensive the paint is, if it requires a complex process to get the work done, you will surely get disappointed. And that is what we love about angelus leather paint. We haven't had any issues with using this product throughout the process. We were surprised that we hadn't had to wear a face mask or use special tools.
We also like how vibrant the color was when applied to our leather shoes. We only wish it came in a large bottle; overall, we were satisfied with our purchase. This product won't disappoint you if you are looking for safe, quality shoe paint.”
PIGMENTED COLORS: You can ensure that your shoe paint won't fade quickly.
SHINY RESULTS: Gives your shoes a glossy appearance that adds to their overall look.
WIDELY USED: You can use it on various surfaces such as canvas, wood, glass, ceramic, and more.
SAFE FOR ALL AGES: Allow you and your kids to safely decorate their shoes without worrying about harmful chemicals.
EXCELLENT COVERAGE: Conceals any scratches, scuffs, and imperfections on the shoes for a refreshed look.
What We Don't Like
Multiple coats may be necessary for full coverage.
The color may stain on clothes when not washed before drying.
What Buyers Say
"This is a gorgeous gold metallic paint that, when combined with silicone, has produced some amazingly beautiful cells. The value of this bottle is incredible and lasts when you're mixing acrylics for dirty pours. This paint can also be mixed with Flowtrol and silicone for the amazing ability to spread, flow, and huge cells! Recommended."
STRONGLY PIGMENTED: Your shoes will look like real metal when dyed.
VERSATILE: Allow you to use one bottle with various leather items, including shoes, bags, and purses.
QUICK DRY: Allows you to use your shoes in a matter of time without waiting for long. This saves you time and allows for easy, convenient use.
NO FINISHING REQUIRED: You don't need to apply additional coatings or finishes to achieve the metallic appearance.
IDEAL FOR LEATHERS: Unlike other shoe paints/ dyes, this one is specifically designed for leather, enhancing the overall appearance of the leather item.
What We Don't Like
Works for leathers only
What Our Editors Say
“Finding the right shoe Paint or dye for leather shoes can be a real headache, can't it? Many options claim to be the best, but they often fall short on quality, durability, and versatility. That's why we're so glad we found this bronze metallic paint, Leather Dye!
It's seriously the best thing that ever happened to our shoes.
They're now so pigmented and look like real metal. And wait until you hear about the drying time. We were blown away when we only had to wait 4 to 5 hours before we could use our newly dyed leather items. No more waiting for days or even weeks! That's a real game-changer for us.”
EASY TO APPLY: Allow to use without prior painting or dyeing experience.
EXCELLENT COVERAGE: Conceals old and faded color and provides an even and consistent coverage throughout the leather surface.
LONG-LASTING: Provides a durable finish that will last a long time, even with regular use.
COMPLETE SET: You can start using them right away without having to buy anything separately.
SHINY FINISHED: Provides a highly-polished, metal-like finish that gives a glossy appearance to your leather items.
TRUE-TO-COLOR: Ensures that the color you see in the bottle is the same color you'll get on your leather.
What We Don't Like
It may take several coats to get the perfect shine.
What Buyers Say
"Leather dye did an excellent job with scuffs and areas of lost color. Easy application and good results. The service was super, delivering in time to fix shoes before the trip."
EASY TO USE: You can easily apply this Paint even if you are a first-time user.
DURABLE: Ensures that it will not crack or peel when dried.
WATER-BASED: You can wash your hands with soap and water after painting your shoes.
SMOOTH AND EVEN CONSISTENCY: You don't have to worry about brush strokes or other inconsistencies in the final result.
What We Don't Like
It could be better if sold with a brush or sponge.
Not suitable for children
What Our Editors Say
"Angelus Paint is making waves as a top-notch shoe paint brand! We were curious to see what all the fuss was about, and let me tell you; it didn't disappoint! This paint is seriously amazing when it comes to coverage. It flawlessly hides all the scratches and imperfections on our shoes that we were ready to toss in the trash.
Do you know what the best part is? Angelus saved us a ton of money from having to buy new shoes! Our kicks are looking new again, and we couldn't be happier with the results. We highly recommend this product to anyone who wants to breathe new life into their footwear."
STICKS IN MOST SURFACE: You can use it on canvas, glass, metal and paper, ceramics, and textiles.
EASY TO WORK WITH: Whether you're a seasoned DIY-er or a complete beginner, you can give your shoes a fresh new look with a breeze.
INTERMIXABLE: You can mix this Paint with different colors to create custom shades.
SAFE TO USE: This enables your kids to customize their shoes without worry.
COST EFFECTIVE: You can save money by diluting the paint in water without losing its opaqueness.
What We Don't Like
It could be better if its more pigmented
Needs a couple of coats to achieve full coverage
What Buyers Say
"This acrylic Paint in the tube is easy to squeeze out and apply very well. Even if you dilute a little with water, the color is still very good and opaque. When painting, you only need a brush stroke.
If you use it to paint surfaces in plain colors, one layer is sufficient. It can also be mixed well. I would buy this quality again if needed. The paint dries quickly. I really like it.
EASY TO CLEAN: You only need water to clean the brush and your hands after use.
DONT LEAVE STAIN: It makes it easy to maintain your workspace.
COVERS IMPERFECTIONS WELL: Perfect for hiding any blemishes on your shoes and giving them a smooth, polished finish.
OPAQUE AND SMOOTH COVERAGE: Ensures that the paint does not crack or peel over time, making it a durable solution for personalizing your footwear.
SUFFICIENT PAINT SUPPLY: Allows you to complete your projects without running out of materials.
NO CLUMPS: This ensures a smooth, consistent flow, making it easy to achieve professional results.
EASY TO MIX: This makes it perfect for creating custom shades and blending with other colors.
What We Don't Like
One bottle cannot sustain large projects.
Need to apply more than one coat to achieve full coverage.
What Our Editors Say
“We have tried a lot of different bronze paints in the past, but this one really stands out! We were super impressed with how opaque and evenly it covered our shoes. The color just shines on its own without any extra layers needed. And talk about easy to use - the smooth consistency made it a breeze to work with and apply.
Plus, it dried quickly to a tough finish. Bonus points for having enough paint, so we didn't have to worry about running out in the middle of our project. Overall, if you're looking to customize your shoes, this bronze paint is a must-try. Whether you're a DIY pro or want to add some personality to your footwear, it's a great option!”
EASY TO DISPENSE BOTTLE: With its flip-top caps, you can open the bottle easily and securely.
LARGER BOTTLE: You can have enough supplies for painting all your shoes.
RICH PIGMENT: Provides vibrant, long-lasting color that won't fade or crack over time.
SAFE TO USE: Ensures that it won't cause any harm to your skin or the environment.
What We Don't Like
Not for fabric shoes
What Buyers Say
"We love this bronze paint from Sargent Art! The first thing that impressed us was the easy-open bottle. We also like the 16 oz bottle that not only looks great but also gives us enough paint to last a long time, making it a great value for money.
But that's not all; what really stood out for us was how easy it was to use. We didn't use any special tools to apply the paint. The paint also has a smooth consistency and spreads evenly, giving us the professional finish we were looking for. This product is a versatile and reliable choice for any shoe painting project."
TRUE TO COLOR: Ensures that the color you see in the bottle will match the color on your project.
REAL METAL LOOK: Gives a metallic finish that resembles real metal, providing a high-end and sophisticated look to your finished product.
DRIES QUICKLY: Allows you to move on to the next step in your project without waiting long periods.
GREAT COVERAGE: You can ensure that your project is evenly coated and the color is vibrant and long-lasting.
VERSATILE: You can use it on various surfaces, including wood, metal, ceramics, etc.
What We Don't Like
Needs to be shaken well before use
What Our Editors Say
“We have been using the DecoArt Antique Bronze Extreme Sheen Paint, and we're impressed with how well it works. We used it to fix some shoes about to be thrown out, and now they look as good as new! Applying the paint was a breeze - it was as easy as 1, 2, 3, and we didn't sweat.
We've tried other similar products before, but this one stands out because it's true to color. What you see on the bottle is exactly what you get! In terms of quality, it's one of the best! It provides smooth, even coverage that dries quickly and doesn't leave any streaks or brush marks.”
Unlike other brands, this one is easy to apply and dries quickly, ensuring a smooth and even finish every time. With its great coverage and long-lasting finish, it is the ideal choice for anyone looking for a high-quality leather paint that will get the job done right.
Best Bronze Paint for Shoes Buying Guide
With so many options available for bronze paint in the market, it can be overwhelming to choose the right one. That is why it is important to consider some factors to make an informed decision when buying one. Here are some of the things you should take into consideration:
Type of Paint
According to Bill Morgan from Studyinghood, “look for a paint specifically designed for shoes. Paint meant for other surfaces may not adhere well to leather and may not last as long.
Also, opt for waterproof and weather-resistant paint so your shoes will stay looking their best through rain, snow, and other elements.”
Shade of Paint
“When it comes to the color of bronze paint, there are several shades to choose from. The range of colors includes a soft, golden hue to a more burnished and darker option. Depending on your style and the look you want to achieve, you can pick a color that best suits your taste.”
Type of Shoes
Understanding the differences between these paints is important to ensure you are using the right one for your shoes. Bronze paint is not created equal. Some are perfectly suited for leather shoes, and some are better for canvas shoes.
For example, leather shoes may require a more flexible and durable paint, while canvas shoes may benefit from a more absorbent and easy to work with.
Desired Finish
Do you want it glossy or matte? The choice between a glossy or matte finish for your bronze paint will depend on personal preference and the look you want to achieve. It is important to consider the desired finish when choosing bronze paint for your shoes, as it can impact the paint's final appearance, durability, and longevity.
Opacity of the Paint
Consider how opaque you want the paint to be. Some paints may be more translucent, while others may be more opaque. Opaque paint will cover the surface of your shoes more effectively and may require fewer coats to achieve the desired look.
It is also effective at concealing any imperfections or flaws in your shoes, helping to give them a more polished appearance. Whether you want a bold and vibrant look or a more natural appearance, considering the opacity of the paint can help you achieve your desired outcome.
Dry Time
Also, consider how quickly you want the paint to dry. Some paints may dry quickly, while others may take longer to cure. This factor is important, especially to those in a hurry who need their shoes to be ready for use or wear as soon as possible.
Quick-drying paints are also useful for those who are painting their shoes in stages and must apply multiple coats quickly.
Ease of Use
Choosing a paint that is easy to apply, clean up, and use with the tools and techniques you are comfortable with is important. This will help ensure you achieve the best possible results and have an enjoyable experience.
Shoe Bronze Paint FAQ
What is the best bronze paint recommended by experts?
According to Hiba from Animeshoes, “in my opinion, one of the best bronze paints for shoes on the market is Angelus Acrylic Leather Paint. This paint is highly pigmented, quick-drying, and water-resistant, making it a great choice for painting shoes.”
Can I clean my shoes after they have been painted with bronze?
Yes, you can clean your painted shoes, but it is important to use a gentle cleaner and avoid harsh chemicals that can damage the paint. Some safe cleaners for your painted shoes include mild soap and water, a soft cloth, and a gentle cleaner designed on painted surfaces.
Can I apply more than one coat of bronze paint to my shoes?
Yes, you can apply multiple coats of bronze paint to achieve the desired opacity and finish. However, it is important to allow each coat to dry completely before applying additional coats to prevent any runs or drips.
Why Trust Glytterati?
Our team of editors is passionate about art and craft projects, so we only recommend products that we genuinely believe in. We provide honest, unbiased reviews of the best art supplies, and we often consult with industry experts to make our content professional and friendly, even for beginners. So if you're looking for new ways to improve your creativity, we can help!
]]>
https://glytterati.com/blogs/articles/best-airbrush-for-shoe-painting2023-02-15T21:06:37-08:002023-02-15T21:06:38-08:0013 Best Airbrush for Shoe Painting In 2023: Reviews & Buying GuideJoshLevi Soriano
Shoe customization has been on the rise in recent years, and airbrushing is one of the most popular techniques for adding unique designs to sneakers and other footwear. Whether you're a professional artist or just starting out, our guide will provide you with everything you need to know to make an informed decision.
We recommend the best products that we believe will offer value for our readers —learn more about our review process. If you buy through links on our site, we may earn a small commission at no extra cost to you.
Are you looking for the perfect airbrush to create intricate designs on your shoes? Look no further! In this blog post, we'll be compiling the top airbrushes that are perfect for detail-oriented shoe painting. From fine lines to precise shading, these airbrushes will help bring your vision to life.
Whether you're a professional shoe artist or just starting out, these top picks will help you achieve the highest level of precision in your work. So read on and get ready to discover the best airbrushes for detail-oriented shoe painting!
GREAT FOR BEGINNERS: Includes all the necessary components and equipment for airbrushing and has easy-to-follow instructions for setup and use.
EASY TO HOLD: This makes it perfect for those just starting out.
QUIET OPERATION: You can use it without disturbing others around you.
GREAT PRESSURE: You can get a deep cleanse without having to scrub too hard.
COMPACT: You can bring and store it easily.
What We Don't Like
No air pressure gauge
What Our Editors Say
What we like about this airbrush is the accuracy it offers. It has a dual-action trigger that allows you to control the amount of paint and air applied to the surface. This allows for very precise and consistent results. The nozzle is also adjustable, which helps to control the spray pattern.
We also love the automatic shut-off feature that shuts off after a period of inactivity. This feature helps to conserve energy, as well as protect the components of the airbrush from overheating or damage.
EFFICIENT AIRFLOW SYSTEM: Cuts down on the amount of noise it generates so you can work quietly
SOFT GRIP HANDLE: Makes the airbrush comfortable to hold and prevents hand cramps
HIGH-QUALITY NEEDLES: Increase efficiency and reduce the time and effort required for each project.
ACCESSIBLE TIP AREA: Allow you to clean the dried paint easily
What We Don't Like
A bit expensive
What Buyers Say
"I love everything about this airbrush. Best purchase ive ever made! Easy to clean and reassemble. The grips also stop my hand from cramping! Even better than the Iwata I used, especially because the parts can be replaced without having to specifically buy grex pieces like you have to with Iwata."
EVEN FLOW: Ensures a smooth, consistent application of paint or other materials
PRODUCES FINE LINES: Helps you in creating intricate designs and details.
QUIET COMPRESSOR: Makes it easy to use the airbrush without disturbing others or disrupting the work environment.
WATER SEPARATOR: Helps to prevent moisture from entering the airbrush and causing problems with the paint application
ADJUSTABLE PRESSURE REGULATOR: Allows you to control the airflow, making it easy to achieve the desired spray pattern.
AIRBRUSH HOLDER: Keeps your airbrush organized and easily accessible.
COMES WITH ACCESSORIES: You can get everything you need to get started including a gravity feed airbrush, siphon feed airbrush, and three interchangeable airbrush tips.
What We Don't Like
Lacks air tank
Could have better instructions
What Our Editors Say
“Like every user says, this airbrush is a game changer! We were impressed by the versatility of this airbrushing kit. With its range of features and capabilities, we could use it for a wide range of projects and applications, not just for painting shoes but also for customizing clothing.
Another factor that sets this kit apart is its quiet air compressor, which helps us focus on our artwork without disturbing those around us. And most importantly, we love the adjustable pressure regulator allowing us to control the airflow and produce fine lines and intricate designs with ease.”
DUAL ACTION AIRBRUSH: Provides better control and precision for your airbrushing projects.
3 PIECE HEAD SYSTEM: Includes needle cup, nozzle cup, and fluid nozzle that allows you to switch between different spray patterns for different projects.
EASY TO USE: With its user-friendly design and simple controls, even beginners can start using the G22 airbrush with ease.
CONSISTENT RESULTS: Ensures a consistent paint flow, resulting in more consistent and uniform coverage.
ADJUSTABLE NEEDLE/NOZZLE: Allows you to switch between different spray patterns and fine-tune the airbrush for specific projects.
EASY TO CLEAN: It is easy to disassemble and clean, allowing you to quickly switch between different colors and keep the airbrush in top condition
What We Don't Like
Occasional air hissing from the tip
Smaller paint cup compared to other airbrush models
What Buyers Say
"This is a great airbrush. Love how easy it is to use and very easy to clean. The only issue I had was cleaning the valve; I snapped it the first time cleaning it. So just don't over-tighten it. But I would recommend this one to anyone."
WIDE RANGE SPRAY PATTERNS: Features three different nozzle sets (0.2, 0.3 & 0.5mm needles, fluid tips, and air caps), providing improved performance and versatility.
SPRAYS WELL: This enables you to achieve greater accuracy and precision, allowing you to create the exact results you want.
EASY TO MAINTAIN: The cutaway handle allows for easy cleaning and maintenance, reducing downtime and prolonging the lifespan of the airbrush.
EXCELLENT VERSATILITY: Works for various applications, from hobby and craft projects to professional uses such as illustration, graphic arts, and cake decorating.
USER-FRIENDLY DESIGN: The ergonomic design and comfortable grip make it easy to use for extended periods, reducing hand fatigue and improving your overall experience
What We Don't Like
Has a smaller paint cup compared to other airbrush models
The needle may lose over time due to disassembling.
What Our Editors Say
“When choosing an airbrush system, it is no secret that the ease of use is next to the quality. The Master Airbrush Master Performance G233 Pro Set stands out when it comes to that factor. We love the cutaway handle that prevents our hands from slipping while using this product. Maybe it's not a big deal for some people, but it's a huge plus for us.
The smooth operation makes it a pleasure to use, and the ability to change colors quickly and easily is a real game-changer. The ease of cleaning is another standout feature that sets this airbrush apart from others.”
EASY TO ASSEMBLE: The quick-release connector allow you to quickly switch between tasks or clean the airbrush.
VERSATILE: With its 3 different nozzle sets (0.2, 0.3, and 0.5mm), you can use it for many applications, from fine detail work to more robust coverage.
CONSISTENT FLOW: Allow you to control the application of paint easily.
DUAL ACTION TRIGGER: Provides control over air and color flow, enabling you to create fine detail and shading.
LIGHTWEIGHT: Makes it easy for you to handle the airbrush for extended periods.
AFFORDABLE: Provides quality results without breaking the bank
What We Don't Like
Steep slope on the needle
Requires some knowledge to achieve great results
What Buyers Say
"This set works great, as good as products five times its price. Customer service is excellent; they stand behind the product with a two-year warranty. This product is for you if you want a versatile airbrush that works great and does not break the bank."
ADJUSTABLE FLUID FLOW: Allows you to have precise control over the amount of fluid being released from the airbrush.
BETTER AIR FLOW: Allows you to have improved airflow through the airbrush, resulting in a smoother and more consistent paint application.
BUILT IN TEFLON O-RING: Helps prevent leaks and increases the overall durability of the airbrush.
NO CLOG: Allows for uninterrupted use and reduces the need for frequent cleaning.
What We Don't Like
The thick paint may won’t push through the airbrush tip
What Our Editors Say
“This compact airbrush saved all our shoes from ending up in the storage box. With this product, we can easily add unique designs and personal touches to our shoes. We love how it has elevated our shoe game and allowed us to express our creativity.
Because of the adjustable flow feature, we no longer have to worry about the paint being too thick or too thin. As a result, our projects come out looking flawless every time. The ease of use and reliability of this airbrush has left a spot in our hearts, and we feel confident in recommending it to others.”
EASY TO CLEAN: Reduces workload allowing you to get back to your projects quickly.
RESPONSIVE TRIGGER CONTROL: You can achieve accurate and precise lines and details, reducing the need for touch-ups and corrections.
STURDY BUILT: You can ensure that this airbrush will last longer of use.
WORKS WELL WITH ACRYLIC PAINTS: Allows you to paint your shoes without having a problem with paint compatibility.
NOT PRONE TO CLOGGING: This can save you time and effort in cleaning and maintenance, allowing you to work more efficiently and effectively.
What We Don't Like
No air hose included
What Our Experts Say
According to Thomas Foster, a Community Manager at Facialteam, "as a shoe painting hobbyist, I've had the chance to test out several airbrushes currently available on the market. That said, the Badger Airbrush Co Patriot 105 is the airbrush I usually use.
What sets it apart from its competition is the fact that it's appropriate for both experienced artists as well as those just beginning out with shoe painting. It's great for beginners because it is so adaptable and simple to use."
EASY TO ASSEMBLE: It includes an instruction manual that explains all the steps required for assembly making the process a breeze.
QUIET COMPRESSOR: You can perform airbrushing even with someone sleeping in the same room.
COST EFFECTIVE: It works with diluted acrylic paint, so you can simply use a bottle of paint to create more acrylic paint.
SPEED SELECTION: Comes with three different speeds allowing you to control the airflow according to the project you are working on.
EASY TO OPERATE: With the size of a pen, you can easily hold this for better airbrushing.
What We Don't Like
It may not work with thick paint.
The pump doesn't have a tank.
What Our Editors Say
“We're so glad we purchased this airbrush kit! It's very easy to use, and the results are amazing. The compressor has great power, and the airbrush itself is very precise. The pressure is just right, and we haven't encountered any problems with the airflow control.
It's also very easy to clean, which is a huge plus. The build quality is solid, and it's been holding up well even after frequent use. But what we like the most is the three perfect nozzle sizes that allow us to create a variety of spray patterns with ease. Additionally, the nozzle is easy to change, so we can switch between different sizes with minimal effort.”
WORKS ON MOST PAINT SPRAY MEDIA: You can use this airbrush on various types of paint and mediums, making it versatile and suitable for different projects.
LIGHTWEIGHT: Makes it easy to handle and operate, reducing user fatigue during long periods of use.
AUTOMATIC OFF FEATURE: Automatically turns off after a certain period of inactivity to ensure users' safety.
INCLUDES AIRBRUSH HOLDER: Provides a convenient place to store the spray gun when not in use.
CONSISTENT FLOW: Allows you to have a light to heavy spray according to your needs.
What We Don't Like
Not suitable for thick paint.
Lack of pressure adjustment from the compressor
What Buyers Say
“I am enjoying my airbrush kit. I purchased design canvas bags and t-shirts. The only thing I had to buy was paint. I pretty much got everything I needed to start my new craft for under $100. this airbrush kit is perfect for me since I’m a beginner. It’s small, easy to set up, and easy to use.”
GREAT FOR BEGINNERS: The unit has three modes chosen from low, medium, and high, making it easy to adjust the pressure to suit their needs.
COMPLETE STARTER KIT: The set comes with everything you need, such as an airbrush, battery compressor, charging cord, cleaning brushes, and more.
SOLID CONSTRUCTION: Unlike any other airbrush on the market, this airbrush is built to last.
PORTABLE: Allow you to bring it wherever you go.
EASY TO CLEAN: You can clean this airbrush gun using just a mix of Temptu cleaner and alcohol.
RECHARGEABLE: You can use your airbrush for extended periods without having to worry about replacing batteries.
What We Don't Like
Includes only 1 nozzle in the set
What Our Experts Say
Veronica, the COO of Everyday Power, stated, "this multifunctional kit works well on different media such as shoes and metallic objects. It can deliver up to 32 PSI, so the color will stay with the medium.
The metal components are also made of high-quality materials, so they won't easily rust or deteriorate. The best thing about this is that the kit is very easy to clean, so your work area will be less messy. Overall, this is a really good set for shoe painting.
RECHARGEABLE: This saves you money and is more environmentally friendly as you are reducing the need for disposable batteries.
EASY TO CARRY: You can take it with you to a friend's house for a creative shoe painting session.
NO COMPLEX CLEANING REQUIRED: You can wash it with water and solvent using a brush.
MULTI-PURPOSE: You can use it not just for shoe painting but also for cake decoration and manicures.
What We Don't Like
A bit more expensive than more quality airbrushes
What Editors Say
“We love this airbrush because its compact design makes it easier to store and bring anywhere we go. With its versatility, we not only use it with paint but also for makeup, which is a great bonus. Its rechargeable feature is also a plus, making it more environmentally friendly and cost-effective.
However, its mini compressor and short battery life may not be enough for larger projects. Despite these challenges, the ease of use, versatility, and portability make this airbrush great for artists and hobbyists who value convenience and mobility.”
STRONG COMPRESSOR: Allow you to complete your project faster and achieve better results.
CONSISTENT FLOW: Helps to achieve a smooth and even spray, leading to more precise and professional results.
COMFORTABLE TO HOLD: Allows you to use it for extended use without discomfort.
QUIET AIR TANK: Allow you to have a pleasant and stress-free work environment.
MOISTURE FILTER: Ensures that the paint remains free of contaminants and that the airbrush functions properly.
What We Don't Like
Way more expensive than other similar products
The lack of a regulator on the compressor
What Our Editors Say
“This product is one of the most impressive airbrush sets we've tried. Although the price tag is way more expensive than others, it's worth the money. The first thing we like about this product is its quiet operation. We like that we can work at night even when everyone is sleeping.
We also love how consistent the paint flows producing clean and even strokes. This is especially important for fine details and intricate designs. But what we lie the most is the high quality compressor that is built to last.”
Final Verdict
In this roundup, the Master Airbrush Multi-Purpose Airbrushing System Kit took the cake for the best overall title. This is because the kit includes all the essentials for airbrushing, along with easy-to-follow instructions that make it ideal for those just starting out.
The ergonomic design of the airbrush makes it comfortable and easy to use. You can also operate this tool without disrupting those around you since it has a quiet motor. Additionally, its pressure is perfectly balanced so that you don't need to scrub too hard to get a deep cleanse.
Best Airbrush for Shoe Painting Buying Guide
Buying an airbrush for shoe painting can be tricky. You have to consider some factors in order to ensure that you select the right airbrush for your needs. Here are the important factors to take note of:
Purpose
Determine what type of airbrushing you want to do, such as fine detailing, large-area coverage, or general airbrushing. This will help you choose the right airbrush for your specific needs.
If you are working with fine details, you will want to look for an airbrush with a small nozzle that allows for precise control and accuracy. On the other hand, if you are airbrushing large areas, you may want to consider a larger nozzle for quicker coverage.
Control
Consider the level of control you want over your airbrushing. Do you need adjustable pressure and flow, or do you want a more straightforward design? Look for an airbrush that offers the right level of control for your needs. An airbrush with adjustable pressure and flow control will allow you to fine-tune the flow of paint to achieve the desired results.
This type of airbrush is ideal for experienced airbrushers who want to have complete control over their projects. However, if you are just starting out, you may prefer a more straightforward design that is easier to use. In this case, a single-action airbrush that operates with a simple trigger mechanism may be the better choice.
Paint Compatibility
Ensure that the airbrush you select is compatible with the type of paint you plan to use. Different airbrushes are designed for use with different paint types, so choose carefully. Some airbrushes may not be compatible with thicker paints, such as those used for fabric or shoe painting.
Be sure to check the manufacturer's specifications to ensure that the airbrush you choose is suitable for the type of paint you plan to use. This will help you achieve the best results and ensure that you are using your airbrush safely and effectively.
Comfort
Look for an airbrush that is comfortable to hold and use for extended periods of time. A lightweight design is preferable for reduced fatigue during extended use. You can find some airbrushes that are designed with ergonomics in mind, featuring a comfortable grip and a balanced weight distribution to minimize hand fatigue.
Cleaning and Maintenance
Consider the ease of cleaning and maintaining the airbrush to keep it in top working condition. A design that is easy to clean and maintain will help you get the most out of your airbrush over time. Look for an airbrush with a removable needle and nozzle for easy cleaning and one that can be disassembled easily for more thorough cleaning.
Budget
Airbrushes can range in price from less than $10 to over $1000, so determine your budget and select an airbrush that meets your needs while also fitting within your budget. Remember that a less expensive one doesn't mean it is of lower quality, as some budget-friendly airbrushes can still perform well for basic or occasional use.
On the other hand, more expensive airbrushes may have additional features, higher build quality, and better performance, making them ideal for professional or frequent use. It's important to find a balance between price and performance that meets your specific needs.
Shoe Painting Airbrush FAQ
Can I use regular paint with an airbrush for shoe painting?
While regular paint can technically be used with an airbrush for shoe painting, it is important to thin it down to a consistency similar to skim milk and strain out any large particles that could clog the airbrush.
This is because regular paint is too thick to be used with an airbrush. If possible, it is better to use a thinner paint specifically made for airbrushing. This type of paint is formulated to flow smoothly through the airbrush and provide an even application without clogging.
What is the best paint for an airbrush for shoe painting?
There are several paints you can use for airbrush; however, acrylic is the most widely used
due to its versatility, fast drying time, and ease of clean up. It also comes in a wide range of colors and is suitable for various surfaces.
Acrylic paint is also water-based, making it less toxic and easier to clean up than oil-based paints like enamel. Additionally, it is less expensive than other airbrush paints, making it a popular choice for hobbyists and artists.
What is the most effective way to clean the airbrush?
The most effective way to clean an airbrush will depend on the type of paint used and the buildup in the airbrush. For oil-based paints, you can use mineral spirits or lacquer thinner. For water-based paints, use water or a specialized airbrush cleaner.
You can soak the airbrush parts in a container filled with solvent or cleaner to help loosen any dried paint and make it easier to clean. You can also use small brushes or picks to clean hard-to-reach areas, such as the nozzle and paint cup.
Important reminder: It's important to note that some solvents can damage certain airbrushes, so check the manufacturer's instructions before using any cleaning method.
Why Trust Glytterati?
Our team of editors is passionate about art and craft projects, so we only recommend products that we genuinely believe in. We provide honest, unbiased reviews of the best art supplies, and we often consult with industry experts to make our content professional and friendly, even for beginners. So if you're looking for new ways to improve your creativity, we can help!
]]>
https://glytterati.com/blogs/articles/best-fabric-paint-for-shoes2023-02-09T23:23:42-08:002023-02-13T07:16:38-08:0010 Best Fabric Paint For Shoes In 2023: Reviews & Buying GuideJoshLevi Soriano
When it comes to customizing shoes, fabric paint is a must-have tool. However, with so many options on the market, it can be difficult to find the best paint for your project. We've compiled a list of the top fabric paints for shoes to make your decision easier. Whether you're a professional artist or a hobbyist crafter, these paints offer the perfect blend of versatility, ease of use, and vibrant color options.
We recommend the best products that we believe will offer value for our readers —learn more about our review process. If you buy through links on our site, we may earn a small commission at no extra cost to you.
24 BOTTLES IN A SET: You will never run out of color options to experiment with different designs and styles.
WIDE VARIETY OF COLORS: Offers endless possibilities for customizing shoes and other fabrics.
NON-TOXIC: Allows you to paint shoes without worrying about harmful chemicals.
BRIGHT COLORS: Provides vibrant and intense hues, perfect for creating eye-catching designs.
QUICK DRY: Makes it easy to work with and allows you to finish your projects in a short time.
What We Don't Like
Requires dilution
A bit more expensive than other similar products
What Our Editors Say
“We like this product because of the sufficient number of bottles included in the set, providing an extensive range of colors to choose from. Imagine a 24 bottles color palette; with each bottle containing a different shade, you can create endless possibilities for customizing shoes and other fabrics.
We also love that the paint is non-toxic, which makes it safe to use and perfect for projects that come in contact with skin. The bright and vibrant colors thrill us whenever we use these shoe paints to customize our shoes. It's amazing to see the transformation of a plain white sneaker into a one-of-a-kind work of art.”
WIDELY USED: Allow you to use it on different surfaces such as wood, fabric, ceramics, and more.
GREAT COLOR SELECTION: You can easily match any color scheme or create unique designs.
STICKS WELL: Ensures that your finished project will have a smooth and even finish without the risk of the paint chipping, peeling, or flaking off.
PIGMENTED: Ensures that your finished project will have a vibrant color that will not fade or lose its intensity over time.
What We Don't Like
Requires thinning
What Our Experts Say
According to Mark from ParentalQueries, "I've been an avid DIYer for years and have used fabric paint on almost everything. My most recent project was using the best fabric paint for shoes to give my old sneakers a new life. After trying out a few different brands, I found that the DecoArt Americana line of paints worked the best.
They didn't smudge or rub off, and the colors were still vibrant after wearing them for a couple of weeks. The vibrant colors and washable, non-toxic formula made it easy to achieve my desired look. Plus, it was incredibly durable and stayed looking great even after multiple wears and washes."
WIDE RANGE OF COLOR OPTIONS: Includes 24 vibrant and true-to-color shades that allow for a wide range of creative possibilities.
NO THINNING REQUIRED: Eliminates the need for additional preparation and saves time and effort.
NO HARSH ODOR: This makes it a great option for people who are sensitive to strong odors or have respiratory issues.
VERSATILE: It works well on various surfaces, including fabric, paper, and canvas.
What We Don't Like
Duplicated colors
Not for beginners
What Buyers Say
"I am very happy with the quality. I am able to paint right out of the bottle with no modification. I have not had any clogs, and the paint goes smoothly with vibrant colors. There is also a great color choice, so this paint will last me a long time.
While it comes with cleaner, it does go fast. If you are new to airbrushing, be sure to purchase cleaner. Overall I am very happy and would purchase again."
EASY TO USE: With no heat, this paint set is easy for both beginners and experienced crafters.
STAYS VIBRANT: Ensures your designs remain bright and beautiful even after multiple washes.
SEMI TRANSPARENT: Allow you to use it on synthetic and natural fabrics.
MANY COLOR SELECTIONS: It makes it easy to match the color of your fabric.
VIVID COLORS: Highly pigmented and vibrant, providing a rich and long-lasting finish.
What We Don't Like
Looks and feels rubbery after dry
It may not work with darker fabrics
What Our Experts Say
As stated by Heather Welch, the Resource Manager at Ukulele Tabs, it can be tough to choose a good fabric paint for shoes. I've used a couple of different ones before and find that some just do not cut - especially when it comes to shows or fabrics that are not "conventional" or "traditional."
I only recently discovered a brand known as Magicfly and decided to try their metallic fabric paint. It's definitely worth it. You don't need to heat the paint, and it's really permanent - even washing the shoes afterward does not cause the paint to come. Off."
FOR CRAFTERS OF ALL SKILL LEVELS: Perfect for beginners and experienced crafters alike.
EASY TO DISPENSE: Makes it easy to control the amount of paint dispensed, ensuring a clean and precise application.
CRACK RESISTANT: This makes it ideal for fabrics that will be stretched or moved often.
BRIGHT COLORS: Provides a bold and vibrant finish.
NO DUPLICATE COLORS: Ensures you have a wide range of options to choose from.
What We Don't Like
Takes too long to dry
Bottles are not as big as similar products
What Our Editors Say
“When choosing the best paint for fabric, we first look for ease of use. Finding out the bottles are easy to dispense made us happy, as it allowed us to apply the paint smoothly and evenly without any mess or fuss.
The easy squeeze bottle made it easy to control the amount of paint being applied, allowing for more precise coverage. The result was a professional-looking paint job that exceeded our expectations. We highly recommend this product to anyone looking for a high-quality, easy-to-use paint solution that delivers great results.”
SAFE TO USE: It conforms to ASTM D-4236 safety standards, making it safe for adults and children.
WORKS ON MOST MIXED MEDIA: You can use it with any surface, including fabric, paper, and canvas, allowing for a wide range of creative possibilities.
WATER-BASED: Makes it easy to clean up and maintain, eliminating the need for harsh chemicals or solvents.
PROFESSIONAL-GRADE: Provides high-quality, consistent results, making them a great choice for both professional artists and hobbyists.
What We Don't Like
Requires a little thinning
Requires knowledge about mixing
What Buyers Say
"I just started using an airbrush and didn't know what brand to buy, but after reading the reviews, I'd try them. The variety of colors is greatly purchased, both primary and secondary. After using them, they work great, the cover we'll dry quickly, and most of all don't need to use a reducer; just shake the paint, add it to the airbrush, and away you go."
WATER RESISTANT: Ensures a long-lasting finish on your shoes.
COLOR CHANGING PAINT: Allows the color of the shoes to change in response to different temperatures or lighting conditions.
INCLUDED 6 LARGE BOTTLES: Allow you to create a wide range of colorful designs and projects.
GREAT VERSATILITY: Works for various surfaces, including shoes, wood, paper, and canvases.
WATER-BASED: These paints are water-based, making them easy to clean up and safe for use on most surfaces.
What We Don't Like
A bit sticky, making it hard to apply when using cotton
What Our Editors Say
“This product made us feel young again. The color-changing feature brings us joy whenever we go for outdoor activities. The water-resistant feature is also a plus, as we don't need to worry about the paint fading when exposed to rain.
The long-lasting finish ensures the shoes will maintain their look and function for a long time. Overall, we highly recommend this product to anyone who likes transforming their shoes to the next level!”
EXCELLENT CONSISTENCY: Gives precise and smooth coverage.
COLOR STAYS BRIGHT: Provides a long-lasting vibrant color even when exposed to elements.
QUICK DRY: You can move on to your project's next step without waiting for long hours.
WIDE APPLICATIONS: Makes its perfect for DIYers.
WATER PROOF PAINT: Protect shoes from water and moisture, which can cause discoloration, staining, and damage to the fabric
What We Don't Like
A little bit patchy
The tubes could be bigger.
What Buyers Say
"This is an amazing fabric paint set. It includes six different sizes of brushes, twelve colors, and one palette. The colors are vibrant and do not fade after wash."
ARRAY OF COLORS: With a pack of 24 tubes, you'll never run out of color options, making it perfect for transforming your shoes to a new level.
EASY TO BLEND: Minimizes mistakes and allows for smooth and seamless application.
CAN BE USED FOR VARIOUS SURFACES: Allows you to use it on various surfaces, including leather and cloth, making it perfect for all shoe customization projects.
BEGINNER-FRIENDLY: Makes it easy for anyone to use, even those who are new to shoe customization.
CREAMY AND RICH COLOR: Provides a vibrant color, resulting in a professional-grade finish.
What We Don't Like
Some colors are different from what should be in the package.
The tubes are not full all the way.
What Our Editors Say
"We love these fabric paints because we can use them easily. Unlike any other similar products that are watery, this one has a creamy consistency that makes it easy to blend. The vibrant colors are also a huge plus, allowing us to be more creative.
We also love that we can use them on various surfaces, including leather and cloth. Whether we're adding some personality to our everyday sneakers or creating a one-of-a-kind pair for a special occasion, this set has done it all.”
MANY COLOR OPTIONS: You can choose from primary colors to more advanced shades such as beige and hot pink.
KIDS CAN USE: Allow you to do other chores instead of supervising your kids when painting their shoes.
BOLD AND THICK COLORS: Allow you to get vibrant and bold results.
ACRYLIC FINISHER: Provides added durability and protection to your shoe paint.
SUITS ANY SURFACE: Allow you to use them on fabric and leather items.
What We Don’t Like
The tubes could be larger.
What Our Editors Say
“This product gives us so much joy because, aside from the array of colors available in the set, it brings us peace of mind knowing that our kids can use these paints safely. This was beneficial to us, as we didn't have to babysit while they were painting their shoes.
We also love this shoe paint set because we can paint almost all kinds of shoes in our house without having issues with compatibility. The paint sticks to any surface, from fabric to leather. However, we find out that the paint easily peels off when it is incorrectly applied. We solved that by ensuring the surface was clean and dry before applying the paint.”
Final Verdict
After thorough research, it is clear that OPHIR Acrylic Airbrush Paint is the best overall choice for fabric paint for shoes. This paint is widely used, allowing you to use it on different surfaces such as wood, fabric, ceramics, and more. This makes it versatile and suitable for different projects.
Aside from its excellent versatility and high quality, it also stands out from its rival because of its comprehensive package of 24 bottles in a set. This gives you a wide variety of color options to experiment with different designs and styles. The quick-drying formula of the paint also makes it easy to work with and helps you finish your projects in a short time.
Best Fabric Paint For Shoe Buying Guide
When it comes to fabric paint for shoes, you should consider a few factors before making your purchase. Here are some of the important ones:
Quality of the Paint
The first and most important factor to look for in fabric paint is quality. High-quality fabric paint will be less likely to fade, crack, or peel over time, so your shoes will maintain their look and function for longer.
Also, high-quality paint will be more resistant to water, which means that the paint will not come off or fade when the shoes are exposed to water. This is especially important if you plan to wear the shoes in wet conditions. Lastly, high-quality paint will also provide a smooth finish, giving your shoes a professional look.
Range of Colors
A wide range of colors will give you more options and flexibility when customizing your shoes. For example, if you want to add a pop of color to your shoes, it's important to have many options to choose from.
In addition, if you plan on creating a specific design or pattern, having many colors at hand will allow you to create a more intricate and detailed design.
Versatility
Before buying fabric paint, check if the fabric paint is suitable for different shoes and fabrics. This will give you more flexibility when customizing your shoes, as you won't have to limit yourself to certain types of shoes or fabrics.
Additionally, versatile fabric paint will also be suitable for indoor and outdoor use, which means you can use it to customize shoes for different occasions and purposes. This will save you time and money as you won't have to buy multiple types of paint for different projects.
Safe to Use
You need to find a fabric paint for shoes that is safe to use because some paints may contain harmful chemicals that can cause skin irritation or other health problems. Using paint that is not safe for use on fabrics can damage your shoes and make them less durable.
To determine if fabric paint is safe, check the product label for information about its ingredients and any warnings or precautions. It would be helpful to look for fabric paints specifically designed for shoes and labeled as safe for use on fabrics.
Type of Paints
It is also important to consider the types of fabric paint for shoes because they have different properties and are suitable for different projects. Each type of paint has advantages and disadvantages, and choosing the right one is essential to achieve the desired results.
Water-based acrylic paint: It is a water-based paint that is easy to use, dries quickly, and is available in many colors. It is suitable for canvas shoes, leather, and synthetic materials. It is easy to clean and can be thinned with water to create a transparent effect.
Fabric dye: Fabric dye is used to change the fabric's color. It can be used to create a variety of effects and is available in a wide range of colors. However, it may not be as durable as some other types of paint.
Fabric markers: These are pens filled with fabric paint and used to create fine lines and detailed designs. It is suitable for leather, fabric, and canvas shoes.
Fabric spray paint: This shoe paint is sprayed onto fabric and is available in many colors. It dries quickly and can be used to create a variety of effects. However, it may not be as precise as other types of paint. It can also be used for leather, rubber, fabric, and canvas shoes.
Fabric Paint for Shoes FAQ
What type of paint should I use for painting my own shoes?
Acrylic paints are a great option for painting shoes. They are water-based, easy to use, and dry quickly. They are also suitable with many surfaces, canvas, leather, and synthetic materials.
Is spray paint good for shoes?
Spray paint can provide quick and even coverage on shoes, and it can be used to create a variety of effects. However, It can be difficult to achieve precision and control with spray paint, and it can be challenging to paint intricate designs or patterns.
It's also important to remember that some spray paints contain chemicals that can damage or weaken the fabric of the shoes, so it's best to choose a spray paint formulated for use on fabrics.
Is fabric shoe paint exclusively for fabric only?
Fabric paint is primarily designed for use on fabric materials, such as cotton, polyester, nylon, and canvas. However, some fabric shoe paints can be used on other surfaces, such as rubber and leather shoes.
The key is to check the product information and the manufacturer's recommendations, as some fabric paints may not be suitable for certain surfaces. Some fabric paint may not be flexible enough for rubber shoes and may not adhere well to leather or synthetic materials.
Why Trust Glytterati?
Our team of editors is passionate about art and craft projects, so we only recommend products that we genuinely believe in. We provide honest, unbiased reviews of the best art supplies, and we often consult with industry experts to make our content professional and friendly, even for beginners. So if you're looking for new ways to improve your creativity, we can help!
]]>
https://glytterati.com/blogs/articles/valentines-nails2023-02-02T21:47:43-08:002023-02-02T21:47:43-08:0017 Valentine's Nails Design: Romantic and Chic Manicure IdeasJoshLevi Soriano
Valentine's Day is approaching, and it's the perfect time to show off your love and affection to your significant other and yourself. Treat yourself to a mani-pedi session, and take the time to choose the perfect Valentine's Day nail design that will make you feel confident, beautiful and stylish.
Valentine's Day is just around the corner, and it's time to start thinking about how you will stand out in the eyes of your special someone. One way to do that is by showing off your stylish nails! Whether you're going out on a romantic date or want to add a touch of love to your everyday look, we've got you covered.
So let's dive in and look at some of the best Valentine's Day nail ideas that will make your heart flutter!
Valentine’s Nails Design
1. Negative Space Hearts
The Negative Space Hearts nail design is a unique and stylish way to show off your love this Valentine's Day. This design features a modern and minimalist approach, using negative space to create the iconic heart shape. The design is simple yet eye-catching, making it perfect for those who want to make a statement without being too bold.
You can achieve this design by leaving a small section of the nails unpainted, creating a negative space that takes the shape of a heart. It's a great way to show off your love and affection stylishly.
2. Picture-Perfect Red Nails
The Picture Perfect Red nail design is a classic and timeless option that will never go out of style. The design is simple yet elegant, with a high-gloss finish that will leave your nails polished and professional.
The solid red color creates a bold and striking look that is perfect for those who want to make a statement without additional designs. The color red will make your nails pop and will complement any outfit. If you want to make it more stylish, you can add rhinestones, just like in the picture above.
3. Small Red Hearts Design
What could be more lovely than cute hearts painted on your nails, adding a touch of romance and love to your everyday look? Whether you're going out on a date or running errands, these small hearts will add a touch of charm and elegance to your nails, making you feel extra special.
This design is done by coating your nails with white nail polish as a base and drawing small red hearts on them. To achieve the perfect look, make sure to dry the base coat first before designing. Whether you're going for a romantic dinner or a casual hangout with friends, this charming and whimsical nail design will never let you down.
4. Candy Hearts Pink Nails
While everyone is wearing red nails on Valentine's Day, stand out with the playful and whimsical Candy Hearts Pink nail design. This unique design features a pink base, with cute and colorful candy hearts scattered across the nails. The design is perfect for those who want to add a touch of sweetness to their look this Valentine's Day.
The candy hearts in different shades of pink will make your nails pop and complement any outfit. So, keep out your red nail polish and try this unique design!
5. Black and Silver Heart Nails Design
If you want a unique and sophisticated way to show off your nails, the black and silver hearts design is the way to go! This features a sleek and modern black hearts on top of silver polish base.
The hearts are clean and simple, making them perfect for those who want to add a touch of elegance to their nails without being too flashy. You can easily create this beautiful and unique design with just a few basic nail art tools, such as a small brush, nail polish, and a steady hand.
6. Light Pink French Tips
If you want something classic, elegant, and feminine, the Light Pink French Tips nail design is perfect for you. This french manicure features a classic French tip with a modern twist, using a soft and feminine pale pink color that adds a touch of romance to the nails.
You can achieve this design by coating your nails with clear polish and combining pink and white nail polish to create the French tip. The light pink color gives a subtle and delicate touch, making it perfect for those who want to add a touch of romance to their nails without being too extravagant.
7. Gel Red Ombré
Ombre will never get old when it comes to nail design. On this Valentine's Day, why not add a touch of love and romance to your nails with this beautiful and unique red ombré design created with gel? This design is perfect for those who want to show off their romantic side while still being on-trend and unique.
The gradient, fade, and playful look will surely turn everyone's heads to you. This design is not hard to achieve. All you need is a base coat, red nail polish, a sponge or ombre brush and a top coat, and you're good to go!
8. High-Shine Nails
Take your nails to the next level with this dazzling design that will leave your date speechless. Imagine how the light catches the shine of your nails, creating a mesmerizing effect that is sure to impress.
The secret to this design is the high-shine topcoat that gives your nails an ultra-glossy finish. This design's sleek and minimalist look is perfect for those who want to make a subtle yet elegant statement. So, if you want to add some shine to your Valentine's Day look without going too over the top, this High-Shine Nail design is for you.
9. Love Soft Pink Nails
Gives your nails a refreshing feminine look with this love pink nail design. In this design, you need different shades of pink. The process involves painting each of your nails with different shades of pink to create a unique effect that will make your nails look effortlessly chic.
You can add little heart shapes to compliment it to make it more Valentine's inspired. Be ready to get some love and compliments with this design. Whether single or in a relationship, this design will make you feel like a love goddess.
10. Red Heart Tips
Elevate your nail game with the bold and striking Red Heart Tips design. This eye-catching look features a classic red manicure accented with heart-shaped tips, adding a touch of playful romance to any outfit.
This is one of the easiest designs to achieve at home and can be created with a steady hand and a small brush. All you need is good quality red nail polish, a clear top coat, and a small brush or toothpick to create the heart-shaped tips. With the Red Heart Tips design, you'll be sure to turn heads and make a statement wherever you go.
11. Black Heart French Tips
Add a touch of edgy elegance to your nails with the Black Heart French Tips design. This is another nail design that is easy to achieve. Like the red heart tips design, you will need colorless nail polish and black nail polish for the tips.
You can use tape or a stencil to guide the black polish at the tip of the nail. Whatever you use to create this design, it's important to be precise and neat to achieve a professional-looking finish.
12. Pink Layered Heart Design
Show your sweetness through your nails with the Pink Layered Heart Design. This design is perfect for Valentine's Day because of its sweet and romantic vibes. You can achieve it by layering different shades of light and bright pink polish to create a heart shape on the nails.
The base color is light pink and white, followed by the layering of different shades of pink in the middle. The key to achieving these pink valentine's day nails is layering the hearts on top of each other to create a 3D effect. Finish with a clear top coat for added shine and longevity.
13. Acrylic Encapsulation Red and Pink Hearts
Unleash the power of love on your nails with the Acrylic Encapsulation Red and Pink Hearts design. Imagine a bed of pink acrylic nails delicately encased with a layer of clear acrylic and then adorned with striking red hearts.
The encapsulation process creates a 3D effect that makes the hearts appear as if they are floating on your nails. The encapsulation process involves layering clear acrylic over the colored acrylic and then using a detailed brush or a stencil to create the heart shape. The result is a stunning, long-lasting design with heads turning wherever you go.
14. Gel Heart Nails Design
Fall in love with your nails with the Gel Heart Nail Design. Imagine a soft, light pink base, perfectly prepped and polished with a touch of hand-drawn pink hearts. This design is created using gel polish, cured under a UV lamp, creating a long-lasting and glossy finish.
The process of creating this design is done by first applying a light pink base coat, curing it under the UV lamp, and then using a fine brush or a nail art pen to hand-draw the pink hearts. The result is a sweet and romantic design that will have your nails feeling the love. To make it more head-turning, you can add some rhinestones and other nail accessories.
15. Tiny Heart Accents
Indulge in the delicate elegance of Tiny Heart Accents Nail Design. You can achieve this by using precision techniques to carefully apply tiny heart decals to your nails. You may seem to think it's daunting, but it's a lot easier than hand-drawn hearts.
The process begins with a light pink or white base coat, followed by applying the different light colors of heart decals. It is best to choose light colors to create a soft and feminine look. Whether you're looking to add a touch of romance to your everyday style or make a statement at your next special event, this accent nail design will leave a lasting impression.
16. Cute Chic Printed Nail Design
This design is created by using a combination of stencils, freehand painting, and decals to create a unique and adorable look on each nail. The process begins with a base coat, and then the different cute designs are applied to each nail.
The designs can be anything from tiny hearts to floral patterns or even cute little circles. A clear top coat is applied to seal the design and add extra shine. This design is sure to match your style and preferences.
17. Bright Red Nails Design
Bright Red Nail Design is a bold, eye-catching look that can instantly brighten up any outfit. The design involves painting the nails in a bright, fire-engine red shade, creating a stylish and attention-grabbing statement.
To achieve this look, you dont need a nail technician as you only need to apply a base coat to the nails, followed by two coats of a high-quality red polish for maximum vibrancy. To add a touch of glam, a glossy topcoat can be applied for a glossy finish.
Factors to Consider When Creating Valentine's Nails
Color Scheme
This factor is important because it sets the mood and tone for the Valentine's Day theme. Traditional colors associated with Valentine's Day are red, pink, and white, which symbolize love, romance, and sweetness. Incorporating these colors into the nail design creates a cohesive and festive look for the occasion.
You can also use black if you want a more edgy or alternative look. Black can add a touch of drama to the overall design and give it a unique twist but still complement the Valentine's Day theme.
Occasion: Casual, Formal, or Romantic Setting
The occasion is important to consider when creating Valentine's Day nail designs because it affects the overall look and style of the nails. If the occasion is casual or relaxed, you may opt for a more playful and fun design with bright colors and patterns.
However, if the occasion is more formal or romantic, a more elegant and sophisticated design may be appropriate, focusing on neutral or pastel shades and intricate details. It's essential to consider the occasion when creating Valentine's Day nails to ensure the design is appropriate and enhances the event's overall experience.
The Design
Valentine's Day is not just about red hearts and flowers but also about expressing love and affection creatively and personally. You dont have to stick with plain designs as
there is a wide range of design options, such as hearts, flowers, glitter, lace, and many more.
However, as mentioned above, the theme setting should also be considered. By considering both theme setting and design, you can create a meaningful, special, and unforgettable look for the occasion.
Tools You Can Use to Create Valentines Nails
Creating beautiful and intricate Valentine's Day nails can be easier with the right tools. From base coats to glitter and rhinestones, having the right tools on hand can help you create a look that is both stunning and long-lasting. Here are some tools you'll need to create the Valentine's Day nails of your dreams!
Base Coat and Top Coat
Basecoat is a protective barrier between your nails and the nail polish, preventing your nails from staining and discolouring. It also helps the nail polish adhere to your nails better and provides a smooth and even surface for the design.
A topcoat is applied over the nail polish to seal and protect the design. It helps to add shine and prolong the life of the design, preventing chips and cracks. It also helps to keep the colors vibrant and prevents fading.
Nail Polish
Your desired nail polish colors are the main component of creating Valentine's Day nails. It is used to create the design's desired look and color scheme. The color selection can range from classic red, pink, and white to more unconventional shades, depending on the individual's preference and the occasion.
You can use nail polish to create patterns, shapes, and designs using other nail art tools. Using various colors, you can create a unique and personalized Valentine's Day nail design that truly showcases your love and affection.
Nail Art Brush
Aside from the brush inside the nail polish bottle, the nail art brush s a useful tool for creating more intricate and detailed designs. Nail art brushes come in various shapes and sizes and are specifically designed for fine detailing and precision work.
They allow you to create fine lines, dots, and other patterns easily and accurately, giving your Valentine's Day nails a professional and polished look.
Stencils, Dotting Tool, Striping Brush
And, of course, nail art tools such as stencils, dotting tools and striping brushes will never be forgotten when creating the perfect Valentine's Day nail design. These tools make creating precise and uniform shapes, patterns, and designs easier.
Stencils provide a template for patterns, while dotting tools are great for creating small dots and embellishments. Striping brushes are ideal for creating thin and precise lines, perfect for creating outlines or adding details to your design. With these nail art tools at your disposal, you can unleash your creativity and create Valentine's Day nails that are truly one of a kind.
Small Crystals or Rhinestones
If you want to make your nail design sparkle and shine, small crystals or rhinestones are a great addition. They add a touch of glamour and elegance to your Valentine's Day nails, making them stand out. Rhinestones come in various shapes, sizes, and colors, allowing you to customize your design.
Tweezers
These tools are essential for easily creating stunning and intricate Valentine's Day nail designs. Putting small details like rhinestones on your nails will be a bit challenging without the help of a tweezer. This is why tweezers are useful for applying small embellishments like rhinestones to your Valentine's Day nails.
This nail art tool allows you to pick up and place the rhinestones with precision and accuracy, making it easier to create the desired design. The sharp tips of tweezers allow you to pick up even the smallest rhinestones, making them perfect for adding details and accents to your nails.
Valentine's Nails FAQ
Can I create Valentine's Day nails at home, or do I need to go to a nail salon?
You can create Valentine's Day nails at home with the right tools and a bit of practice. There are many tutorials and step-by-step guides available online to help you get started. However, if you are unsure where and how to begin, it is always best to visit a nail salon.
How long does a Valentine's Day nail design typically last?
The longevity of a Valentine's Day nail design depends on various factors, such as the type of polish used, how well it is applied, and how often it is exposed to water and other elements. On average, a manicure can last up to 7-10 days with proper care.
How can I protect my Valentine's Day nails from chipping and fading?
Applying a basecoat and topcoat will help protect your nails from chipping and fading. It is also important to avoid exposing your nails to water and harsh chemicals as much as possible.
Conclusion
Valentine's Day is a special occasion that calls for special attention to your nails. Whether you choose a classic red hue or a playful design, nail art can add the perfect finishing touch to your look. With so many options available, it's easy to find a design that suits your style and personality.
So, tell us which Valentine's nail design you chose this year and share your experience in the comments section below! Let's spread the love and inspiration to others looking for Valentine's nail art ideas. Happy Valentine's Day!
]]>
https://glytterati.com/blogs/articles/best-matte-top-coat-for-nail-art2023-02-01T04:52:52-08:002023-02-01T04:52:52-08:009 Best Matte Top Coats For Nail Art In 2023: Reviews & Buying GuideJoshLevi Soriano
A good quality matte top coat is an absolute must-have for achieving a flawless matte finish on your nails. But with so many options on the market, it can take time to decide which one to choose. That's why we've rounded up the best matte top coats for nail art so that you can find the perfect one for you.
We recommend the best products that we believe will offer value for our readers —learn more about our review process. If you buy through links on our site, we may earn a small commission at no extra cost to you.
When it comes to nail art, the right top coat can make all the difference in the final look. A matte top coat can add a modern and sophisticated touch to any design, and many options are available on the market. But which one is the best?
In this blog post, we will be sharing our top picks for the best matte top coats for nail art, from well-known brands to affordable options that won't break the bank. Whether a beginner or a seasoned pro, these top coats will give you the perfect matte finish for your next nail art project."
BEGINNER FRIENDLY: You can use it without prior experience or knowledge of nail care.
CAN BE APPLIED THINLY: This helps to make the bottle last longer.
SEALS AND HOLDS VERY WELL: You don't have to worry about chipping or peeling easily, as it forms a strong barrier over the nail polish.
SHINY MATTE FINISH: Gives your nails a subtle shine while maintaining a matte look.
What We Don't Like
Doesn't dry quickly
Leaves white residue on nails
What Our Experts Say
According to Kerry Lauders of Startups Anonymous, "This top coat is a favorite among beauty bloggers and professionals, and for a good reason. It gives a beautiful, sleek matte finish with no texture. It's also very durable and lasts for weeks without chipping."
STAYS ON NAILS LONGER: You won't have to constantly replace your polish, saving you time and money in the long run.
DRIES FAST: Makes it a convenient option for those who are always on the go.
IMPROVES NAILS: Made with high-quality ingredients that nourish and strengthen nails, helping to improve their overall health and reduce brittleness over time.
VERSATILE: You can also use it as a base coat and regular nail polish.
VEGAN FORMULA: Perfect for those who are conscious about using products that are free from harmful chemicals.
What We Don’t Like
May peel off when exposed to too much water or moisture
The brush is too short
What Our Experts Say
Another product our experts recommend is the Essie Matte About You Top Coat. According to Kerry Lauders, a Mental Health Officer at Startups Anonymous, "this top coat is a bit more expensive than the others, but it's worth the price. It gives a beautiful, high-gloss matte finish that's also chip-resistant."
STURDY: The coat can last up to 21 days without chipping.
TOXIN FREE: You can guarantee your nails won't damage.
EXCELLENT COMPATIBILITY: You can use it with natural nails, nail lamp gel nails, artificial nails, and acrylic nails.
NO HARSH ODOR: You can use it without affecting the smell of the surrounding area.
What We Don't Like
Burning feeling on your nails when coated thickly
Needs extra care when applying as it can irritate your skin
What Buyers Say
"This is great! I was hesitant to order this because I've used regular matte polish top coats, which are always uneven and accentuate any imperfections. This top coat is very smooth, even, smooth to the touch, and almost blurs the nails. I used a shiny coat over the flowers, but I'm sure the matte would look good over designs too. Great bang for your buck!"
DOES NOT TURN YELLOW: Allow you to maintain the original color of the nail polish for a longer time.
DRIES QUICKLY: Allows nails to be ready for use sooner, such as typing or handling objects.
CHIP AND SCRATCH RESISTANT: You can save money as it requires fewer touch-ups or reapplications.
COST-EFFECTIVE: Unlike other products, its bottle contains a 15ml coating formula that can last for many uses.
What We Don't Like
Not suitable for those who have reactions to HEMA-based products
What Our Editors Say
"When choosing the best matte top coat, we always look for something that does not turn yellow on nails after a week. And we finally found it with LuxieNeil Matte Velvet Gel Top Coat! Unlike any other product, this one remains its natural color even after weeks.
Another feature we appreciate about LuxieNeil Matte Velvet Gel Top Coat is its quick drying time. This makes applying and achieving professional-looking nails easy in just a few minutes. It also dries to a chip and scratch-resistant finish, meaning our manicures last longer and looks great for weeks.
EXCELLENT CONSISTENCY: You can apply it in a single layer without worrying about it being too thick or too thin.
LONG-WEARING: Your manicures will stay fresh and polished for an extended period.
FAST DRYING: You won't have to wait for your nails to dry before you can go about your day.
NO DISCOLORATION: This top coat will keep your nails from yellowing, preserving their natural color even after prolonged use.
PLEASANT SCENT: Making it comfortable to use and avoiding any headaches or discomfort.
USER-FRIENDLY: The formula is simple to spread evenly, making it easy to use and clean up.
What We Don't Like
The small bottle may not last as long as other products
More expensive than others
What Buyers Say
"Very thick base with the beautiful shimmer - can be used as stand-alone, without the gel polish layer, but with the top, of course. I bought three different colors -they are all great but much lighter than what appears in the photo. Like them anyway."
SAFER FOR SENSITIVE SKIN: This nail polish is specially formulated with natural ingredients, making it a perfect choice for sensitive skin as it is free of harsh chemicals and irritants.
TOXIN FREE: This is free of harmful chemicals, ensuring that it is safe for you and the environment.
WORKS WITH ANY POLISH: You can use it with any nail polish, creating various looks and styles with the colors you already own.
DRIES FAST: You can get on with your day without waiting for it to dry.
LONG LASTING: Keep your nails looking great for days.
What We Don't Like
A bit more expensive than other matte top coat products
What Buyers Say
"This matte top coat is so cool! Absolutely love it! Super thankful to find a good nail polish that doesn't have all the nasties in it. Doesn't have the stench most do and actually dries and hardens quickly - but still easy to apply!"
CONTAINS MULTI-COLOR FLAKES: Adds a unique and fun element to your nails
THICK BASE: Provides an even and long-lasting application
NOT STICKY: Allow you to apply and remove the coating easily.
CAN BE USED AS STAND-ALONE POLISH: You can use it to add a glossy or matte finish to your natural nails or create unique designs and styles without the need for any other polish.
EASY TO APPLY: The smooth and consistent formula allows the brush to glide evenly for a professional-looking finish.
NICE COVERAGE: Allow you to achieve full and vibrant color in just one or two coats, saving you time and hassle.
What We Don't Like
The bottle contains only a 10 ml formula
More expensive compared to other options
What Our Editors Say
“This product nailed it when it comes to being stylish. Its sparkling flakes and velvet matte finish adding a unique and sophisticated touch to any manicure. As beginners, we appreciate how easy it is to apply on our nails while providing a smooth matte salon-looking finish.
So even if the bottle is small, it is worth the investment as it is a high-quality product that delivers consistent and long-lasting results. The no-wipe feature also makes it more convenient and eliminates the need for additional tools and steps, making it a great option for both at-home and professional use.”
PERFECT FOR VARIOUS NAIL TYPES: You can use it for oily nail beds and dry nail beds.
SMOOTH FORMULA: Allows you to achieve a flawless and long-lasting finish.
NO STRONG ODOR: Eliminates any potential irritation or discomfort caused by strong fragrances.
SUFFICIENT QUANTITY: Provides ample amount for multiple uses, ensuring you don't run out quickly.
REQUIRES SINGLE COAT: Allows you to achieve full coverage and desired results with just one application, saving you time and effort.
What We Don’t Like
The nail brushes are a little small and plastic-like
The thick base may be prone to smudges
What Buyers Say
"The colors are opaque, and the outcome after doing a set of nails looks very professional. The colors and top coats are very smooth when applied. The texture is pretty consistent. It is not sticky if you accidentally get it on your hand when applying. Also, oddly enough, the polish smells good and doesn't smell chemical at all!"
15 ML PER BOTTLE: Provides a convenient and portable size for on-the-go touch-ups or easy storage.
QUICK DRYING TECHNOLOGY: Dry fast with UV/LED LIGHT provides a more efficient manicure or pedicure experience.
LONG-LASTING SHINE: Formulated to provide a durable and glossy finish that will last for weeks.
USER FRIENDLY: You can quickly apply and soak off without a complex process.
WASHES OFF EASILY: Allows easy and hassle-free removal, just like common nail polish.
EXCELLENT VERSATILITY: You can use it for professional salon settings and personal use at home.
What We Don’t Like
Makes your nails extra thick
Not suitable for people with HEMA allergy
What Our Editors Say
One of the things we love about this product is the sufficient formula quantity in a 15 ml bottle, making it last longer than other top coat brands. The pigmented and smooth formula, combined with the quick-drying technology and long-lasting, high-gloss finish, makes it a top choice for professionals and at-home users.
The finish adds a touch of sparkle and glamour to any look, making it perfect for special occasions or adding a bit of fun to your everyday nails. The glitter particles are evenly distributed throughout the formula, providing a consistent and smooth finish that will not leave any clumps or unevenness.
Final Verdict
Overall, these matte top coat products greatly help seal and enhance your nail art. Each product has its unique features and benefits. The OPI top coat is a great option for beginners and those looking for a shiny matte finish.
However, the best matte top coat for you will depend on your preferences and needs, so it's important to read reviews, compare ingredients and prices, and try different products before making a final decision.
Best Matte Top Coat for Nail Art Buying Guide
When choosing matte top coats, there are a few things you need to consider before making your purchase.
Type of Finish You Want
As stated by Kerry Lauders, "The first and most important factor to consider is the type of finish you're looking for. Some matte top coats give a beautiful finish, while others create a more textured, frosted look. If you're looking for a sleek, matte look, make sure to find a top coat that will give you that finish."
Type of Nails You Have
Another thing to keep in mind is the type of nails you have. If you have very thin or delicate nails, you'll want to find a top coat that won't cause them to chip or break. Conversely, if you have strong, healthy nails, you should find a top coat that will give them extra strength and protection.
Price
This factor will affect the overall cost of the project. A high-priced top coat may offer better quality and durability, but it may be outside your budget. On the other hand, a lower-priced top coat may be more affordable, but it may provide a different level of quality and durability, potentially requiring more frequent replacements.
Kerry Lauders states, "Price is always an important consideration for beauty products. You want to find something affordable that will also last a long time. Some matte top coats can be a bit on the expensive side, but there are a few affordable options available, as well."
Element of the Product
Additionally, it's also important to check the ingredients of the top coat, as some may contain harsh chemicals that can damage your nails. A top coat that is vegan, non-toxic, and free from harmful chemicals is a safer and healthier choice for your nails.
Compatibility of the Top Coat
Another important factor to consider is the compatibility of the top coat with other nail products you already own, such as base coats, nail polish colors, and other top coats. You'll want to ensure that the matte top coat you choose works well with the other products you already have to avoid any issues or additional expenses.
Nair Art Matte Top Coat FAQ
What are the benefits of using a matte top coat for nail art?
A matte top coat provides a smooth and velvety finish to your nails, giving your nail art a unique and elegant look. It is also chip-resistant, long-lasting, and easy to apply.
Are there any precautions I should take when using a matte top coat?
Using a base coat before applying the matte top coat is recommended to protect your nails and ensure a smooth application. Also, read the ingredients and check for any allergies or sensitivities you may have.
How long does a matte top coat last?
The longevity of matte nail polishes depends on the brand and quality of the product, but most top coats can last up to a week or more with proper application and maintenance.
Can I use a matte top coat over any nail polish color?
A matte nail polish or top coat can be applied over any nail polish color, but it is recommended to use it over light-colored or neutral shades for the best results. It can also be applied over nail art for an elegant finish.
Why Trust Glytterati?
Our editors are passionate about art and crafting projects, so we only recommend products we genuinely believe in. We provide honest, unbiased reviews of the best art supplies, and we often consult with industry experts to make our content professional and friendly, even for beginners. So if you're looking for new ways to improve your creativity, we can help!