20+ Halloween Party DIYs To Make Your Parties Spookier And Fun

Halloween is an exciting time for children and adults. Halloween parties are a holiday staple, but it's essential to develop creative Halloween party ideas that will be fun for everyone. Read on for Halloween Party DIYs that you can create at home using your local craft store supplies!
1. Foamboard Tomb Header

You can erect old tombstone headers for eerie decors to tie together the theme of your Halloween bash. You can reuse these decors, so it saves you money and time for the following year.
Things You'll Need
- Styrofoam board
- Craft knife
- Paring knife or soldering iron
- Permanent marker
- Spray paint, black
- Acrylic paint
- Paintbrush
Direction
- Prepare the tomb header by cutting off the top of the styrofoam board using the craft knife.
- Sketch out the design of your tombstone. You may use a wry remark, cross, I'M DEAD, or anything else you choose. Make sure that the designs are simple and easy to carve.
- Carve out the design with a paring knife or soldering iron.
- Spray the tombstone header with black paint.
- Dip the tip of the paintbrush in white or gray acrylic paint, then apply it to the headstone without getting paint into the carved parts.
- To assemble, use bamboo skewers to stick the tombstone on the ground. Arrange a jack-o-lantern, flameless candles, and other decorations to make the tombstone look spookier.
2. Packing Tape Yard Ghost

Packing tape yard ghost installed in the front yard - Image by I'm Not Bored; I'm Creative
Have you heard tales about apparitions of a white lady? Here's a Halloween party DIY you can make from simple supplies around the house. Invite friends over and spook them with this yard decor that will surely give them creeps.
For a scarier effect, add dry ice using a low-lying fog machine and spooky music. You can buy the fog fluid separately to use on your fog machine.
Things You'll Need
- Half-body mannequin
- Clear adhesive tape
- Creepy cloth decors
- White trash bag
- PVC tube, 3/4"
- PVC cross connector, 3/4"
Directions
- Wrap the head, arms, and torso of the mannequin with clear adhesive tape. Add three or more layers to give it more body.
- Cut the adhesive tape to remove it from the dummy, then assemble it back using more adhesive tape to close the body, head, and arms. Set aside.
- Cut some translucent plastic into strips of varying width and lengths. Tape it around the hips of the adhesive tape mannequin for the skirt. You can also use white fabric scraps for the skirt.
- Measure the distance from the top of the head to the shoulder and across the shoulder of the mannequin. Make the points on the PVC tube.
- Cut the PVC tube using a hacksaw, then assemble the cross to support the head and shoulders.
- Fit the adhesive tape body into the PVC cross and stand it in the yard, using a short length of rebar.
- Finish your white lady with some wispy cheesecloth draped over the head and shoulders.
3. Skeleton Candy Slide

DIY candy slide for safer trick or treating - Image by Wicked Makers
Be generous even with COVID restrictions by using this candy slide. If you don’t have a PVC pipe, you can also use cardboard tubes from linoleum. We don’t recommend a particular design as it’s a blank canvas, so be free to choose your child-friendly theme.
Things You'll Need
- PVC pipe, 3"
- PVC pipe, 1"
- PVC T connector, 1"
- Hot glue gun and glue sticks
- PVC glue
- Rebar stake, ⅜”
- Creepy cloth decors
- Full skeleton
- Skull
- Hacksaw
Directions
- Cut the 3-inch PVC pipe to 7 feet for the candy slice.
- Cut the 1-inch PVC pipe into six 22-inch pieces and three 5-inch pieces.
- Assemble the stand by gluing the 5-inch PVC between two T connectors.
- Insert the 22-inch pipes on the T connectors to make an uneven H. Make 3 of these.
- Insert one uneven H to one set so that it is twice as high as the other uneven H.
- To assemble, poke 2 rebars on the ground, using the distance of the foot of the stands.
- Add another 2 rebars on the other side for the shorter frame. The slide should fit on the higher stand and the lower stand.
- Decorate the candy slide with old cheesecloth or gauze bandage. End the slide with a skull (or anything you prefer), but leave enough space for the candies to go through.
- Decorate the higher stand with a skeleton (or anything you fancy).
4. DIY Dementor

Harry Potter-inspired wraith - Image by Becca Beach
This craft is by far the scariest on this list and is not for the faint in the heart so we don’t recommend it where kids and faint-hearted are in attendance.
Things You'll Need
- 18 gauge tie wire
- Masking tape
- Pool noodle
- Spray paint, black
- Foam skull
- Hot glue gun and glue sticks
- Black gauze cloth
Directions
- Spray the foam skull with black paint. Let the paint dry.
- Push a length of 16-gauge wire at the top of the foam skull to the neck. Make a small loop at the top of the skull.
- Cut about 20 inches of pool noodle for the shoulder.
- Pass the tie wire inside the pool noodle to hold form. Wrap the pool noodle with electrical tape.
- Cut about 12 inches of tie wire and wrap it with foam and masking tape to add the arms. Do the same for the lower arm.
- For the hand and fingers, tie together five cuts of tie wire. Wrap them with masking tape until you get the right size. Bend the fingers so it looks like it wants to grab on something.
- Spray the arms and fingers with black paint.
- Finish the assembly by draping the head and arms with black gauze cloth.
5. Glittered Treat Bags

Glittered treat bags - Image by HGTV
Give your party favors in style using these glittered treat bags with Halloween designs that kids will love. If you love sewing, you can easily make these treat bags from inexpensive canvas or use pre-made canvas bags, then decorate them with glitters.
Things You'll Need
Directions
- Cut your canvas cloth into 5x8-inch pieces, 2 for each bag. If you want bigger bags, you can adjust the size of the pieces.
- Mark 1 1/4 inches on the long side of the canvas.
- Fold 1/4 inch on either side of this mark and sew to prevent unraveling. Fold halfway along the 1 1/4-inch mark and sew across. This part will hold the cord.
- Sew the three sides, leaving the folded portion open.
- Cut two pieces of cord, each one about 2 1/2 times the width of the treat bag.
- Using a safety pin, thread the cord from one opening of the bag, then thread it to the other side, so both ends of the cord meet. Tie them off.
- Repeat the process, starting on the opposite side of the bag.
- Lay the treat bag on a flat surface, then trace your stencil outline.
- Fill the outline with glue, and sprinkle glitter over the glue. Tap the excess glitters off and let dry.
- If you find gaps on the glitter pattern, add more glue and glitter, tap off the excess, and let dry again.
6. Bloody Wine Glass

White wine poured into a bloodied wine glass - Image by 5-Minute Crafts
This simple craft is easy to make but is a lovely way to glam up a wine glass to keep up with the Halloween vibes.
Things You'll Need
Directions
- Clean the wine glass with rubbing alcohol and a paper towel to remove all grime and grease from it.
- Turn on the glue gun to heat the glitter glue stick.
- Apply dripping blood on the wine glass using the melted glitter glue stick. If you don't want glitters, you can use colored glue sticks instead.
7. Spooky Candle Holder

Spooky candle holder - Image by The Crafty Couple
Turn an old platter into a Halloween-worthy with this spooky candle holder DIY. You can also use Halloween mugs or a plate if you don't have a platter available. Just spray it with silver paint and give it an antique effect with the chalk paint.
Things You'll Need
- Severed hand skeleton
- Silver-plated platter
- Chalk paint
- Sponge
- Paintbrush
- Hot glue gun and sticks
- Flameless candle
- Candle lighter
Directions
- Cut the hand skeleton on its knuckles. Remove the thumb too.
- Reassemble the hand skeleton using a hot glue gun so that the hand looks like it's holding something on its palm.
- Paint the skeleton with white chalk paint. Let dry.
- Dip the sponge into the black chalk paint and in the water before dabbing it on the silver platter so it gets an antiqued look.
- Apply brown chalk paint on the hand skeleton. Dip the sponge in water to lighten the chalk paint. Let it dry.
- Hot glue the hand to the silver platter.
- Melt a red crayon over the flameless candle, so it looks like dripping blood.
- Set the candle on the hand before turning the candle on.
8. Caged Dog Skeleton

Caged dog skeleton - Image by Happy Home Mama
A dog howling in the middle of the night is more than enough to give you an eerie feeling, but what if the howling dog is caged inside your house? It's something that's guaranteed to give your Halloween parties a creepy feel that will bring your party to the next level.
Things You'll Need
- Dog skeleton
- Plastic shackles and chain
- Plastic laundry basket
- Masking tape
- Spray paint, black
- Black acrylic paint
Directions
- Cut off the top of two laundry baskets, then spray them with black paint.
- Remove one shackle and chain link from the manacles.
- Make two holes on one of the baskets to put the chain for hanging. Push the chain into the holes.
- Put the dog skeleton inside the basket, then close it with another basket.
- Tape the baskets together using the masking tape. Paint the tape over with black acrylic paint.
- Lock the cage with the shackle you removed from the manacles.
- Hang the cage along with other Halloween decors.
9. Halloween Crystal Ball

Halloween crystal ball - Image by Heidi Ferguson
What if you can get a giant eye to welcome your party guests? Turn a simple fishbowl into a crystal ball, then set a mini projector behind the glass ball and project whatever spooky images you want of partygoers.
Things You'll Need
- Fishbowl
- White acrylic paint
- Round pot
- Hot glue gun and glue sticks
- Spray paint, black
- Mini projector
Directions
- Spray the inside of the lamp with rubbing alcohol and wipe the dirt off with a paper towel.
- Add some water to acrylic paint and pour it inside the lamp. Swirl it inside the lamp, taking care to paint only half of the glass lamp.
- Spray the rounded pot with black paint. Glue the glass lamp to the pot.
10. Halloween Shoes

Halloween shoes - Image by 5-Minute Crafts
Turn an old pair of loafers into something to glam up your Halloween outfit. Be sure it's something you won't wear anymore, so you don't ruin a fine pair for a single event.
Things You'll Need
- Old shoes
- Aluminum foil pie plate
- Glue
- Paper towel
- Acrylic paint
- Rhinestone buckles
- Glitter paper
- Spray paint, violet
Directions
- Cut out the center of the aluminum foil pie plate and cut two leaves out of it - one smaller and one bigger.
- Put together the outer sides of the pie plate and cut it into a leaf, about the size of the shoe's sole.
- Tape the first to aluminum leaves on the opening of the shoes and the other behind the heel. The tape also the leaf from the outer side of the plate to the sole of the shoe.
- Apply glue to the shoe and stick the cut paper towels on the shoe. Add layers until you get the correct thickness.
- Spray matte paint on the shoes. Paint the heels, soles, and leaves on the shoes.
- Spread glue on the shoes, then sprinkle it with glitter.
- Cut a strip of glitter paper and use it to decorate the front and sides of the shoes.
- Adorn the strip on the front with a buckle to finish the shoes.
11. Endless Drinking Skeleton

Endless Drinking Skeleton - Image by Wicked Makers
Start building a pirate tableau for your Halloween parties, starting with this drunken pirate. It's also a good way to add a water feature to your Halloween decors and is an excellent way to give new life to your empty wine bottles.
Things You'll Need
- Wooden tub
- Full skeleton
- Brown chalk paint
- Fountain setup
- Wine bottle
- Pirate boots
- Pirate costume
Directions
- Give the skeleton a good rub-down of brown chalk paint mixed with water to stain but not paint it through.
- Line the wooden tub with a garbage bag large enough to fit the bottom of the tub. Staple or glue halfway up the depth of the tub. Cut off the excess.
- Position the skeleton inside the wooden tub. You may have to snap and reglue some bones to get the position you want.
- Dress the pirate and glue it in the wooden tub so it holds its pose.
- Put up the fountain setup, following the contour of the torso and the arm holding the wine bottle.
- Fill the tub with water mixed with red food color to mimic red wine.
12. Spooky Tree

Spooky Tree sculpture - Image by Where the Gnomes Live
You can use the spooky tree as a candy bowl for your candy corn and other treats to keep the kids entertained. Fashion a bowl out of aluminum foil, like the other parts of the sculpture, then place it on the top of the tree. You can make it removable or build it into the sculpture itself.
Things You'll Need
- Aluminum foil
- Masking tape
- Glue
- Paper towel
- Fake moss
- Faux greenery
- Acrylic craft paint
- Battery-operated tealight
Directions
- Unroll 5-m long aluminum foil and fold it in half.
- Wrap it around your hand to form the body of the sculpture.
- Roll more aluminum foil to make the body sturdier.
- When you have enough thickness, wrap the body with masking tape.
- Add limbs made from rolled aluminum foil, wrap them with more masking tape, and tape the arms to the body.
- Make a hole at the back for the battery-operated tealight and the face.
- Mix one part of water with two parts of glue.
- Dip torn tissue paper into the glue and stick it to the sculpture to give it the texture of the bark.
- Add 4 or more layers of torn toilet paper or paper towel and let it dry for 12-24 hours before painting.
- Paint with dark brown or black craft acrylic paint. Let it dry before dry-brushing a lighter brown over the black paint.
- Adorn the tree with fake moss, twigs, and a few leaves.
- Fit the tealight to the back of the sculpture to finish the setup.
13. Popsicle Stick Witch Cottage

Popsicle Stick Witch Cottage - Image by Little Sun
Take your time doing fun Halloween crafts such as this popsicle stick, which house your kids will love doing with you. The good thing about this project is the rugged look, so you don't have to worry about cutting precise shapes.
Things You'll Need
Directions
- Cut your cardboard according to the design you want for your witch cottage. Measure and make enough pieces for the house before starting to assemble them.
- Cut where the doors and windows go.
- Glue the cardboard pieces together on a piece of styrofoam board.
- Cut off the curved ends of the popsicle sticks, about 3/4 inch from the edge. Set aside.
- Start covering the walls with uneven cuts of popsicle sticks. Keep it rugged, allowing space between slats.
- Once done with the walls, proceed with the roof, using the popsicle ends for the shingles.
- Add the doors, window bars, stairs, porch, and picket fence.
- Paint the walls and roof with black craft paint. Let it dry, then dry brush with gray paint.
- Add faux greens, twigs for trees, roots, and other decors to make the witch house look more authentic.
- Finish the setup with a battery-operated tealight.
14. Mummified Glass Candle Holder

Mummified Glass Candle Holder - Image by Hometalk
Making crafts for your Halloween party is easier than you think. This particular craft is easy as child play and very versatile too. You may try it on your condiment jars, candle holders such as in the example above, jam jars, and even wine bottles.
Things You'll Need
- Used jar
- Paper towel
- Gauze bandage
- Googly eyes
- Tealight
Directions
- Clean your used glass with rubbing alcohol and a paper towel.
- Stick the googly eyes on the jar. You may also use glue dots if the self-adhesive is not strong enough.
- Wrap a 2-inch gauze bandage around the jar, letting enough space for the eyes to peek through the bandage.
15. Splatter Pumpkin Candy Server

Splatter Pumpkin Candy Server - Image by 5-Minute Crafts
Here's another Halloween party DIY that your kids will love doing. Take all the broken crayons from your kid's stash and use them for this fun DIY project. Instead of real pumpkins, you may also use foam pumpkins.
Things You'll Need
Directions
- Paint a medium pumpkin with white craft paint after removing the stem from the crown.
- Once the paint is dry, glue the crayon around the pumpkin's crown, choosing the color scheme you want.
- Set your hairdryer or heating tool on high and melt the crayons, so they splatter on the white-washed pumpkin.
- Top the pumpkin with a glass bowl and fill it with candy corn, chocolate drops, and other treats.
16. 3-Tier Pumpkin Craft

3-Tier Pumpkin Craft - Image by Kimberly Carole Lewis
Here is an easy Halloween party craft that your kids will love doing for you. If younger kids do this craft, you’ll only need to assemble the bouquet, though older kids can easily do it.
Things You'll Need
- Jack-o-lantern baskets
- Hot glue gun and glue sticks
- Spray paint, white
- Paintbrushes
- Gold craft paint
- Orange plastic flowers
- Burlap ribbon
- Plastic pot
Directions
- Remove the handles from the jack-o-lantern baskets.
- Fill one basket with pebbles for weight.
- Glue the baskets one on top of the other. Add more glue to make the connection more stable.
- Spray the tower with flat white paint until well-covered.
- Paint the eyes and the mouth with gold paint.
- Arrange the flowers in a foaming pot that fits the opening of the basket.
- Make a bouquet from more orange flowers and burlap ribbon and glue it on the second basket. You may want to make your flowers; visit our tutorial for making paper flowers.
17. Skeleton Handprint on a Bottle

Skeleton Handprint on a Bottle - Image by Troom Troom Select
Glam up a simple bottle with black and white acrylic paint. It’s the perfect decor for your bar area.
Things You'll Need
- Empty bottle
- Skeleton hand stencil
- Acrylic paint
- Acrylic paint medium
- Paintbrush
Directions
- Wash the empty bottle with dishwashing soap and warm water. Let it dry.
- Mix black acrylic paint and acrylic paint medium to make it runnier.
- Pour the paint inside the glass bottle and swirl it until all parts are covered with paint.
- Wipe the surface of the bottle with rubbing alcohol and a paper towel.
- Position the skeleton hand stencil on the bottle, then paint it with white acrylic paint.
- Once dry, seal the painting with clear acrylic varnish.
18. Tree Stump Face Trash Can

Tree stump face - Image by Where The Gnomes Live
Turn your ordinary trash can into a tree stump face trash can and encourage partygoers, especially kids, to throw their trash in the proper places.
Things You'll Need
Directions
- Roll aluminum foil and tape it on the garbage can. Add more until you cover all the sides of the trash can.
- Cut off a portion of the aluminum cover for the face. Fill the cut portion with the facial features.
- Mix one part of water with two parts of glue.
- Dip torn tissue paper into the glue and stick it to the sculpture to give it the texture of the bark.
- Add four or more layers of torn tissue paper and let it dry for 12-24 hours before painting.
- Paint with dark brown or black craft acrylic paint. Let it dry before dry-brushing a lighter brown over the black paint.
- Decorate the face with fake moss.
19. Pumpkin Topiary

Lighted Pumpkin Topiary - Image by Chic On The Cheap
Instead of store-bought pumpkins, you can host a pumpkin carving contest and then use the winning pumpkins for the topiary. It will be a fun Halloween game for crafters and artists. If you have kept your Cinco de Mayo flowers, you can also use them for this project.
Things You'll Need
- Foam pumpkins
- Trash can
- PVC pipe, 1"
- Permanent marker
- Craft knife
- Acrylic paint
- Paintbrush
- Fairy lights
- Raffia grass
Directions
- If you're using colored pumpkins, paint them with white acrylic. Give it three coatings to get an even coat. Skip this step, though, if using white foam pumpkins.
- Draw a jack-o-lantern face on the pumpkins (use 5) and cut out the features with a craft knife.
- Cut a hole at the back of the pumpkin to put the fairy lights on later.
- Poke a hole from the top to the bottom of the pumpkins, leaving one without a hole on top.
- Prepare the base by gluing the PVC pipe inside a circular trash can. Add pebbles to weigh the trash can so the topiary won't topple down.
- Push the pumpkins onto the PVC pipe, alternating the orientation in a zigzag pattern. Use the pumpkin without a hole on top as the last pumpkin for the topiary.
- Insert the fairy lights at the back of the jack-o-lantern.
- Arrange raffia grass around the bottom pumpkin.
20. Haunted House DIY

Haunted house DIY from a dollhouse - Image by DIY Karem
Haunted houses are always present during Halloween, so why not use your daughter's outgrown dollhouses. Check out this tutorial for more inspiration on how to turn your colorful dollhouses into Halloween-themed party decors.
Things You'll Need
- Dollhouse
- Antique White Gloss Enamel Spray Paint
- Chalk Aged Gray Spray Paint
- FolkArt Metallic Gunmetal Gray Acrylic Paint
- Chalkboard Paint Black
- Acrylic paint
- Hot glue gun and glue sticks
Directions
- Disassemble a dollhouse and cut off the parts you won't use.
- Assemble according to your design using a hot glue gun.
- Spray the walls with antique white gloss and the roof with old gray paint.
- Dry brush burnt umber and chalkboard black acrylic paint on the walls.
- Add gunmetal gray highlights on the roof, windows, and doors.
- Assemble the whole house and light a battery-operated tealight on the first and second levels of the house.
21. Spooktacular Night Light
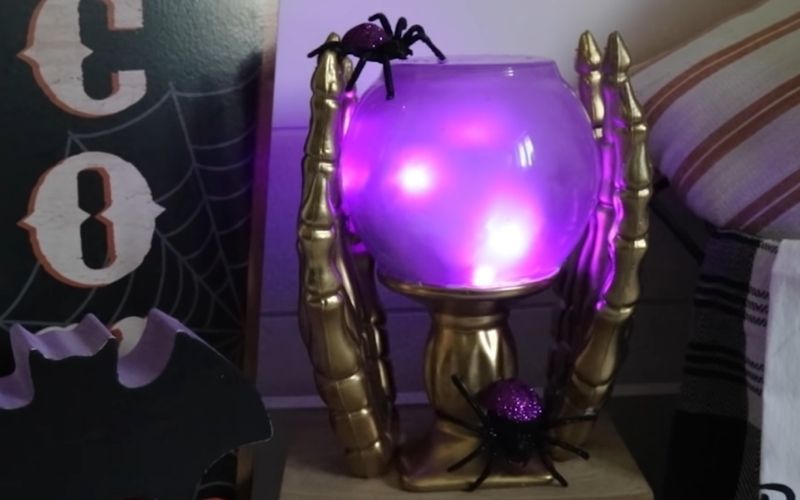
Night light made from a fishbowl and candelabra - Image by Jessica Lynn
Tired of your bland candleholders? A simple gold spray and skeleton hands are all you need to make it more interesting. You can even turn your scented candle into Halloween-themed decors using this craft. Just glue the gold-painted hand on the scented candle glass, and you’re all set.
Things You'll Need
- Candleholder
- Fishbowl
- Skeleton hands
- Fairy lights
- Cotton
- Hot glue gun and glue sticks
- Gold spray paint
- Sea glass spray paint, pink
- Plastic spiders
Directions
- Spray the candle holder and skeleton hands with gold paint.
- Clean the fishbowl with rubbing alcohol and a paper towel. Spray the inside with pink sea glass paint.
- Put the fairy lights inside a large ball of cotton, then stuff it into the fishbowl.
- Glue the fishbowl on the candle holder.
- Hot glue the skeleton hand on the crystal so that they look like holding the crystal ball.
- Decorate with plastic spiders.
22. Frosted Vase Ghost

A frosted vase glass - Image by Hometalk
This craft is another easy DIY that can be done in less than 2 hours, including the drying time for the paint. Assembly can be done in less than 5 minutes.
Things You'll Need
Directions
- Get rid of grime and grease from your vases with a rubbing alcohol spray and wipe it off with a paper towel.
- Spray the inside of the vases with frosted glass paint. Let it dry.
- Draw ghost eyes on the vases using the permanent marker.
- Fill a flowerpot with rocks or sand and top with glass pebbles.
- Stake a solar light into the pot and pot the frosted glass vase over the solar light.
23. Candy Corn Halloween Door Hanger

Candy Corn Halloween Door Hanger - Image by Happiness is Homemade
Don’t think we forgot about the ever-present door hanger to welcome your guests. And it’s nothing spooky, so it’s child-friendly because we’re making candy corn door hangers!
Things You'll Need
- Styrofoam board
- Acrylic paint
- Flat paintbrush
- Permanent marker
- Paint markers
- Ribbons
- Pipe cleaners
- Gold leaves
Directions
- Outline a long, round-edged triangle on the styrofoam board. Cut out with a craft knife.
- Paint the candy corn with white, orange, and yellow.
- Add black dots to the white part, a jack-o-lantern face on the orange, and orange bubbles on the yellow.
- Glue a 1-inch ribbon where the colors meet.
- Make a messy bow from burlap ribbon, fabric ribbon, and gold leaves
24. Witch's Half Body Candy Holder

Witch's Half Body Candy Holder - Image by Jessica Lynn
Why serve your candies and treats in a tray when you can help them in a fun candy holder? You may even make matching treat buckets for your guests’ kids by adding a tutu and witch’s legs.
Things You'll Need
- Mixing bowl
- Tulle ribbon
- Witch's legs
- Hot glue gun and glue sticks
- Abaca rope, 10mm
- Spray paint, black
- Candies
Directions
- Spray black paint on the outer part of a large mixing bowl.
- Make a tutu around the top of the mixing bowl using the tulle ribbon. If you can spare more, it is better to make two layers of the tulle ribbon.
- Cover the top of the tulle ribbon on the bowl with a length of 10mm abaca rope.
- Remove the witch's leg from its holder, then glue it under the mixing bowl.
- Fill the bowl with candies.
25. Halloween Piñata

Halloween Piñata - Image by DIW World
Children and adults alike love piñatas - the challenge, the surprises, the fun! Instead of packing your party favors, throw them all into the piñata, and let your guests have so much fun! This time, though, let's get it to a new spooktacular level with a spider!
Things You'll Need
- Balloon
- Cardstock (black and white)
- Crepe paper (navy blue)
- Old newspapers
- Floral wire
- Ribbon, ¼”
- Masking tape
- Double-sided tape
- Glue
- Craft scissors
- Assorted sweets
Direction
- Start with a balloon large enough to hold your sweets. Blow it up and place it in a bowl.
- Tape a length of string or ribbons to the top of the balloon to hang the piñata later.
- Cut the old newspapers in 1x3-inch strips and store them in a small box.
- Mix glue and water for your paper mache.
- Dip the cuts of paper and stick them to the balloon. Add 4-5 layers or until you get the right thickness you want. Leave a small portion at the bottom so you can fill it with Halloween candy later.
- Let the paper mache dry for 12 hours or more before adding the decors.
- While waiting for the paper mache to dry, make the spider legs by wrapping gauge 16 floral wires with newspaper strips. Make the tips slimmer than the base of the legs.
- Cut the crepe paper into 1-inch strips, then cut fringes on it by making small halfway cuts, about 1/4 inch apart, on the strips.
- Wrap the legs with the crepe paper fringe.
- Once the paper mache is dry, pop the balloon, so it's easier to break later. Fill it with your sweets. Tape the hole, so the candies don't fall out.
- To assemble, tape four legs on each side of the balloon using masking tape.
- Glue more crepe paper fringe around the balloon. Add eyes and mouth from white and black paper or cardstock.
Conclusion
You can create a one-of-a-kind Halloween party with simple, yet creative DIYs that will be fun for everyone in your neighborhood. Remember always to have lots of candy on hand, and don't forget the costumes!
We hope these tips helped get you started on planning a special Halloween experience this year. If you need any help or want more ideas from our team of experts, please let us know! We're looking forward to celebrating with you soon!