The Ultimate Guide To Transferring Drawing Onto Canvas

- How to Transfer Drawings With Transfer Paper
- DIY Transfer Paper Using Charcoal Pencil
- DIY Graphite Transfer Paper
- How to Transfer Drawings Without Tracing Paper
- Using Gel Medium
- Using Dry Gel Medium Transfer
- Using Mod Podge
- Using Grids
- How to Magnify Images for Transfer
- Using an Art Projector
- Using a Lightbox
- Using a Window
- Using a Computer Monitor
- The Best Paper for Transferring Drawings
- Fun Facts and Trivia
- FAQ
Do you have a favorite picture or drawing you've created and would like to see hanging on your wall? If so, learning how to transfer drawings onto canvas is the perfect solution!
While free-hand drawing is an option to outline your painting, it is easier to transfer them onto canvas. You can use several techniques, including making a DIY transfer paper or tracing from a computer screen.
These tutorials will show you how to do that in simple steps. Following these instructions, you can create a professional-looking piece of art that will impress your friends and family. So grab your supplies and get started!
How to Transfer Drawings With Transfer Paper
Using a transfer paper is the easiest way to transfer drawings on canvas, especially if you're not working on overly complicated artwork. Many artists recommend it for newbies to get the right proportions and likeness of their reference image onto the canvas.
Aside from transfer paper, you may also use carbon paper to trace over, but you won’t be able to erase lines. The lines may turn muddy using water-based paints like acrylic and watercolors.
If you're using black canvas, you'll need white transfer paper. You can also use it on white stretched canvas. It is best to use white transfer paper if you don't want to erase lines on your canvas.
What You'll Need
Directions
- Print your reference image on the right size of paper. If your canvas is large, print sections of your reference image on several sheets of inkjet paper.
- Tape the image pieces together, ensuring that each sheet fits well with the other sheets.
- Cut the right transfer paper size to fit your reference image and canvas. You may use regular stretched or black canvas.
- Arrange the transfer paper, graphite side down, and the reference image on top of the canvas. Tape both to the canvas.
- Trace the image to transfer the drawing to the canvas. A regular graphite pencil will do well, but we recommend using colored mechanical pencils for intricate drawings so you can see your progress easily. You can also use a stylus or a blank ballpoint pen to trace.
- Before removing the reference image and the tracing paper, remove one taped side of the tracing paper to see how you're doing. Tape it back carefully and trace over the places you missed.
- Depending on your medium, you may need to apply a workable fixative, especially when working with oil paints.
DIY Transfer Paper Using Charcoal Pencil
You don't always need a transfer paper, especially if you're working with large canvases. The good thing about DIY tracing paper is that you can customize it in the size you need.
This hack is perfect if you love using transfer paper but have yet to get one. You can use it to make your DIY transfer paper!
Pro Tip: Don't throw away your charcoal pencil dust since you can apply it on the backside of your DIY transfer paper. You may also make white transfer paper using white charcoal pencils.
What You'll Need
- Printer paper
- Charcoal pencil
- Graphite pencil
- Vine charcoal
- Stretched canvas
Directions
- Print your reference image on inkjet paper.
- Apply vine charcoal on the backside of the paper. Tap off the excess charcoal dust.
- Trace the lines using a pencil to transfer the image on the canvas.
- Apply a workable fixative if using oil paints. You may dilute your paint by adding more water for water-based paints or thinner for oil paints.
- Wipe off the excess charcoal with a clean rag to avoid muddying your painting after applying the first layer of paint.
DIY Graphite Transfer Paper
Instead of using printer paper, you may use tracing paper to make a DIY transfer paper. This technique makes the transfer paper last longer.
A good thinner to include in your art supplies is a rubber cement thinner because it evaporates faster. However, you should work in a well-ventilated area to avoid inhaling the fumes.
What You'll Need
Directions
- Apply graphite or white charcoal pencil on one side of the tracing paper until well covered.
- Dampen a paper towel or a cotton ball with rubber cement thinner.
- Rub the graphite with thinner to blend it well.
How to Transfer Drawings Without Tracing Paper
You may still transfer your drawings to the canvas without tracing paper. This technique is more laborious but allows you to work with a large canvas. If you have gel medium or mod podge in your art studio, you no longer need to buy transfer paper.
Using Gel Medium
Transferring a drawing (or your favorite photo) on canvas is easier than it sounds when using a gel medium. You don't even need specialty paper; regular printer paper is enough. After removing the paper, you can paint the image with oil or acrylic paint.
What You'll Need
Directions
- Scan and mirror your reference image during printing or draw it in high resolution. Make sure the ink you use will not react with the gel medium.
- Cut out the excess paper of your reference image.
- Apply the gel medium to the surface of the canvas.
- Carefully put the image facedown on the canvas. Press firmly and remove air bubbles with a squeegee, an old credit card, or your fingers.
- Let the paper dry overnight.
- Using a damp sponge, gently rub off the paper from the canvas. Remove any whiteness on the paper to fully saturate the paper.
- Let the image dry, then peel off the paper gently with a dry sponge.
- Finish removing the paper with your bare fingers. Too much rubbing may cause some parts of the image to peel off.
Using Dry Gel Medium Transfer
Try the dry gel medium technique if you want less mess on your transfer. Instead of using a damp sponge to remove the paper, you can simply roll the pieces off the canvas.
However, we don’t recommend this technique if you want to paint over the transferred image since the remaining paper may muddy the paint.
What You'll Need
Directions
- Tape around the canvas to get a clean edge on your transfer project.
- Add a generous amount of Liquitex Matte Medium to the canvas using a sponge brush.
- Carefully put the image facedown to the still-wet matte medium.
- Remove any bubbles with a squeegee. Let it dry for about 3-5 minutes.
- Remove the inkjet paper by carefully rolling the pieces with your fingers.
- Scrape off the remaining paper with a dry, unused sponge.
- Some paper will remain on the surface of the transferred image, but don't worry. It won't be visible after you apply two layers of acrylic varnish.
Using Mod Podge
Take out your Mod Podge and use it to transfer your drawing or image to the canvas. Apply the Mod Podge in the same way as you would with gel medium.
But since Mod Podge is heavier than gel medium, you need to support the stretched canvas so it won't sag while it dries.
What You'll Need
- Canvas
- Mod Podge
- Sponge brush
- Sponge roller
- Dish sponge
- A thick book
Directions
- Apply Mod Podge generally to the canvas. No need to dry it.
- Mirror your reference image when you print it using an inkjet printer.
- Lay the image carefully facedown on the canvas and remove any air bubbles with a sponge roller and finish with your fingers.
- Place a book or several books thick enough to support the canvas so it doesn't sag during the drying process. Let the Mod Podge dry well.
- Dampen a dish sponge and wring out the excess water. Moisten the paper to loosen it from the canvas.
- Rub off the paper from the canvas using your fingers or the coarse side of the dish sponge, going in a light circular motion.
- You can paint over the canvas or apply acrylic gloss to finish it.
Using Grids
Scale is important when using the grid method to transfer an image onto the canvas. Though this is a very time-consuming method, many artists use it to enlarge, scale down, or get the likeness of the image.
For example, if you used one-inch squares on your reference image and want to scale it up twice, you need to use 2-inch squares on your canvas. Conversely, if you want to scale it down to half its size, you can use half-inch squares instead.
What You'll Need
- Reference image
- Ruler
- Graphite pencil
Directions
- Print your reference image on regular printer paper.
- Make a grid on your reference image. Smaller squares are better if you want to capture the details.
- Make a grid on the canvas, depending on the scaling you want on your painting. Keep the lines light for easier erasing.
- Outline the image on the canvas following the placement of the lines. Use light pressure to erase your marks easily.
- Erase the grid lines on your canvas before you start painting.
How to Magnify Images for Transfer
Some reference images are small, and it's frustrating to print them on several sheets of paper to get the right size. Though it is not always easy to magnify your images, you can still capture the original image by tracing over it before painting.
Try these simple hacks to transfer your image to tracing paper and canvas.
Using an Art Projector
An art projector can adjust the image to the size you want to transfer to canvas. Before powering it up, clean the projector's lens and ensure you have a good-quality image to start with, so you can replicate it well.
Another good thing about this device is that you can get the entire digital image or just the parts you want to paint.
What You'll Need
Directions
- Save your HD image on a memory stick. Some projectors connect with Bluetooth, so you can also use your smartphone or computer to connect with the projector.
- Cut the tracing paper to the size of the image you want to transfer.
- Position your tracing paper and art projector to get the right image on your paper. Use a glare-free background, preferably plain, to see your image without obstructions.
- Adjust the light in the art studio. You may turn off a few lights to get a better image view.
- Trace over the image projected onto the tracing paper. You may get as many or as few details as you want when working with an art projector.
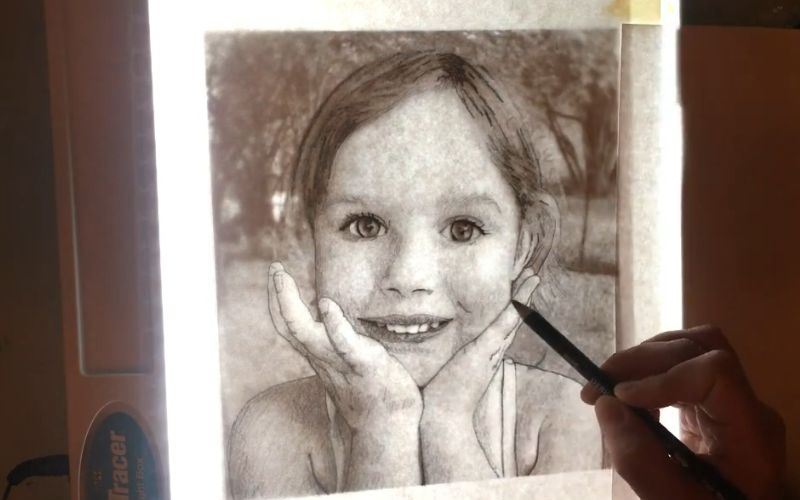
Using a Lightbox
A light box is an excellent alternative for tracing images you want to transfer onto canvas. Though you have little control over the size, you can still manipulate your reference image and tracing paper to work on a large image.
What You'll Need
Directions
- Tape the reference image and the tracing paper into the lightbox. If you're using a larger image than the light box, position and tape the tracing paper to the image first before taping it to the lightbox.
- Adjust the light so it won't hurt your eyes but still provide enough illumination to replicate the image.
- Use a regular graphite pencil to trace the image.
- Use store-bought or DIY transfer paper to transfer the image to the canvas.
- Tape the transfer paper under your image and trace it before painting.
Using a Window
This drawing transfer method is best until you've improved enough to invest in a lightbox or a projector. To avoid glare while working, wait until the sun is not facing you before tracing.
Instead of a regular graphite pencil, you can use a charcoal pencil to trace the image. This approach will eliminate the need to use a transfer paper when transferring your drawing onto the canvas.
What You'll Need
Directions
- Cut your tracing paper or easel paper to size.
- Tape your reference image and tracing paper to the window. Don't tape the bottom edge when working with complex images so you can peek under the drawing.
- Trace the drawing using a graphite or charcoal pencil.
- Using a regular pencil, you can use a DIY graphite transfer paper to transfer the image to the canvas.
- You may use a charcoal pencil to trace the original image. You can trace directly over the drawing using a regular pencil. The charcoal transfer shortens your drawing process.
Using a Computer Monitor
This hack is especially helpful if you transfer an image to a larger canvas. It works almost the same as tracing on a window, only that you don't have to worry about the sun’s glare.
When tracing directly from your computer monitor, you can get the image to the size you want by moving the tracing paper around.
Note that his technique is only an intervening step to get your drawing onto the canvas. You still need to trace your image later before starting the painting process.
What You'll Need
Directions
- Choose an image or photo on your computer that you want to trace and magnify to the size you want.
- Cut your tracing paper to the canvas size and tape it to the monitor's upper side.
- Trace the image lightly. Be sure not to press too hard on your monitor, or you'll damage it.
- Remove the tape and adjust your tracing paper to get the other parts of the image; be careful to align everything.
- You can now use this image to transfer to your oil or acrylic painting canvas.
Best Paper for Transferring Drawings Onto Canvas
Here are some papers you can use to transfer your drawings to canvas. The transfer paper is the most commonly used, but you can also use other types.
Transfer Paper
Usually sold in sheets or rolls, artists use transfer paper to transfer images onto canvas. White transfer paper is best for black canvas, while dark gray transfer paper is best for regular canvas. This paper is reusable until the graphite is no longer functional on one side.
Inkjet Paper
This paper is the next best thing for transferring your drawings to canvas. Aside from being cheap, it is also very versatile. You can use it to print your reference image or make it into a DIY transfer paper.
Tracing Paper
Most artists use tracing paper for several reasons. Aside from tracing drawings, you can turn them into a DIY transfer paper. You can also use tracing paper for sequence drawings if you're working on animation.
Parchment Paper
This paper has a non-stick and heat-resistant coating and is usually used for lining a baking dish to prevent food from sticking. Though slippery, you can print on it using an inkjet printer to transfer your drawings on canvas.
Be sure to print on the unwaxed side. Use regular printer paper as a carrier sheet to push the parchment paper out of the printer.
Fun Facts About Transferring Drawings to Canvas

Paintings showing how artists reuse cartoons for their paintings - Image by Getty Images
Cartoon: The Early Evidence of Tracing
Did you know that the word cartoon originated from the Italian word cartone, which means pasteboard or carton (cardboard)? The term began in the 1600s when artists used a piece of cardboard to make their drawings.
Since artists had no access to technology for transferring or projecting drawings, they poked holes in the drawing and applied soot over the holes to outline their frescoes and murals.
Tracing played an integral part in the success of many Renaissance artists. And since it was time-consuming to make a cartoon back then, artists reused them by providing new features, so they didn't look the same across paintings.
After a time, the word cartoon began to mean the design that the fresco artists rubbed through to transfer to the fresh plaster. After the plaster dries, the artist paints over them.
In the 1800s, the word cartoon meant a humorous drawing, according to the Oxford English Dictionary. As of this writing, it means a comic drawing or animation.
Use of Optical Devices

How artists use optical devices to improve their paintings - Image by Supersonic Animation
Even before the camera obscura, old masters like Johannes Vermeer (1632-1675) and Amerighi Caravaggio (1571-1610) made use of optical devices to improve their paintings.
Evidence has it that these artists poked a small hole in the wall of a dark room to direct the light to a specific spot. They could then paint whatever image was projected into the room.
It is worth noting that the image was upside down. Nevertheless, the technique effectively gave paintings a detailed and realistic look.
The Use of Tracing Paper

Intricate drawings on illustrated manuscripts - Image by Cambridge University
The use of tracing paper was evident during the early 20th century. Cennino d'Andrea Cennini, in his handbook entitled Il Libro dell'Arte documented the use of carta da lucido.
According to Cennino, art apprentices use tracing paper to trace over their work and the work of their masters. He further described this process as a way of practicing figure drawing and getting a feel of how to draw.
Evidence also shows that masters from the 8th century already used tracing paper. Aside from its application in paintings, artists also use it to duplicate intricate drawings in illuminated manuscripts.
Transfer Drawing Onto Canvas FAQ
Is it cheating to trace drawings?
Tracing is a time-tested technique that many artists use, especially if you're going for realistic images. Purists think tracing and using grids is cheating and should be avoided by artists.
However, even artists during the Renaissance used tools to replicate their images, especially when working with frescoes and murals.
What is the best way to draw on canvas before painting?
Artists recommend using a transfer paper to transfer drawing onto a canvas. However, if you don't have one, you can load the back of your drawing using a soft graphite pencil (best drawn on regular printer paper).
Flip the paper over, then trace your drawing on the canvas. The graphite on the back of the printer paper will leave a mark. Using your pencil or liner brush, you may need to redraw the canvas after the transfer.
Can you draw directly on canvas?
Some artists, especially those confident with their skills, draw their images directly on the canvas using the free-hand or grid method. This technique lets you get the painting’s outline on the canvas without committing to it.
Drawing on canvas is also best for planning your painting. Since it is temporary, you can move around your pieces to make the drawing look more harmonious. This method is especially helpful if you don't have a model or reference image to follow.
Artists may use graphite pencils, watercolor pencils, or charcoal to draw on a canvas. However, we don't recommend using charcoal with water-based paints since the paint may look muddy with charcoal marks.
Can you erase pencil on canvas?
You can erase pencils on canvas using a damp cloth and liquid soap. Add a few drops of liquid soap, preferably pH neutral, into a small water bowl. Dip one end of a clean rag into the slightly soapy water, wring out the excess water, then rub the rag to the area you want to erase.
Other artists also use a wet eraser. Simply dip a white rubber eraser in water, then rub it over the pencil mark to remove it. Remember to let the water evaporate before drawing again to get precise lines.
Conclusion
So there you have it! Our complete guide to transferring your drawings onto canvas. We hope this article has been helpful and that you feel inspired to start creating beautiful art pieces.
As always, if you have any questions or feedback, please don’t hesitate to get in touch with us. Happy drawing and painting!