How To Emboss Leather: The Ultimate Guide For Every Enthusiast

Leather embossing is a new hobby that has grown in popularity over the last few years. The process is quite simple, and many people are looking for how to get started.
First, moisten your leather after taping its back. Next, position the leather stamp by making a line in the middle of the leather. Lastly, emboss by tapping your stamp firmly with a mallet.
What tools do I need to start embossing leather? What is the workable budget to start? These are some of the things you'll learn in this article.
Why Emboss Leather?
Embossing is a unique way to add depth and dimension to your leather projects. It makes the design stand out beautifully and adds an element of texture.
Embossing also provides a protective layer on unfinished leather because the deeper you impress designs, the more the leather fibers get more compact.
How to Emboss Leather
-
Choose the right leather
Finished leather is more resistant to embossing or tooling because of the oils and waxes applied to it. Emboss unfinished leather for best results as it still absorbs moisture to expand the fibers to have better-impressed designs. You can use leather finish once the project is done, but never before.
Another tip is to find the right leather. Leather has several types, and you can't use all of them for embossing. We recommend top-grain and corrected vegetable-tanned leather for your embossing projects. These leathers are durable, have a distinct leather aroma, and have a lovely earthy tone finish.
Thin leather also doesn't work too well with embossing, so get one that's at least 2mm thick.
-
Get the right tools and supplies
Your artistry and expertise won't do you any good if you don't have the right tools. Tools are expensive, and there is no need to buy them unless you use them for a long time. You can also try our tutorial on how to make DIY leather stamps.
-
Find the right workspace
Leather crafting can be complex without the right equipment. A comfortable and stable work surface will help you create items more efficiently and with fewer health risks. You'll want your work table to have an adjustable height so you can work standing or sitting.
Leather Surface Embossing Basic Terms

If you want to learn how to emboss leather, you need to know crafting terms that may mean a different thing when used in other media. Understanding these terms makes it easier for you to create lovely leather goods in no time.
-
Embossing
Technically speaking, embossing on leather needs special equipment to transfer a design to large sheets of leather. Usually, leather that does not pass the grade for fine leather goes to the embossing process to mask imperfections while increasing its value.
You may leave the design as it is for blind embossing or add dyes to highlight the design. For texts and small logos, blind embossing is good, but we recommend you apply the leather dye for large areas with an intricate design. You'll observe that the leather darkens slightly in embossed areas.
-
Tooling
At the crafters' level, embossing is a term interchangeably used for tooling and sometimes stamping. Tooling is done strictly by hand and requires a certain level of expertise before achieving a professional look. Stamping tools are part of the tools you need for leather tooling. As with other leather crafting techniques, tooling works best with unfinished leather.
-
Stamping
On the other hand, stamping means using an embossing machine and a leather stamp to transfer an image. This method also includes hot foil stamping and branding. You may also use an arbor press with your metal stamps for blind effects.
-
Engraving
Though engraved leather may look the same as embossed leather, engraving involves cutting through the leather surface and needs a leather finishing product to protect the leather from damage.
-
Carving
Carving leather is the primary purpose of a swivel knife and is the first step to leather tooling. Consistency is a must when cutting to have an even depth throughout the work.
-
Casing
Casing, for a leathercrafter, means adding moisture to vegetable-tanned leather. The leather absorbs the water to expand the fibers to be more receptive to stamping and embossing.
For thick leather (>3mm), you may want to soak it in water for a minute or use a spray bottle. Use a damp sponge to case thin leather. You may give your leather another rub with the sponge during the stamping process to keep up with the moisture.
Leather Embossing Tools

-
Swivel Knife
A swivel knife is an excellent tool to emboss leather because it's small and sharp and is necessary for leather tooling or carving. There are four types of swivel knives - angled, non-angled, hollow ground, and ceramic. A non-angled one is a good starter tool.
-
Stamps
Leather stamps are tools used to create an embossed pattern on the surface of leather. It would help if you had different stamps - border, background, beveler, and a basic basketweave stamp. You can add other stamps as you become more expert with it or have a custom leather stamp to add a logo to your projects.
-
Mallets
Crafters use a mallet to flatten the leather to take on an embossed stamp or to drive in stamps to impress a design. Mallet heads come in different sizes, determining how much pressure is applied when you use them. You can use nylon, rawhide, or wooden mallet, whichever you prefer using.
-
Cutting platforms
The stone slab (you can use marble or granite) is another essential tool you need for embossing leather. You may also try a flat anvil if the stone slab is too expensive for you. It provides a sturdy work surface during the embossing process, so you get a deep impression of your leather.
A pound board is a rubber board used under the stone slab or anvil to absorb the pressure during stamping. It also serves as an excellent board for cutting your patterns because it has a slight tack where your pattern paper sticks, tracing designs, or stamping directly on it. However, we don't recommend the latter, especially if you're working on thick leather, as it needs a firm surface.
-
Other Supplies
To start with embossing on leather, you'll also need the following supplies: a sponge, sharp scissors (preferably curved), precision knife or cutter, straight edge ruler, and French curve. Finish your embossed leather project with finishing oils or dyes to achieve the look you want.
Embossing Leather Equipment

-
Leather Embossing Machine
To do leather stamping, you need an embossing machine and metal embossing stamps. A leather embossing machine is usually hand-cranked to give more control to the crafters. It has a precision plate to absorb some pressure from the embossing machine while making a good impression on the leather. Push it harder until you achieve the desired embossing depth.
Usually, it doesn't need much muscle strength since it has a pressure potential of 2 tons. Instead of the expensive embossing machine, you can also use an arbor press. However, it can only work with smaller stamps such as logos.
If you want to go into hot stamping, you'll need a digital stamping machine. You may change its temperature setting using the digital display. Aside from leather, you can also use it to hot foil other materials, including faux leather, PVC, wood, and other similar materials.
-
Metal embossing stamps
Nowadays, it is easier to have a custom leather stamp made with a CNC or laser engraving machine. However, when using an arbor press, you can also use wax stamp heads to go into the press. Be sure to change the slotted anvil into a metal slab to have a sturdy surface for leather stamping.
-
Other supplies
For hot stamping, you'll also need heat-activated foil (it comes in different colors), thermal tape, and alphabet stamps with its T-slot and holder.
How Much Do You Need to Start Embossing Leather?
To start with leather embossing, you'll need $200-300 for the starter tools and equipment and another $100 for the supplies. You may need to spend more as you progress with your craft, especially if you'll buy machines and have custom stamps made.
How to Transfer a Design onto Leather
-
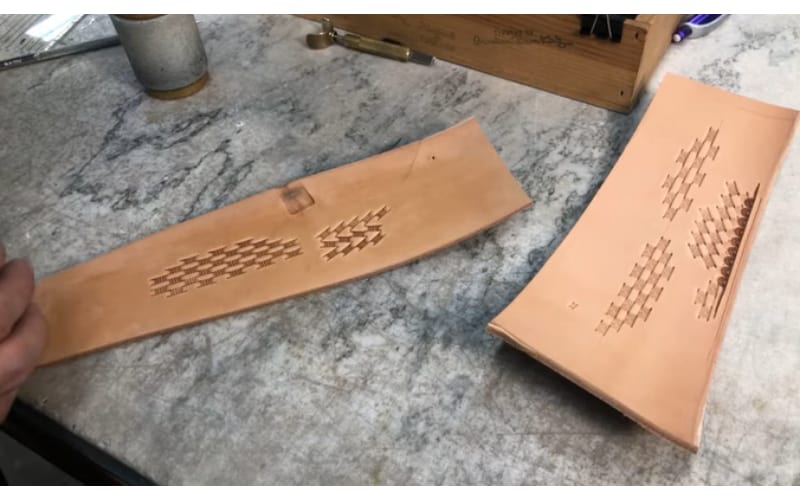
By tapping from a leather pattern

- You can use any finished leather design you want to use, then tape the backside to protect the leather.
- Position it over your new leather after casing it.
- Give the pattern 3-4 firm taps starting from one end to the other. Be sure not to move the pattern before you finish transferring it.
-
By tracing from a printout

- Once you have your design on tracing paper, case your leather with a slightly damp sponge to give it some moisture.
- Sharpen a #2 pencil, then lightly scratch the fine point on sandpaper to blunt it slightly. You can also use a 1mm embossing stylus.
- Finally, put your tracing paper with the design on top of the leather and trace lightly at first. Make a second pass to deepen the impression.
- Always use a French curve and a ruler for long lines to maintain the crisp image of your design.
How to Emboss Leather Using a Metal Stamp
1. Tape the back of your leather piece
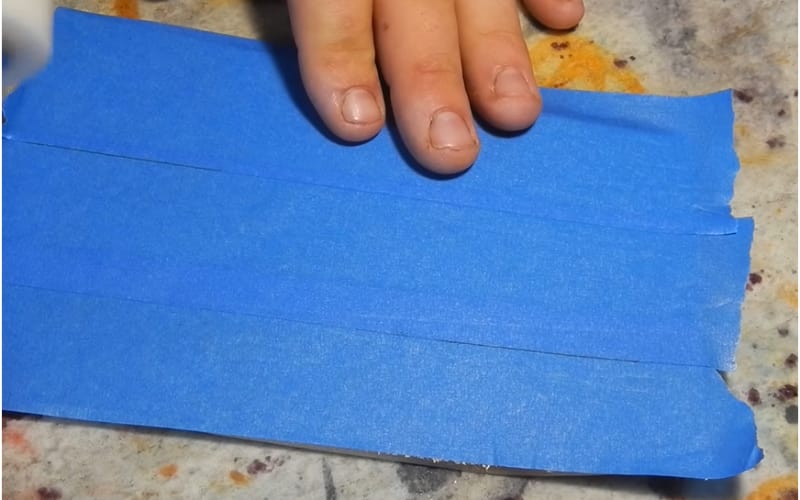
Before you case the leather, especially if working on large leather sheets, add painter’s tape to the back. This will prevent the leather from stretching after casing it. For smaller pieces of leather, you may skip this step.
2. Case your piece of leather

You can case your leather by wiping it with a damp sponge, spraying water over it, or soaking it in a small basin. The thicker the leather is, the more water you need. Wait until the leather has returned to its dry color before working on it.
3. Position your metal stamp over the leather

For patterned stamps like a basketweave, draw a line where you want to start, usually in the middle, to spread your design evenly.
4. Tap the stamp with a mallet

Once you have your stamping position in place, start stamping by giving your tool a firm tap. If you want to deepen the impression, give it half a tap without moving your stamp.
If you accidentally made errors while stamping, try this article for a simple solution. Try the hack on a piece of scrap leather before working on your project.
Getting Started with Your First Project - Simple Keychains!

Are you looking for a simple project to start with leatherworking and a permanent personal touch to your gifts? Learn how to emboss leather to make products like a keychain. It is also an excellent way to make use of scrap leather.
A small tip if you don't have a rivet setter, you can try lining a metal cylinder that is slightly larger than the rivet. Top it with a piece of cardstock or paper to mimic the tool for setting rivets. You can use a metal bolt or anything that fits the rivet to push it in and lock.
Simple Keychain

To start with your leather keychain, cut a piece of leather, depending on the size you want. You can make this keychain in 5 minutes or so.
- Cut a long strip of leather, about 3/4 inch wide and 8 inches long.
- Put a key ring through the leather strip, fold it in half, then secure it with a rivet a little below the bulge made by the ring.
- Prepare your design on tracing paper. You may also skip this step and use other stamps like alphabets for personalized keychains and then add fun stamps, perhaps flowers or geometrical designs to go with it.
- Case your leather strip, front side up with a damp sponge. Let the leather dry a bit. You'll know it's ready when it returns to its color before you cased it.
- Put a strip of washi on the leather strip to see where your stamps should go. Stamp the name you want, cut the leather to a semi-circle, ribbon, or leave it squared off.
- You may opt for unfinished or finished leather to go with the rugged or sophisticated look you want. Burnish the leather edges with a burnishing tool.
Cow tag Keychain

- If you decide on a more intricate design for your keychain, you may make a stencil with a Cricut maker or download and print some online.
- Start by cutting a larger piece of leather, about two inches square, from scrap leather. Cut the upper corners to look like a cow tag.
- Trace your design onto the leather strip using a slightly blunt pencil. You may also draw directly on the leather using a pencil. The graphite on the pencil also helps lower the friction on the leather.
- Deepen the impression according to your desired embossing depth.
- If you used tracing paper, you could start beveling around your design. If you drew directly on the leather, deepen the outline with a swivel knife.
- Finish your project by rubbing dye on the leather surface to give it an antique look. Buff the edges with a burnishing tool.
- Punch a hold on the narrow side of the keychain and attach a key ring holder to it.

If you want more suggestions on leather keychain designs, you can also consult the online designers at Keychains Co. It is GS-JJ's custom keychains website, which can design and customize keychains with various crafts and patterns with no minimum order. You can go to ask for advice by drawing a clear image of the design you want and they will be happy to help.
Conclusion
We hope this post answered any questions you may have about embossing leather and got your creative juices flowing. Check out this article to learn more about other tools you need!
Are you ready to learn how to emboss leather? Don’t forget to share your experience in the comments.