How to Epoxy A Tumbler Without A Tumbler Turner

You can still make fabulous epoxy tumblers even without a tumbler turner by using some scraps around the house. All you need is a little creativity.
This tutorial will show you how to epoxy a tumbler without a tumbler turner using three simple methods—hanging, manual turning, or revolving hanging. Each of these designs has its pros and cons, so you can decide which one is best.
We included unique tumbler designs you can make even without a cup turner. We also tackled common issues you might encounter during the process and tips on how to resolve them.
What You’ll Need
- Stainless tumbler
- Epoxy
- Glitters
- Painter’s tape
- Flat white paint
- Flat black paint
- Mod podge or adhesive spray
- Clear acrylic spray
- P220 sandpaper
- Silicone baking liner
- Measuring cups
- Popsicle sticks
- Silicone brush
- Nitrile gloves
- Blow torch
- Mask and goggles
Step-by-Step Instructions
1. Prepare your tumbler

Before starting, be sure to work in a well-ventilated area and use the proper protective gear, such as a mask and goggles, gloves, and apron.
- Remove all grit, grease, oil, adhesives, and even fingerprints from your tumbler. You can do this by either sanding it with 320-grit sandpaper and washing it with soap and water or wiping it off with a paper towel and 91% rubbing alcohol.
- Tape off the parts that you don’t want to apply epoxy. You can skip this step if you want a full epoxy tumbler.
- Apply your designs as desired. Skip to the five fabulous tumblers section to get inspired. Let your design dry.
2. Apply Epoxy with Gloved Finger

- Mix your epoxy well using a 1:1 ratio for the resin and the hardener. If the epoxy is too cold (less than 70oF), you can use a hot water bath to warm it up. Measure the components in individual cups and let them sit in hot water before mixing.
- Pour some epoxy on the tumbler and slowly distribute it to the tumbler using a gloved finger. Limit the drips by pouring only a tiny amount of epoxy at a time. Torch the air bubbles.
- Let dry for at least 12 hours or until dry to the touch.
- Sand and wipe off the dust from the sanding with a paper towel and rubbing alcohol.
- Apply a second coat of epoxy, torch, and let dry. Cure for 48-72 hours, depending on the epoxy brand.
3 Alternative Ways to Epoxy a Tumbler Without a Cup Turner
1. Hanging Method

Don’t boggle your mind on how to epoxy a tumbler without a tumbler turner. It’s a lot simpler than most people think. One method you should try is hanging—a straightforward way to make epoxy tumblers without special implements. You can use anything that can fit your cup, such as spray paint can, a piece of dowel, or a kitchen towel roll.
You can also make a 2-tumbler drying stand that you can still use should you decide to buy or create your cup turner. All you need is a ¾-inch PVC pipe and PVC ¾-inch tee connectors, PVC ¾-inch caps, two pieces PVC ¾-inch male adapters, and PVC cement. You can also make a 4-tumbler drying rack by following this tutorial.
How to Make It
- Fit your tumbler into the stand using wads of newspaper, a foam football, or a pool noodle. You just need a base to make your cup stand.
- Be sure to have a piece of paper or silicone mat to catch any drips as you apply epoxy using your gloved finger. Torch to remove air bubbles.
- Follow the drying and sanding procedures before curing your tumbler for 48-72 hours.
2. Manual Turning

You can use a makeshift tumbler turner that turns manually. Set it up using a PVC pipe, pool noodles, and a small cardboard box. You can even add weight inside the cardboard box, so your cup doesn’t topple over.
How to Make It
- Start by cutting a small hole on either side of the cardboard box.
- Ensure the holes are at the same height and are only large enough to fit the ¾-inch PVC pipe or 1-inch dowel.
- Add a foam football or pool noodle at both ends of the PV pipe or dowel.
- Fit your tumblers here and turn it manually while applying epoxy until it is firm enough to leave on its own.
- Torch, dry, sand, and reapply.
3. Revolving Hanging Method

An upgrade to the hanging method. You can pull off the revolving hanging method by utilizing a used bike wheel and adding a wooden platform with PVC stands, as shown in the photo above. You can also use a bamboo pencil caddy or mesh desk organizer.
This technique makes adding epoxy and glitters easier. If you decide to add a cup turner to your craft shop, you can always use this setup as a drying post.
5 Fabulous Tumbler Designs that Don’t Need a Cup Turner
1. Dishwashing Powerwash
For this tumbler design, you need Dawn Platinum Powerwash Dish Spray as the defining part. You can also add decals if you want.
How to Make It
- Prime your tumbler with black flat spray paint and let dry for 1-2 hours.
- Identify the tumbler part that you want to leave blank and spray it with powerwash dish spray. Spray flat gold paint on the part without the dish spray.
- Rinse the soap off with water and dry well. The resulting design has a lovely burst effect.
- Add your decals and spray with clear acrylic spray. Let it dry, then add your epoxy.
- You can add a sprinkle of glitter confetti if you like. Let dry and add a second coating of epoxy.
- Don't forget to torch after every epoxy application to remove the air bubbles and sand before applying the second layer of epoxy.
- Let it cure for 48-72 hours, depending on the recommendation of the epoxy manufacturer.
2. Hydro Dip

We love this simple but fantastic design on any tumbler. It’s perfect for anyone looking for a lovely all-occasion gift.
How to Make It
- Prepare your tumbler by wiping off all grime, oil, adhesives, and fingerprints with a paper towel and rubbing alcohol.
- Tape the parts you don’t want to add the paint. Prime with flat white paint.
- Snugly wrap cellophane around the lid. Push the cover in to keep the paint from the tumbler interior and on the cover.
- Fill a bucket with enough water to submerge your tumbler. Add a few sprays of the glossy paint you want to use, alternating the colors until you get enough paint on the top.
- Carefully submerge the tumbler into the bucket, slowly twisting it as you go to get the colors you want. Air spray and let dry.
- Remove the tape once the paint has set.
- Retape off the part you don’t want to add epoxy. Apply epoxy as recommended and torch off the air bubbles. Let dry.
- Sand before applying a second coating. You can also add decals at this stage if you want.
3. 3D Geode

What makes this design unique is the crushed glass and craft sand added to the previously hydro-dipped tumbler.
How to Make It
- Prepare your tumbler by wiping it clean with rubbing alcohol and a paper towel.
- Prime with white flat spray paint and hydro dip following Design #2. Use subtle colors so your 3D design pops out. Let dry.
- Mark off the geode area with acrylic paint.
- Add 2-3 colors of your crushed glass using superglue. A pair of tweezers and popsicle sticks also help in getting your crushed glass into your design.
- Use the craft sand to corral the crushed glass. Add Mod Podge to the crushed glass to set it in better. Let dry for 24 hours.
- The tricky part comes with applying epoxy to the 3D design. Apply epoxy first on the 3D design before you do the rest of the tumbler. Torch the air bubbles.
- Let it dry and sand off imperfections carefully before adding the second layer of epoxy.
4. Double-Sided Striped
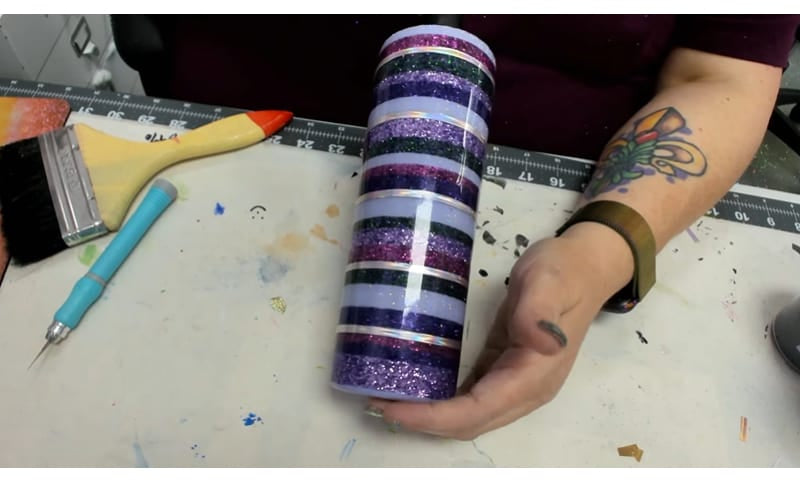
The most crucial element for this tumbler design is the double-sided tape.
How to Make It
- Wrap your tumbler carefully with double-sided tape, randomly alternating the widths. Try not to have wide gaps between the stripes.
- Remove the stripes where you want to add the glitters.
- Choose 4-5 shades of color, alternating them as shown in the picture above. You can also use vinyl stickers to break the glitters or close the gaps in your design.
- Apply epoxy. Torch after each epoxy layer and sand between applications. Cure as recommended.
5. Tie-Dye

Some tie-dye designs use acrylic paint as using a brush is much more complex for those who haven’t tried it. This particular design, though, uses dual-tip alcohol art markers. If you want to use acrylic but aren’t confident about your brush skills, go for acrylic paint pens instead.
How to Make It
- Draw a guide for your swirling design on a stainless steel tumbler, previously spray painted with flat white paint.
- Keep the lines at least 1 ½ inches apart, carefully following a swirl along the side of the tumbler.
- Follow this swirl as you make squiggles along the guide mark, starting with hot pink, purple, blue, green, yellow, and orange. You can also use the color pattern you like, such as monochrome, contrasting, etc. Use the fine tip of your alcohol marker.
- Dip a small round brush in 91% rubbing alcohol. Dab it on a paper towel to remove the excess alcohol to keep your design from running.
- Blend along where the colors meet and cover the white lines you missed during the squiggling process.
- Dip your brush in alcohol when it becomes too dry.
- When you finish blending, you can use a clear acrylic spray to seal in the colors. You can also let it dry overnight before adding epoxy so the colors will set.
- Apply epoxy as recommended, using the method that works best for you. Always remember to torch off the air bubbles after each epoxy coating.
- Let dry and sand between applications.
Common Issues When Making an Epoxy Tumbler Without a Tumbler Turner
-
Uneven Finish
The main reason for this is the uneven distribution of the epoxy or applying too much epoxy and allowing it to drip. To avoid this, apply only a tiny amount of epoxy every time and distribute it as evenly as you can using your gloved finger.
You can sand off the thicker parts or use a craft knife to remove imperfections and smoothen them. Apply a new layer of epoxy and let dry.
-
Messy Drips
If you pour too much epoxy at once, you’ll have messy drips on your worktable. Use a silicone mat, an aluminum tray, or some old newspaper to catch the drips. Also, try applying a small amount to avoid unnecessary drips. Remember, epoxy is expensive, so make use of every last drop.
-
Epoxy or Paint Inside the Finished Product
Some paint or epoxy may end up in the tumbler’s interior during the spray painting or epoxy process. Remove them using a coffee filter and rubbing alcohol or acetone on the stray paint or epoxy. You can use an acetone dispenser for easy access. The coffee filter does not leave strands as cotton does, so it is less messy.
If the paint or epoxy is too stubborn, use a craft knife and gently scrape it off. Be careful not to go deeper and scratch the tumbler. Finish off with rubbing alcohol or acetone rub. Note that acetone is more aggressive and may damage your epoxy finish if it accidentally touches your finished epoxy. Use 91% rubbing alcohol instead.
Conclusion
We hope you enjoyed this tutorial on how to epoxy a tumbler without a tumbler turner. The designs we included are easier to create without a cup turner because you can manipulate the process better without considering the turner’s motion.
The common issues and solutions when applying epoxy without a tumbler turner also come in handy, especially among newbie crafters. Which of the methods above would you like to try? Let us know in the comments.