How To Draw With Watercolor: Tips, Techniques And Creative Prompts

Do you want to learn how to draw with watercolor? Drawing with watercolor is a challenging task, but you can take it on with patience and diligence. In the following article, we will go over tips and techniques for using this medium. We also included a few creative prompts to help your artistic creativity flow at the end of the post.
Drawing with watercolors needs the right tools. We also included how you should choose them. Choose your subject, then make light sketches on your watercolor paper. Fill in the drawing with watercolors, then add contrasts and values. Lastly, add the details needed to highlight your painting.
What you'll Need
- Watercolor paper
- Watercolors
- Brushes
- Painter's tape
- Paper towel or rag
- Water dish or glass
- Palette or mixing tray
Step-by-Step Instructions
1. Prepare the right tools
Some newbie artists don't take having the right tools as a primary concern before painting. However, the choice of tools and supplies can make or break your watercolor painting journey. The most basic tools you need are watercolor paper, paint, brushes, a rag, a mixing tray, and something to hold your water.
-
Watercolor paper
When painting with watercolors, choose at least 140 lb (300gsm) cold-pressed watercolor paper with enough tooth and absorbency, some of the best attributes of a good watercolor paper. The paper should not disintegrate, especially if you're adding paint to a wet surface for the wet-on-wet technique.
Avoid hot press paper since it's smoother and shinier if you're a newbie and cannot understand the different techniques such as rendering. You may also choose from cotton or wood pulp paper. Cotton is preferable because it is stronger and is best for professional artists.
When selecting wood pulp paper, be sure to check if it is acid-free and lignin-free. Lignin causes the paper to discolor and disintegrate after some time. The size of the paper is also another consideration. For practice, use smaller format watercolor paper, like watercolor journals.
-
Watercolors
Watercolors come in cake, pans, tube, and pencil form, and each has its advantages and disadvantages. Professionals usually prefer tubes because they are easier to apply and mix without activating the pigments. Cake watercolors are best for beginners and young artists.
Watercolors in pans are more convenient since the pans (half pans or full pans) are removable from the case, so the watercolor artists can hold them while painting. They are also slightly moist compared with cake watercolors.
Lastly, you can use pencil watercolors to draw directly on your watercolor paper to activate the pigments later, pick pigments using a wet brush from the watercolor pencil or apply it on wet paper.
Beginners who have yet to master the watercolor brush will love using watercolor pencils. Remember that it is best to stick with a smaller set of good quality when buying watercolors than to have more colors that won't give justice to your paintings.
-
Watercolor brushes
Watercolor brushes are among the most expensive investments when painting. A good watercolor brush should have enough spring, snap, and capacity. Avoid pony hair because it is inferior in quality.
The best watercolor brushes are Kolinsky sable, but they also come with a stiff price. Other good alternatives are squirrel and sable, but you can also use synthetic nylon brushes and a combination of natural hairs and synthetic bristles.
Use the right size and type of watercolor brush. Mop and flat brushes are best for adding washes, while fine brushes are best for adding details. As our reminder for watercolors, be sure to buy better brushes than buy a cheap one.
-
Painter's tape
Painter's tape, masking tape, or washi tape is essential to keep your watercolor paper from buckling after it dried. Watercolor artists stretch their watercolor paper on a flat surface before they start to create art, especially if you're using the wet-on-wet technique.
Taping around the paper also helps keep the border clean. Be sure to push the tape down, so it keeps the watercolor from seeping into the paper underneath.
-
Palette or mixing tray
A palette or mixing tray is another must-have for the watercolor artist. Most of the magic happens on the mixing tray before the artist transfers it to paper. Some palettes have wells to add the paint you want to use, but an essential feature of a palette is compartments to keep your colors separated.
One enterprising artist used a styrofoam plate and added hot glue to divide the plate into compartments. However, you may encounter issues such as beading, especially if using a plastic palette. Visit our article on the best watercolor palettes to know more about them.
-
Water dish or glass
Although water is free, it is also one of the essential things you need before starting with watercolors. Dirty water affects the quality of your painting and the result of the pigment you're using.
Have at least one water dish at hand when painting with watercolors. However, if doing negative painting, it is vital to have more than one water dish for cleaning the brush and using it for mixing. How much water you add to your watercolors also determines the effect of your paper.
Less water means more color, while more water results in a faint wash. Be sure to use clean water when mixing paints to preserve their colors. Replace your water before it becomes too muddy. There's nothing worse than ruining your painting with dirty water.
-
Rag or paper towel
Don't underestimate the power of your rag or paper towel. You need it to absorb the excess water from your brush so you don't get too much water on your paper, especially if using the wet-on-dry technique. You may also use a sponge to do this job if you prefer.
2. Choose your subject
Choosing your subject before you start watercolor painting helps you plan your composition well. You may use outdoor scenery, a printed image, or a digital copy of your reference photo for inspiration. Just make sure you're using high-definition images for your subjects.
3. Make light sketches
Planning your composition is vital for successful artwork. Start by sketching your plan on scratch paper before transferring it lightly to your watercolor paper. Use light pressure and erase any marks that you don't want to show on your work.
4. Fill in the sketch with watercolors
Start painting once the sketch is in. Apply a light wash on your paper, then let it completely dry before adding more layers.
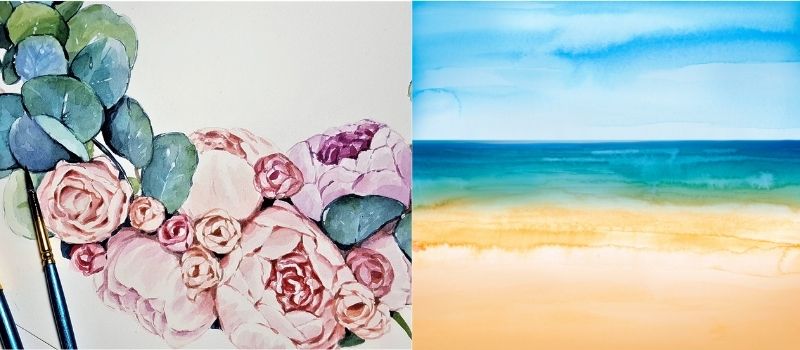
5. Add contrasts and values

Changing values creates contrast and depth to your paintings. Start from laying your mid-tones first and define some light- and darker values each time. Put your observation skills into use to study your reference photo and note where the darker values are.
If you observe the painting above, the left half doesn't have much contrast, and the values are subtle. The right half of the painting, on the other hand, made use of contrast and values. The result is more enticing, even if the paintings are very similar.
6. Add details
Once you have the contrasts and values in, add the final touches and details. You may add ink or another medium for mixed media effect.
Drawing with Watercolor: The General Process
Color mixing

Mixing colors is one of the things you should master first when using watercolors. Since not all colors are the same - some are slightly opaque, translucent, and transparent - they don't behave the same when mixed. Some brands even have varying transparency in one set, so it's best to understand your watercolors first.
Most artists recommend making a sample color swatch to show how one color mixes with another. It is easy to remember the resulting combination of basic colors, but mixing secondary and tertiary colors is a lot trickier, so the sample swatch helps.
Familiarize yourself with the color wheel and the color theory to understand color mixing better. Finding the right mixture for color is time-consuming and needs more practice.
Contouring

Watercolors are very effective for visuals because they blend smoothly. Using contouring techniques for adding a darker shade of the same color allows you to paint realistic watercolors. Using different opacity levels also helps.
For example, when you paint an apple, you don't only use red. In the above example, you'll see that the left image looks juvenile and amateur while the apples on the right look more realistic because of the contours.
Leave enough white space

Plan your composition well to leave enough white space on your paper. Some artists prefer sung masking fluid to protect the whites. Though you'll need more time to add the mask, let it dry, and remove it after painting, the results are very dramatic.
In the above painting, you'll see the white near the horizon, making it the lightest part of the painting so that the viewer can perceive the light from that area.
Don't dump your colors at once

Don't darken your colors from the start, instead build your colors as you go. It is easier to lift colors from a light wash than a dark one if you make mistakes. Let the layers be completely dry before adding more colors to avoid unnecessary blending and running of colors. It also makes the colors distinct instead of looking muddy.
You can also use a mask before painting and let it dry for extra protection against accidental smudges. Once you've finished, remove your mask carefully by tilting it at an angle so that all dried watercolors don't come off in one piece. The style of the painting demands adding solid colors in one steady brush stroke.
Also, consider the capacity of the brush. Though it is short and flat, it can go a fairly good length. However, we discourage newbies from taking on such a challenge early on, though it helps to practice several styles as you improve your skills. As it is, build your skills with constant practice before taking on more challenging projects.
Don't add too many colors
Other painters may get away with using too many different colors on your painting, but you should avoid that. It is best to stick to a limited number of colors to overwhelm the piece with too much detail and color.
Make use of colors and their analogs so you can still use values and tones so that even if you limit yourself to three colors, you can still build up your painting so it doesn't look flat.
Control the pressure
A defining characteristic of watercolor drawing is its casual expression. Other artists use only their wrists when working on their paintings. This technique results in stiff, forced strokes. Use your whole arm instead, keeping the shoulder and wrist relaxed.
You may observe that masters paint while standing. It is more about control and a wider range of motions. Hold your brush near the middle for more control. Learn to control the pressure of your strokes. You may add more pressure to your brush for broader strokes, while lighter strokes and details require less pressure.
Simplicity is the key
If you want to apply a soft wash before painting, keep it simple. To get watercolor sketching, don't try to perfect your strokes. The rugged finish gives your painting its allure.
Relax
Painting should be a relaxing activity, not stressful. You want to enjoy it and not dread the entire process. If you find that you are getting tense when painting, then take a break or ask someone else for help with your project.
Should You Sketch Before Painting?
Benefits of underdrawing before painting
Underdrawing is adding an initial sketch before you paint with watercolor. While there are plausible reasons for not underdrawing, there are also good reasons why you should.
First, it lays the foundation for your drawing, especially if you're a newbie to watercolors. However, be sure to sketch lightly and not leave a deep impression on the paper. It helps you track your progress while painting.
Next, planning your design is easier than when you paint directly without a pencil sketch. If you make mistakes while sketching, it is easier to erase them than when you make mistakes with your watercolors. One thing to put in mind when working with watercolors: you can make them lighter but cannot erase them.
Underdrawing also gives your painting a mixed media effect. Aside from simply making the outline sketch, you can also use other pencil techniques such as hatching, cross-hatching, and shading. Use an HB pencil for these techniques as graphite is prone to smudging. You may use graphite for simple outline sketches, though.
In the above example, you'll see the contrast between a more structured watercolor painting on the left and a more accessible abstract painting on the right. Both need careful planning but to make a detailed painting, a pencil sketch helps.
Arguments why you should not draw before painting with watercolors
Many artists prefer structure to their paintings, so they draw their outlines using pencils or graphite. Here are some arguments against drawing before painting with watercolors.
However, some artists want to make use of watercolor's properties, so underdrawing defeats that purpose. Watercolors tend to be spontaneous. Restricting the natural flow of watercolors within your painting defeats that purpose.
If you're using watercolor pencils, there is no need to outline using a pencil since you can do it directly with the watercolor pencils. When you add water to the watercolor pencils, there is also a tendency to bleed and smudge, especially if you use graphite.
When painting abstracts, you don't need to add a pencil sketch before painting. You'll want to explore the freedom of using watercolors to appreciate your watercolors better.
Creative Prompts
Landscape

Watercolor landscape - Image by Karen Rice
You can use different watercolor painting techniques to create landscapes and all other scenery. Before you start panting, decide on the color scheme and the style you want to use.
Negative painting

Turning an abstract painting into negative painting - Image by Creations Ceecee
Negative painting is a technique where you paint around objects as opposed to filling them in. This technique will give the object prominence and make sure that nothing distracts from your subject.
Flowers

Watercolor painting of a sunflower - Image by Jay Lee
Flowers are probably the most common subject for your watercolor paintings but are certainly not the easiest. An excellent way to tackle flowers is by first sketching them out.
A simple flower would be easier than an intricate one, so start with something familiar and work your way up. You can move to more intricate subjects as you improve your skills.
Marine Life

A watercolor painting inspired by marine life - Image by Nianiani
Marine life is another interesting subject to tackle for your watercolors, especially if you love working with analogs of blue. Live subjects are hard to obtain to use still images taken from videos as your reference image.
Masking

Watercolor painting was done by masking with torn paper - Image by Amber Rain Davis
Masking is a technique, but you can also use it as a subject for your watercolor painting. In the artwork above, the artist used torn paper to mask parts of the paper to create patterns on your paper.
Conclusion
The following article discusses a brief introduction to drawing with watercolor. If you want more information, refer to negative painting and abstract watercolors in this blog. Watercolor is not only an affordable medium, but it also provides endless opportunities for creativity. If one of our posts has helped with your project, please let us know in the comments below.
Thank you for explaining about underdrawing before painting. My sister is learning how to watercolor, so I’m trying to learn about some of the different techniques. This seems like it could be a good way to plan out the work beforehand. https://birgitoconnor.com/free-courses-1