25 Best Last-Minute Christmas Crafts On A Tight Budget

Origami Christmas Trees - Image by
Last-minute Christmas crafts on a tight budget? Don't worry. We have you covered. This article will discuss some of the best last-minute holiday crafts that you can do with things found inside the house or at a thrift store. We'll also offer tips on upcycling some materials you already have into a Christmas craft you'll be proud to display or give as gifts.
Paper Crafts
Making paper crafts is a lot of fun, especially when you can do it with someone else. The best part about that is how easy they are to make. Even younger children can make these Christmas crafts to enliven the holiday spirit.
1. Origami Christmas Trees

Origami Christmas Trees - Image by Hello Origami
This origami Christmas tree is one of the best ideas for holiday crafting among older kids who have better muscle control. You can use these origami Christmas trees to decorate your kid's room or a children's Christmas party.
Things You'll Need
Directions
- Cut your construction paper into squares, depending on the size you want for your Christmas trees.
- Fold the square in half to make a triangle. Fold again to make a smaller triangle.
- Open the paper, then lay it flat on the table.
- Make a rectangle by folding it in half, making sure the score lines cross the center of the square.
- Turn the square, so it looks like a diamond to you. Hold the opposite sides of the diamond, then pull them in to make a smaller square. The fold should be inside the square.
- Turn the smaller square again, so you're looking at a smaller diamond. Fold in the corners of the diamond, so they touch the center of the diamond. Score the folds.
- Make another fold on the fold you made earlier, then score the folds again. Your diamond now has 8 sections.
- Fold along the first score line from the center, then fold it in again. Do the same on the other side so that the ends do not overlap but meet at the line. This part will be the trunk of the tree.
- Repeat steps 6-8 on the other side of the square.
- Turn over the diamond so the tree's trunk is inside the diamond. Fold the triangles at the lower end of the tree and the trunk, tucking it inside.
- Decorate the tree with markers and stars cut from construction paper.
2. Construction Paper Christmas Ornaments

Construction Paper Christmas Ornaments - Image by Youten Crafts
Make construction paper ornaments for a fun and inexpensive Christmas craft with the family. Though your kids need help cutting the construction paper, these ornaments are easy to make.
Things You'll Need
Directions
- Make a 2cm-mark along both sides of the construction paper. This mark will indicate where you make your cuts later.
- Cut 1cm strips on the construction paper, careful that you don't go over the line you made earlier.
- Glue a long strip (2cmx31cm) of cardboard, then glue the construction paper to it to look like a cut tube of construction paper.
- Glue the ends together, so the tube now looks like an ornament.
- Cut 2 long strips of construction paper for the hanger.
- Make circles and stars from construction paper of contrasting colors. Glue the shapes randomly on the wreath.
- Make a bow from another piece of construction paper to complete the ornament.
3. Paper Snowman
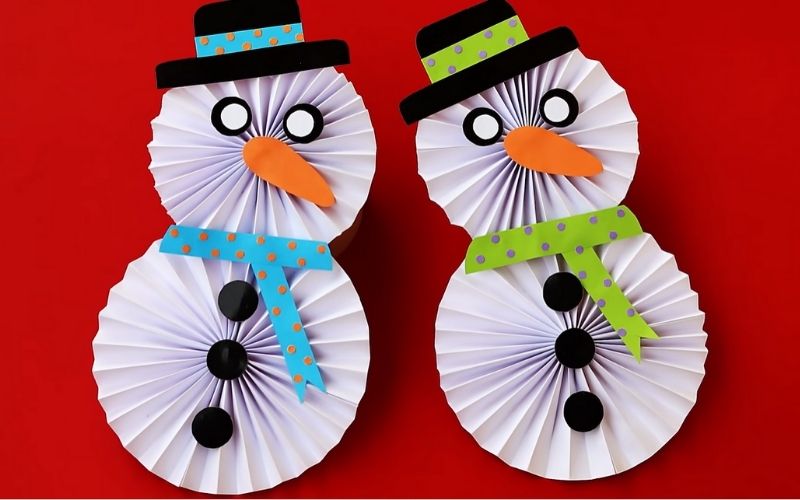
Paper Snowman Craft - Image by World of Art and Craft
This paper snowman is a super easy craft that every kid will love to make because it does not need special skills. It needs folding skills for the little hands to make these cutesy crafts.
Things You'll Need
Directions
- Fold two squares of white construction paper accordion-style, then glue them together to form a circle.
- Repeat the step above using smaller squares for the head of the paper snowman.
- Glue the head to the body.
- Cut out the snowman's hat from black cardboard and scarf from a gift wrapper. You may also use construction paper for the scarf, but you can draw on it using markers to add designs.
- Make small circles from black and white construction paper for the eyes and 3 larger black circles for the buttons.
- Make the nose from orange construction paper.
- Add the hat, scarf, eyes, and buttons from construction paper to the snowman to finish it.
4. Christmas Wreath

Christmas Wreath - Image by Craftastic
This Christmas wreath is for your front door because your Christmas decorations are never complete without a wreath. It's a fun project that involves simple folding. It doesn't even need fancy decors, just powdered glitters and glitter foam sheets.
Things You'll Need
Directions
- Cut your construction paper into triangles. Make 11 red and 11 green triangles of the same size.
- Fold them in accordion style, then fold them in half, leaving the smallest point of the triangle in the outermost fold. Glue them together to form a leaf.
- Add glue to the grooves of the leaves, then dip the leaf into glitters. Tap off the excess glitters.
- Cut out a circle from a piece of cardboard. The outer diameter should be 23cm. Cut out another circle with an 18-cm diameter.
- Cover the cardboard with green construction paper.
- Glue the red on the outer row, leaving enough space between them. Glue the red leaves on the inner row.
- Glue circles cut from the red glitter foam sheet between the green leaves.
- Make a bow out of construction paper to decorate the wreath.
- Finish the wreath by gluing a piece of ribbon to hang it.
5. Paper Angels

Paper angels - Image by Miss Mioumioum
Do you have old books that you no longer read? Transform those old books into beautiful paper angels that you can display on your mantel or side table to tie your Christmas decors together.
Things You'll Need
- Old books or newspaper
- Wood glue
- Hot glue gun and glue sticks
- Christmas ball, 1 ½"
- Wooden beads
- Gold cardstock
Directions
- Fold the book page to make a triangle from one side to touch the spine. Fold again to make a thin triangle.
- Fold the excess of the page, so it is in right angles with the page.
- Fold as many pages as you can to make a cone out of the pages.
- Remove 2 pages from the book you're using, then fold them accordion style.
- Glue 2 pages together to create a wing. You'll need four pages for the pair.
- Secure the wings at the top of the cone with some wood glue.
- Using some hot glue gun and glue sticks, install a Christmas ball at the top of the cone for the angel's head.
- Add a crown or halo cut from gold cardstock to the angel and a couple of wooden beads for the angel's hands.
- Make a songbook from gold cardstock. Add some pages to the songbook using some pages of the old book you're using.
- Finish the paper angel by gluing the songbook on the angel's body, just above the wooden beads.
Glass Jars and Bottles Crafts
If you have lots of glass jars and bottles, here is your chance to turn these jars and bottles into interesting Christmas crafts.
6. Mason Jar Snow Globe

Mason jar snow globe - Image by Lemonitto DIY
Turn those small mason jars and even glass jars from baby food into cute snow globes to decorate your house and give them as DIY Christmas gifts.
Things You'll Need
- Small mason jar
- Styrofoam circles
- Hot glue gun and glue sticks
- Miniature trees
- Miniature Santa
- Fake snow
- Baker's twine
Directions
- Cut a styrofoam block to fit the mason jar lid, then hot glue it inside the lid.
- Glue the miniatures on the styrofoam.
- Fill the mason jar with the fake snow.
- Cover the mason jar tightly, then tip it over, so the lid rests on the table.
- Tie a bow around the mason jar lid using the baker's twine.
7. DIY Mason Jar Luminaries

DIY Mason Jar Luminaries - Image by WhatsUpMoms
Take out your metallic spray paint and turn this craft into a simple painting job to make a DIY mason jar luminary. Line several of these mason jar crafts in your porch for some muted lighting or place it on your mantle together with some Christmas decors for a lovely mantelpiece display.
Things You'll Need
- Mason jar
- Black paint pen
- Gold spray paint
- Holiday scene printout
- Tea light
Directions
- Clean the mason jar with rubbing alcohol and a paper towel.
- Spray the outer part of the mason jar with gold paint. Spray more on the upper part than on the lower part for a monochrome ombre effect.
- Print out a black and white holiday scene you want on your luminary.
- Cut out the excess paper, then tape it inside the jar.
- Follow the outline of the scene with black paint pen, then fill in the image until no parts of the image are uncovered. Make sure the image is completely opaque.
- Put a battery-operated tea light inside the jar and display.
8. Mason Jar Centerpiece
Mason Jar Centerpiece - Image by Areli Miscavage
Here's a mason jar centerpiece to make out of fake snow to grace your dinner table. This masterpiece is one of the best Christmas craft ideas to try because it is cheap and super easy to make. You may also want to try painting frosted glass for those elegant centerpieces.
Things You'll Need
- Mason jar
- Sparkling snow
- Pinecones
- Christmas berries
- Pine needles
- Jute string
- Hot glue gun & glue sticks
Directions
- Apply glue to the mason jar.
- Sprinkle chunky glitter on the mason jar, then tap off the excess.
- Tie a length of jute string around the mason jar's mouth.
- Decorate with pine cones, pine needles, and Christmas berries.
- Put a tea light inside the jar.
9. Christmas Ball Ornaments

Christmas Ball Ornaments - Image by Wicked Sippers, Trippers & Flippers
Christmas ball ornaments are an all-time favorite for the holiday season. You may even turn these DIY ornaments into something you can sell to friends. Who knows what possibilities you can discover with this festive project.
Things You'll Need
- Clear crystal balls
- Old Christmas cards
- Fake snow
- Pine needles
- Satin ribbon, ¼"
- Double-sided tape
Directions
- Clean the crystal balls with alcohol and a paper towel.
- Cut out a 3-inch circle from a Christmas scene you like.
- Add double-sided tape on the top of the picture, then gently roll the image to insert it into the crystal ball.
- Spread the image using a pair of craft tweezers.
- Fill the Christmas ball with fake snow.
- Spruce it up with a sprig of pine needles.
- Insert a piece of satin ribbon into the slot on the crystal ball cover to hang the ornament.
10. Wine Bottle Nativity Scene

Wine Bottle Nativity Scene - Image by JaneLK Ideas
Who doesn't love a nativity scene? Take it a notch higher by turning an empty wine bottle into a cute scene to display on your mantle.
Things You'll Need
- Wine bottle
- Jute string
- Hot glue gun and glue sticks
- Nativity scene miniatures
- Spanish moss
- Dried Spanish moss
- Popsicle sticks
- Corrugated cardboard
- Burlap cloth
- Acrylic paint
- Fairy lights
Directions
- Clean the wine bottle with alcohol and a paper towel.
- Make a small cave-like shape on the bottle with a piece of jute string.
- Cover the rest of the bottle with more jute rope until you get to the neck.
- Cut popsicle sticks in different lengths, then glue them on the bottle.
- Paint the popsicle sticks with brown to resemble bricks.
- Remove the upper covering of 2x6-inch corrugated cardboard for the roof.
- Paint the corrugated cardboard with brown acrylic. Let it dry.
- Add some patches of white acrylic paint on the roof to resemble snow.
- Cover a square of cardboard with burlap cloth for the floor. Glue the wine bottle to the floor.
- Fold the roof in half, then glue it over the cave-like opening on the wine bottle.
- Support the roof with a pair of bamboo skewers.
- Cover the floor with Spanish moss, then add some pebbles.
- Add some dried moss to the floor and the roof.
- Arrange the nativity figurines under the roof.
- Put the fairy light inside the wine bottle.
Upcycling Materials
Turn some materials into easy peasy crafts to make with your kids and friends. Instead of bringing those toilet paper rolls and plastic bottles to the recycling station, why not upcycle them into DIY Christmas projects?
11. Toilet Paper Roll Christmas Ornaments

Toilet Paper Roll Christmas Ornaments - Image by Irina
Who would have thought these lovely Christmas ornaments were toilet paper rolls? These easy Christmas crafts are a winner with creativity and cheap crafting supplies.
Things You'll Need
- Toilet paper roll
- Glitter foam sheet
- Hot glue gun and glue sticks
- Satin ribbon, ¼"
- Rhinestone
- Metallic craft twine
Directions
- Cut the toilet paper roll in half.
- Impress the toilet paper roll on the glitter foam sheet, then cut out two circles for each paper roll.
- Measure the length and diameter of the paper roll, then cut that measurement out of the glitter foam sheet.
- Glue the rectangular foam sheet around the paper roll.
- Cut an 8-inch ribbon, then glue it on the inside of the paper roll.
- Cover both ends of the paper roll, keeping the ribbon out for hanging the ornament.
- Cut six 4-cm squares from another sheet of glitter foam sheet. Use a darker color than the one you used for the paper roll.
- Cut another six 4-cm squares from a silver glitter foam sheet. Glue the contrasting squares together.
- Roll the glued squares, so they look like a rolled diamond tube.
- Glue these rolled diamonds around the paper roll.
- Finish decorating the ornaments with metallic craft twine and beads.
12. Toilet Paper Roll Centerpiece

Toilet Paper Roll Centerpiece - Image by Mami Art
Here is another toilet paper roll craft to spruce up your dinner table. Turn those throwaways into a charming centerpiece with metallic spray paint, flowers, and Christmas balls.
Things You'll Need
- Toilet paper roll
- Glue
- Hot glue gun and glue sticks
- Metallic gold spray paint
- Artificial pine garland
- Christmas ball
- Christmas berries
- Foam apple
- Poinsettia
- Tea lights
Directions
- Fold a paper roll in half to flatten it.
- Measure 2 cm on the flattened roll, then cut them.
- Fold the 2 cm cuts again in half, then glue 3 at the V, so they look like leaves. Make 8 of these leaves.
- Cut the other toilet paper rolls into different lengths - 9 cm, 7 cm, 5 cm, and 3 cm.
- Glue the uneven paper rolls together.
- Make candle drips around the paper roll using hot glue.
- Make a flower out of the 2 cm cut paper rolls by gluing 8 of them.
- Set the candles on the flower.
- Glue the leaves in between the flower petals.
- Crumple some paper and insert them into the paper roll. Seal the paper in cardboard circles. Leave enough space to fit the tea lights into the paper roll candles.
- Spray the setup with metallic gold paint.
- Finish the setup by decorating it with evergreen bough, poinsettia, and berries.
13. DIY Sock Snowman

DIY Sock Snowman - Image by Moth Art
Got some old socks in the drawer? Don't throw them out. This craft studio DIY from old white and colored socks is super cute, and your kids may even want to play with them that you'll have a hard time finding more socks to transform into stuffies like these crazy little projects.
Things You'll Need
- Old white socks
- Old colored socks
- Old printed socks
- Polyester fiberfill
- Needle and thread
- Rhinestone
- Small Christmas balls
Directions
- Cut the sock just above the heel. A kid's sock makes a small snowman; an adult sock makes a bigger snowman.
- Make a circle out of cardboard, then cut it out. Fit the circle into the bottom of the sock for the snowman to stand on.
- Fill the sock with polyester fiberfill, then make a running sketch about ⅔ of the sock.
- Pull one end of the thread, then pull it tight to separate the body from the head.
- Fill the head of the snowman, then sew it close.
- Mark the eyes and the nose of the snowman with pins. Sew on beads for the eyes.
- Cut a small square from orange felt, then make a cone out of it for the nose.
- Snip off the excess felt cloth, then glue the nose on the snowman.
- Cut two socks of different colors for the bonnet. Sew the edges together to make it a double-sided bonnet.
- Put a small polyester fiber at the end of the bonnet, then sew to make a small pom-pom at the top of the bonnet.
- Use the printed half of the sock for the snowman's clothes and the half of the colored sock for the scarf.
- Glue two buttons on the snowman's clothes. Decorate the bonnet with Christmas balls.
14. Egg Tray Christmas Decor

Egg Tray Christmas Decor - Image by Valeri R
Everyone who loves eggs must have some paper egg trays that you need to recycle. Worry not; this lovely project is something you can easily make from some old egg trays and cardboard pieces.
Things You'll Need
- Star template
- Used paper egg trays
- Gift wrapper
- Glue
- Modeling clay
- Craft wire, #16
- Red nail polish
- White acrylic paint
- Paintbrush
Directions
- Cover a cardboard start with a white gift wrapper. Secure a short jute rope to the star's back to hang the decor later. Cut out leaf-like shapes from a paper egg tray.
- Glue the shapes on the uncovered part of the star template. Paint it with white acrylic paint, then varnish.
- Make some berries by wrapping a small lump of modeling clay around the end of a 16-gauge wire.
- For larger berries, melt some hot glue around a 16-gauge wire. Wet the hot glue with water to shape it before wrapping it with modeling clay.
- Paint the berries with red nail polish. Let it dry.
- Cut out house shapes from cardboard. Glue them together.
- Paint it with white acrylic paint, then black windows. Varnish the houses.
- Arrange and glue some fake pine garlands around the center of the star decor.
- Glue the houses, berries, acorns or nuts, and some beads around the house.
- Finish the decor with a red bow made from several kinds of red and silver ribbons.
15. Plastic Bottle Christmas Bells

Plastic Bottle Christmas Bells - Image by Lifestyle
See this cute Christmas bell? No, it's not store-bought but upcycled from plastic bottles. Be sure to use the same shape and size of plastic bottles for these bells since they come in pairs.
Things You'll Need
- Plastic bottles
- Glue
- Glitters
- Glitter foam sheet
- Metallic craft twine
Directions
- Cut off the upper half of a plastic bottle for the bell. Poke a hole into the caps.
- Cut a 12-inch long gold string and thread it into the caps. Tie the ends to secure them.
- Paint the plastic bottle bell with glue and apply gold glitters. You can also use whatever color of glitters you prefer.
- Cut a 16cm square from a green glitter foam sheet. Fold it into a triangle, then fold the triangle again in three.
- Cut out holly leaves from the green glitter foam sheet.
- Cut out 3-5 inch circles from a red glitter foam sheet, then cut a long strip out of the circle.
- Roll the strip around a skewer stick from the circle, starting with the outermost cut. Glue it to make a rosette. Make three rosettes.
- Crumple a sheet of tissue paper into a tight ball, then paint it with glue and cover it with red glitters. Make 4 of these balls.
- Glue gold strings to the tissue paper balls, then glue two of them per bell.
- Glue the two bells together, then glue the holly leaves and rosettes on the top of the bell.
Christmas Cards
When you can't spare the time and money to buy someone a gift, the easiest substitute is a Christmas card. Instead of the usual stamping and calligraphy, we incorporated some paper folding to make your 3D cards. After all, the last-minute need not be cheap.
16. Christmas Tree Card
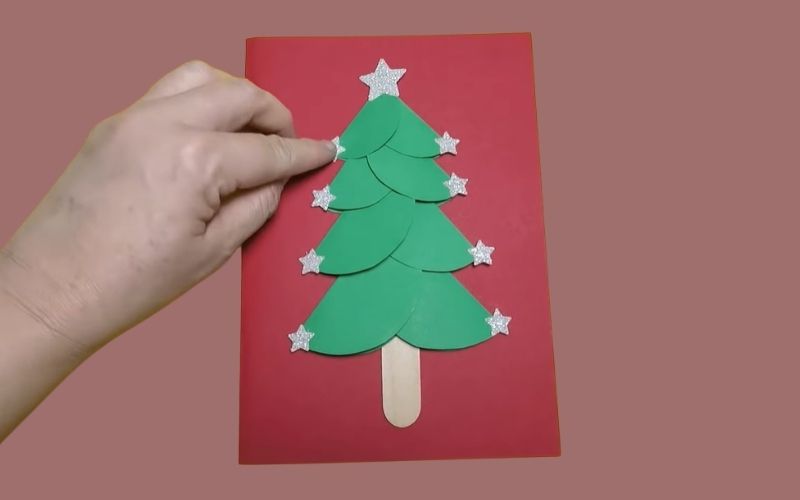
Christmas Tree Card - Image by Easy Kids Craft
You’ll love this Christmas tree card for its simplicity but fun look. A few circles from construction paper is all you need to make this card.
Things You'll Need
Directions
- Make 4 different circles, starting from 1" in diameter, moving ½" larger than the last.
- Fold the circles in half, pairing them according to size.
- Glue the two folded circles together, making a rough triangle out of them.
- Glue the four pairs to make a Christmas tree, then use the popsicle stick as the trunk.
- Stick this tree to a folded construction paper for the cover of the Christmas card.
- Decorate the tree with tiny stars cut from a glitter foam sheet. You can use a craft paper puncher to cut these stars.
17. Accordion-fold Christmas Card

Accordion-Fold Christmas Card - Image by Craftastic
This dainty Christmas card is simple to make yet lovely enough to please your friends and family. You may insert a dollar bill inside it to give to your friends.
Things You'll Need
Directions
- Cut a triangle out of white or beige construction paper.
- Make accordion folds on the triangle.
- Hold the folded triangle tightly, then punch a hole in the center.
- Pass the skewer through the holes on the triangle.
- Apply glue on the folds of the tree, then stick it to the card's front cover.
- Add a Christmas message and flower sequins on the cover.
18. Origami Christmas Card

Origami Christmas Card - Image by JanB Cards
Do you love origami and paper folding? Here’s a lovely Christmas craft to satisfy your crafting preference that sits well with the Christmas spirit.
Things You'll Need
Directions
- Cut the colored cardstock to size.
- Stamp the design and message you want on your card. Set this cardstock aside.
- Cut 5 different sizes of squares from scrapbooking paper.
- Fold the squares into triangles, then fold one side into threes. Use a scoring tool to impress the folds.
- Glue the folded triangles on the cardstock, starting from the largest triangle while overlapping the next triangle.
- Finish the card by adding a bow at the top of the tree.
19. Simple Pop-up Christmas Card

Simple Pop-up Christmas Card - Image by Yimleklek
Pop-up cards are easier to make than you thought. Check out this simple tutorial so you can duplicate it next year, using more complicated designs.
Things You'll Need
Directions
- Fold your pop-up card in half.
- Measure 3 cm from the edge and 3 cm from the fold, then cut.
- Fold the cut inward.
- Measure 4 cm from the cut to the center. Make another cut.
- Cut out the figures you want to use on your card, then glue them to the pop-up part.
- Glue the pop-up to the outer card, using a contrasting color.
- Decorate the outer card.
20. Christmas Window Card

Christmas Window Card - Image by Scrapbooking with Me Crafts
Don’t let time stop you from making something creative. Take out your embossing machine and die to make your 3D cards.
Things You'll Need
Directions
- Cut red and white cardstock to size with a rotary cutter. Glue the white, red, then another white cardstock on top of one another so at least ⅛" is visible.
- Emboss the smaller white cardstock with a Christmas embossing folder.
- Cut the leaves and the window from white cardstock.
- Stick the leaves cut out on one side of the red cardstock to resemble a Christmas tree.
- Cut a piece of foam tape to fit the back of the window.
- Fit it over the red cardstock. Decorate with red organza ribbon and rhinestones.
Yarn & String Christmas Ornaments
Strings, yarns, and even jute rope make simple and easy Christmas ornaments on their own or as decor for your crafts.
21. DIY Holiday Yarn Trees

DIY Holiday Yarn Trees - Image by HGTV Handmade
These DIY yarn trees are simple to make, and several of these miniature trees clustered together in a wooden tray makes an attractive mantelpiece decor.
Things You'll Need
Directions
- Roll a length of yarn around your hand.
- Wrap a length of bronze wire around the yarn. Press the yarn down, then roll the end of the wire for the trunk.
- Trim around the yarn to make it look like a tree.
- Drill a small hole on the wood slices to stand the yarn tree.
- Glue the bronze wire trunk to the wood slices.
22. Yarn Snowman

Yarn Snowman - Image by Yuyuka
These yarn snowmen are adorable, yet they're recycled from yogurt drink bottles. Make several of these snowmen to hand on your Christmas tree or string them together for a cute garland.
Things You'll Need
- Yogurt drink bottles
- Polyester wadding
- Double-sided tape
- Rhinestones
- Colored markers
Directions
- Cut polyester wadding to the size of the yogurt drink bottles. Use the double-sided adhesive to stick the wadding around it.
- Add more layers until you get the right thickness.
- Cut a larger piece of the wadding, and cover the whole bottle.
- Wrap a piece of yarn around the snowman's neck for the scarf.
- For the bonnet, cut a piece of cardboard about 1cm wide. Make it as long as the size of the snowman's head. Tape the ends together.
- Make several 6-inch yarn strips, then fold them in half, wrapping it around the cardboard ring until you cover the entire ring.
- Pull the ends of the yarn into the ring until you get it tight and even.
- Make a tie at the top to close the bonnet, then trim the excess yarn for the pom-poms.
- Color the rhinestones using the markers; black for the eyes and orange for the nose. Glue a small piece of yarn for the mouth.
- Decorate the snowmen with flower beads. Apply some rouge to the cheeks to complete the snowmen.
23. Yarn Gnomes

Yarn Gnomes - Image by Taffleberry Lane
These yarn gnomes are another adorable Christmas craft you can make out of yarn. Alternate the colors for a multi-colored bonnet and use white yarn with larger strands for the gnome’s beard for a chunkier look.
Things You'll Need
Directions
- Make a 4x4-inch square and 5x5-inch square from cardboard.
- Wind the yarn around the 5x5-inch square several times for the beard, then cut it once.
- Do the same for the 4x4-inch square. Cut it once and tie it together for the beard.
- Cut a 1 cm section from a tissue paper roll for the gnome's bonnet.
- Fold the 10-inch yarn in half, thread it to the tissue paper roll. You can alternate yarn colors if you like.
- Gather the end of the yarn for the bonnet and tie it together tightly.
- Get a handful of polyester fiberfill and push it under the bonnet to give it form.
- Glue the beard under the bonnet. Decorate it with a wooden bead for the gnome's nose.
- Trim the bonnet's pom-pom and the gnome's beard.
- Add a jute rope to hang the Christmas gnomes.
24. Tassel Fringe Christmas Tree

Tassel Fringe Christmas Tree - Image by Kinda Shabby
Do you have excess fringe tassels from your curtains and other crafts? Be glad you didn’t throw those scraps because now you can turn them into something you’ll love to hang on your wall for years to come.
Things You'll Need
- 5x7 wooden board or stretched canvas
- Fringe tassel
- Hot glue gun and glue sticks
- Wooden beads
- Jute string
- Antique green chalk paint
Directions
- Paint a 5x7-inch wooden board with green chalkboard paint. Let it dry, then buff it to give it a distressed look. If using stretched canvas, use green acrylic paint instead.
- Cut the tassel fringe in varying widths, and glue them on the wooden board.
- Add a wooden bead at the top of the tree.
- Wrap a length of jute rope in itself for the tree trunk.
25. DIY String Star Ornaments

DIY String Star Ornaments - Image by Ey to Zee Creative
Last on our list is this DIY string star ornament. Even if you’re new to crafting, this craft is easy enough for even young children to make. It may be messy, but be sure to use a sheet of old newspaper to catch glue drips.
Things You'll Need
- String or white yarn
- Dressmakers pins
- Cling wrap
- Glue
- Corkboard
- Star template
- Glitters (optional)
Directions
- Position your star template around a corkboard, then wrap the cork board with cling wrap.
- Stick the pins on the points of the star. Pour some glue into a bowl, then mix it with water.
- Cut a length of string or yarn into the glue. Then, wrap the string several times around the star template. Let it dry thoroughly.
- Cut a long length of string, and dip it into the glue. Wrap the string around the string star until you use up all the string.
- Add glitters if you want to decorate the stars.
Conclusion
With these various Christmas crafts, you will have the most memorable bonding time with your kids. We hope you found some last-minute Christmas crafts that gave your creativity a jump start or even inspired new ideas for DIY holiday gifts.
If we've missed anything, let us know in the comments, and we'll add it to our list! Have you tried any of these suggestions? Which ones did you enjoy most?