The Complete Guide to Resin Crafting: 10 DIY Projects to Make with Epoxy
Epoxy resin has become an incredibly popular material for crafters and DIYers in recent years. The shiny, glass-like finish you can achieve with resin makes it perfect for creating jewelry, home decor pieces, artwork, and more.
While working with resin requires some safety precautions, the end results are well worth it. If you're looking to try your hand at some resin crafts, here are 10 great projects to get you started.
10 Resin Crafts and DIY Projects to Make with Epoxy
- Resin Jewelry

One of the most common uses for resin in crafting is to make jewelry. You can encase dried flowers, coins, beads, seashells, and any other small objects in resin to create unique pendants, charms, and other jewelry pieces. Resin gives these items a smooth, professional finish and helps preserve the materials you put inside it.
To get started, choose silicone molds in the shapes you want, like circles or teardrops. Mix up your two-part epoxy resin according to the package directions. Carefully pour the resin into the molds, adding your dried flowers or other embellishments on top. Let it cure fully, pop the resin piece out of the molds, and attach a chain or cord to create a necklace or bracelet. The possibilities are endless!
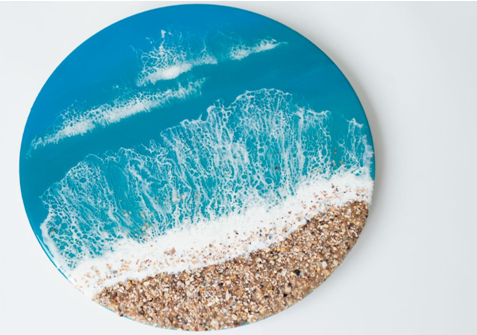
- Resin Coasters

Protect your tables and add a unique touch to your home décor with handmade resin coasters. These make great gifts too. Choose any small items to encase inside the coaster, like sea glass, shells, or pressed flowers. Or add drops of paint or swirls of glitter before pouring the resin for colorful, artistic effects. Square, round, or fun shaped molds all work well.
To prevent sticking, spray the molds lightly with nonstick cooking spray before pouring in the mixed resin. Top the resin with a few bubbles or white wisps to give the coasters an ocean vibe. Once cured, felt pads can be added to the bottom for function. Display them in a coaster set or give them out individually as thoughtful presents.
- Resin Boxes and Trays

Pour resin into silicone baking molds to create gorgeous jewelry trays, trinket boxes, and desk organizers. Mix in mica powder, alcohol inks, or acrylic paints for pops of color. Or top the resin with colorful sand, dried flowers, or glitter before curing. This project allows you to get creative with the designs.
When unmolding the resin, flexibility is key to preventing cracks. Gently bend and twist the mold to pop the resin out smoothly. Finish by attaching small rubber feet on the bottom to keep the trays and boxes from sliding around. A quick DIY way to add colorful storage options to any room.
- Resin Keychains

Make your keys distinctively yours with homemade resin keychains. Simply pour resin into keychain molds, add any small embellishments like beads or charms, and insert a key ring before curing. This is an easy resin project that comes out looking professionally done.
Get creative by placing tiny flowers inside clear resin or adding drops of gold mica powder swirled with a toothpick for a marbled effect. Or sprinkle in glitter and small studs for funky, dazzling designs. With the wide variety of keychain molds available, from animals to geometric shapes, you can create unique keychains for yourself or great little gifts for friends.
- Resin Serving Trays

Transform inexpensive serving trays from a dollar store into dazzling centerpieces for any table with resin. Pick up one or more basic plastic or wooden trays, tape off any handles or edges you don’t want covered in resin, and start decorating. Add strips of lace, fresh flowers, leaves, or other flat items across the surface of the tray before pouring on the resin.
The natural materials immersed in the resin create a lovely display for appetizers, drinks, or desserts at your next dinner party. For extra sparkle, try topping off the resin with glitter, iridescent mica powders, or glass beads. The finishing touch is peelable rubber bumpers on the bottom to protect tabletops. Now you have a customized serving tray that looks like a million bucks!
- Resin Pet Keepsakes

Preserve your beloved pet's paw print or hair forever in resin as a sweet memorial keepsake. Mix a small batch of resin and pour into a silicone mold or baking pan lined with parchment paper. Press your pet's paw into it gently, being careful not to move their paw around too much to keep the print clear.
You can also imprint their nose or add a tuft of fur. Float a small heart charm or their name in resin over the paw print before curing for a sentimental touch. Once fully hardened, pop the resin out and you'll have a transparent cast of their paw to cherish always. Display it on a shelf or carry it with you in a pendant or keychain.
- Resin Paperweights

Paperweights made from resin are easy to craft and make stunning additions to a desk or bookshelf. Find flat bottomed glass votives, vases, or other small glass containers. Print out photos, quotes, comic strips, or pages from a favorite book and cut them to fit inside the glass container.
Arrange the paper how you like within the glass, then mix the resin and pour it inside to cover the paper fully. Top off with beads, shells or other embellishments before the resin cures if desired. The paper design sealed beautifully in clear resin makes for an incredibly meaningful paperweight to cherish.
- Resin Wall Art

For a contemporary home accent, create abstract resin wall art. Stretch colorful canvas across simple wood frames. Then layer on different organic materials like dried flowers and leaves or coffee grounds. Pour on clear resin to coat the materials and seal them in place. The resin helps showcase and preserve the natural beauty of the plants and objects you embed.
Add interest by including bubbles or metallic mica powders swirled into the resin before drying. The plant filled designs sealed between the canvas and resin create bright, textured works of art to liven up any blank wall space.
- Resin Countertops

If you're looking for a more ambitious DIY to transform your home, consider making custom resin countertops or tables. Kits are available online with detailed instructions for pouring and curing the resin. Choose from clear, colored, or artist resin options. You can embed decorative objects like sea glass, stones, dried botanicals or boldly colored artwork under the resin.
There are even ways to simulate the look of marble or granite with specialty resins and mica powders. It takes more time and skill but lets you re-do kitchen or bathroom counters on a budget with eye-catching customized results. Add some shimmery style to your living spaces.
- Resin Shaped Lamps

Light up a room with your own hand poured resin lamps. Buy lamp bases and wire kits to combine with your resin pieces. Choose silicone molds shaped as abstract sculptures, geometric forms, or any shape that inspires you. Embed colorful flowers, glitter, photos or fabric in the resin before it hardens.
Then simply assemble the lamp kit components and adhere them to the resin base with epoxy glue for the finishing touch. The light glowing through the shaped resin makes for incredible decorative lamps perfect for accenting end tables, desks, and more in your home. Make matching sets for a cohesive style.
Conclusion
Epoxy resin can be used to make all kinds of beautiful, artistic projects for your home, for yourself, or to give as gifts. With just some simple resin molds and materials, you can let your creativity run wild. Whether you want to add some personal flair to everyday objects like jewelry or dishes, preserve natural materials like flowers or seashells, or create abstract art and designs, resin provides the clear, glossy finish to make it happen.
The only limit is your imagination! So try out some of these projects to get your feet wet with epoxy resin crafting. And don’t be afraid to experiment and put your own spin on these ideas. Part of the fun with resin is that you can embed practically any small objects, colors, or textures to achieve different looks. Just be sure to work in a well ventilated area, wear gloves for safety, and fully read product instructions.
With a bit of practice, you’ll be designing incredible resin crafts in no time that make perfect additions to your home décor or creative gifts tailored exactly how you like. Let the resin revolution begin!