30+ July 4 Craft Ideas: Fun Decors, Party Favors & DIY Snacks

Table of Contents
- July 4 Crafts for Younger Kids
- July 4 Crafts for Older Kids
- July 4 Decorative Crafts for the Party Spirit
- Something for the July 4 Party Table
Independence Day is just around the corner, and we have some great ideas for you to share with friends and family. Whether you're looking for fun 4th of July crafts for kids or something that adults will enjoy as well, we've got it covered!
From party decorations that are easy enough to make to recipes perfect for sharing with the whole family, this article has everything you need to prepare!
July 4 Crafts for Younger Kids
Young children need to be aware of patriotic holidays and their importance in history. Teach your kids about the 4th of July celebration and why it should continue for years while doing these easy crafts. Aside from teaching them about history, these crafts will also develop their fine motor skills and creativity.
1. Independence Day Visor

If you have any old visors lying around the house, this is a great project to upcycle them! All it takes are some red, white, and blue construction paper, glitter paper, and glue. We decided to make it kid-friendly for this craft and use a paper plate for the visor instead. But go ahead and make use of the visor for the adults, if you like.
What You'll Need
Directions
- Cut red, white, and blue strips along the short side of the construction paper, each about ¾ - 1 inch wide each.
- Draw a circle large enough to sit on your kid's head on the paper plate, then cut it off.
- Let the kids glue the strips around the paper plate, folding the strip in half to sandwich the paper plate.
- Alternate the red and white stripes until only a quarter of the plate is not covered, then add the blue strips to complete the design.
- Make 5 white stars traced from construction paper and 5 smaller ones from silver glitter paper.
- Glue the glitter star on top of the white star, then arrange them on the blue stripes of the visor.
- Cut a triangle off the edge of the stripes to resemble a ribbon, and your visor is good to go.
2. Star Shirt

Create something spectacular with your kids with some fabric paint and Q-tips! It is one of those craft ideas you should explore to give an extra festive touch to an old white shirt. Your kids will surely love doing this fun craft that they can also do with their friends. And don't worry, even if it gets messy, they will wear them all year-round, knowing they made something unique.
What You'll Need
Direction
- Cut out stars from a piece of construction paper. Tape them on the shirt you want to paint.
- Tie a rubber band around a bunch of Q-tips (15-20 pieces should do).
- Dip one end of the Q-tips on red fabric paint and dab it around the stars. Use another bunch for another color.
- Let the paint dry before removing the stars.
- You can try this star stencil. Tape it on the shirt, then dab the Q-tips into it so that the colors are within the star stencil.
- You may also use red or blue shirts, using a different color combination, like blue and white on a red shirt or red and white on a blue shirt.
3. Toilet Paper Roll Lantern

This toilet paper roll lantern is easy enough for children but might take some help from an adult to wrap them around the toilet paper rolls. You can use any type of decorative material you want - scrapbooking ribbon or wrapping paper will work as well! It also makes an excellent crafting option to occupy the kids while you're busy preparing for the celebration.
What You'll Need
- Construction paper
- Tissue paper (red and blue)
- Toilet paper roll
- Beads
- Star puncher (optional)
- Single-hole puncher
- Glue
Directions
- Cover a toilet paper roll with blue construction paper.
- Decorate with white stars cut from construction paper.
- Punch two holes on one end of the covered toilet paper roll.
- Put a string through the holes and make a knot about 2 inches above the toilet paper roll.
- Add red, white, and blue beads to the string, then tie another knot to lock them.
- Cut ¾-inch strips from red and white tissue paper and glue them alternately to one end of the lantern for the tail.
4. Patriotic 4th of July Lantern

Teach your kid how to create a super easy craft that you can use for other holiday occasions, like Christmas and Chinese New Year.
What You'll Need
Directions
- Fold the red construction lengthwise in half. Make cuts on the folded side, about ¾ inch apart, leaving 1 ½ inch on top.
- Take a white construction paper and fold it in thirds lengthwise, and cut one section of it. Form a cylinder from it, overlapping the ends to ½ inch on each side when applying glue.
- Open the red construction paper and glue it around the white cylinder. Push the other side of the red cylinder up and glue it to the other end of the white cylinder.
- Cut two 1 ½-inch strips from blue construction paper and draw stars on them using white crayons. Glue this strip on top and bottom of the lantern.
- Punch two holes on one end of the lantern, thread a piece of ribbon or string to it to hang it.
5. 4th of July Crown of Stars

Let your kids be royalty for a day by helping them make this 4th of July crown of stars. Just cut the pieces and let your kids assemble these patriotic crowns for their friends too.
What You'll Need
Directions
- Fold a white construction paper in half along the long side. Cut, then fold again.
- Staple the two strips together, making sure it fits your kid's head.
- Make stars of varying sizes from red, white, and blue construction paper, 2 for each size.
- Cut different lengths from some red, white, and blue pipe cleaners.
- Glue the pipe cleaner between two stars.
- Insert one end of the pipe cleaner into the slot on the crown, then staple it together. Alternate the sizes and colors, using the three biggest stars on the front.
July 4 Crafts for Older Kids
These DIYs are a bit challenging to keep your older kids engaged while doing some 4th of July crafts that they’ll be proud to display around the house.
6. Patriotic Gnome

Gnomes are cute decors you can put anywhere around your house. Younger kids who love painting may even do this easy craft. The good thing about this gnome is that you can remove the flag to use it for Christmas decor or just let it sit in your fairy garden after the holiday is over.
What You'll Need
Directions
- Paint the hat of the gnome blue, the shirt red, and the pants white.
- Once the paint is dry, add a few white dots on the hat, then add any embellishments you want.
- Hot glue a flag topper across the gnome's body, so it looks like he's holding it.
7. Paper Straw Wreath

Your kids will love putting this heart wreath made with paper straws. The hardest part with this craft would be to decide how big you want it to be.
What You'll Need
Directions
- Make a heart outline out of heavy cardstock and a slightly smaller heart to use later.
- Cut the paper straws into 3 lengths. You can decide what pattern you want to do.
- Position the paper straws in 8-12 strategic points on the heart outline so you have a feel of how they flare out.
- Fill out the spaces with more straw.
- Cover the smaller heart with scrapbook paper or paint it with chalk paint and fill it with stickers.
- Glue some foam stars on the straw around the heart.
- Add a string behind the wreath to hang it.
8. Little Houses

If you have some wooden toys that are no longer complete or your kids have outgrown, make them into some tiny houses that you can use to beautify your foyer table or mantel.
What You'll Need
- Wooden domino
- Jenga blocks
- Scrabble tiles
- Sanding block
- Hemp rope
- Acrylic paint
- Paintbrush
- Hot glue gun & hot glue sticks
Directions
- Cut one end of the wooden domino into a triangle with a precision knife or utility cutter to resemble the roof. Make three of these.
- Sand off the coarse ends of the triangles.
- Shorten one of the houses by cutting a quarter of an inch on the other end of the domino.
- Glue two Jenga blocks together. Make two of these. Paint them in white.
- Paint the tall houses with red and blue, and the short house with white.
- Sandwich the houses between the Jenga blocks by hot-gluing them together.
- Glue the letters U, S, and A from Scrabble pieces.
- Finish off your craft by wrapping hemp rope around the houses, then hot glue the excess on the back to lock the ends.
9. Uncle Sam Bead Garland
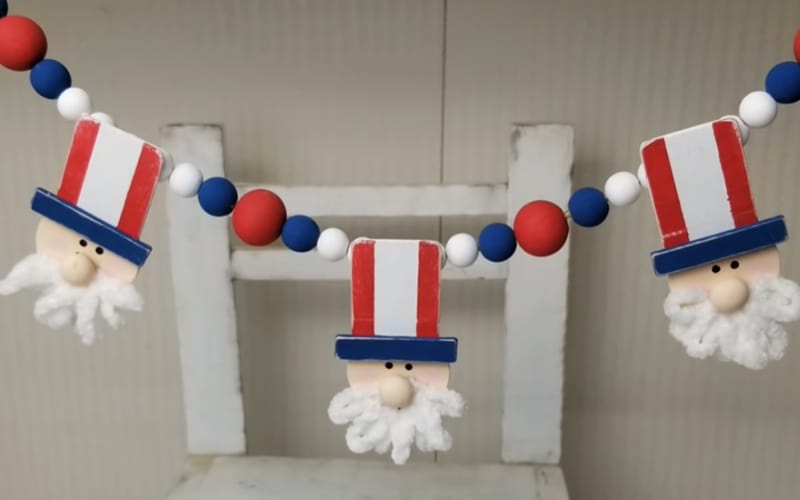
Here's another 4th of July craft you can make from old wooden toys, mismatched beads, and some creativity. If you want a longer garland, you may add more Uncle Sam's heads or double the number of beads.
What You'll Need
- Wooden domino
- Wooden disks, 1"
- Popsicle sticks
- Wooden beads
- Nail file
- Hemp rope
- Hot glue gun & hot glue sticks
- Acrylic paint
- Paintbrush
- White yarn
Directions
- Measure about 1 1/4 inch of the domino, then cut the excess off and sand the rough edges.
- Paint 4 wooden dominos with red and white stripes, and use tan paint on the 4 wooden disks and 4 8mm wooden beads.
- Cut the popsicle sticks longer than the width of the domino, sand off any rough ends, then paint it blue.
- Glue the blue popsicle stick on the bottom of the domino and then the head.
- Add the "nose" to the face using the 8mm bead, make a small dot for the eyes with a black marker, and the beard using the white yarn.
- Distress Uncle Sam's hat by lightly rubbing a nail file on the edges and glue a bead on the back of the hat to string your garland later.
- Paint the large beads red and the tiny beads white and blue.
- To assemble the garland, string a white, blue, red, blue bead, then two white beads, Uncle Sam, and repeat the pattern until you use all the beads.
10. Patriotic Shelf Decors
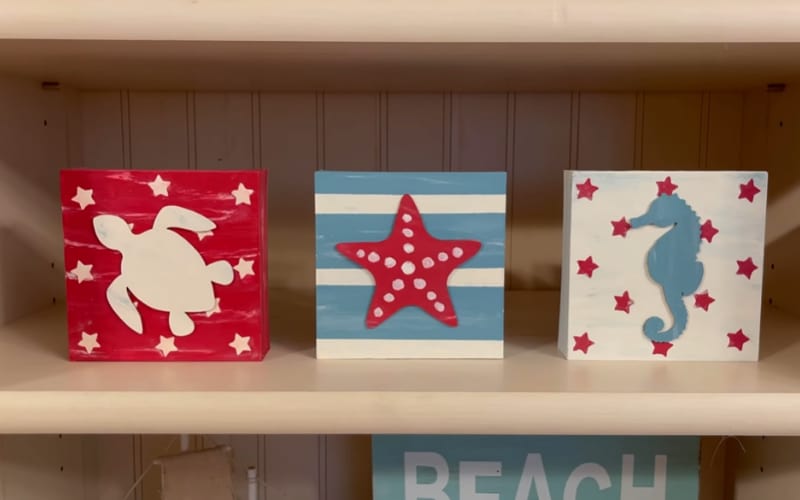
You may use this particular 4th of July decoration for the whole summer because of its charm and colors. You can also customize it for a farmhouse or mountain setting by using wooden cutouts fit for your theme and using sky blue or midnight blue instead of agave blue used in the example below.
What You'll Need
- Unfinished panel boards
- Acrylic paint
- Paintbrush
- Star stencil
- Wooden sea creature cutouts
- Farm animal cutouts
- Forest creature cutouts
Directions
- Paint your wooden panel boards with red, ivory, and the shade of blue to achieve the theme you want.
- Stencil some ivory stars on the red panel board and red stars on the tan panel board. You may also use red star stickers and white star stickers but apply two coats of Mod Podge over the stickers to ensure they stay in place.
- On the blue panel board, add stripes with two coats of ivory paint.
- Paint the wooden animal cutouts, then glue them on the wood panels.
- You may add Jenga blocks to the back of the wood panels to stabilize them.
Decorative July 4 Crafts for the Party Spirit
The Fourth of July is about celebrations and decorations. Instead of buying decors, why not make one? Some materials used in these patriotic crafts are already around your house if you’re into crafting, and even if you’re not, we’re sure you can scrounge up enough supplies to make these fantastic 4th of July crafts.
11. Captain America Accordion Decors

Captain America fans will surely love this 4th of July crafts to grace their walls and photo booths. You may even add popsicle sticks before closing them together to make a fan out of these.
What You'll Need
Directions
- Cut lengthwise strips of red and white construction paper.
- Make a red and white stripe on one end of the construction paper, then do the same to the other end, using the red on the outermost side.
- Fold accordion-style along the width of the construction paper. Make two of these for a single decor.
- Assemble by applying hot glue to the outer folds.
- Decorate with a star cut from silver glitter paper.
- To make smaller decors, cut the construction paper in half, then follow the instructions above. You may also opt to make solid colors or assemble a red, white, and blue accordion fold into one decor.
12. Faux Firecrackers
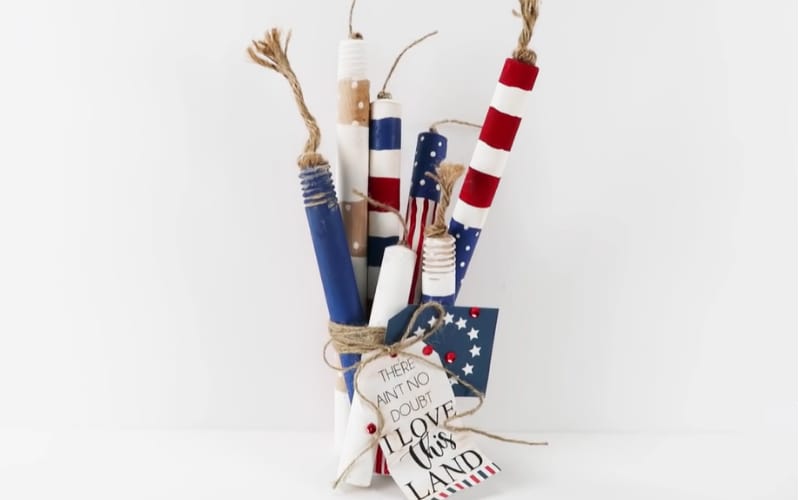
Firecrackers and fireworks play an essential role in the 4th of July celebration to replace cannons and guns after the rise of safety concerns during the early years of celebration. Colorful fireworks also make up the bulk of the expense of most US states, accounting for close to $300 million imported from China in 2016 alone.
What You'll Need
- Wooden dowel, 1”
- Hand saw
- Acrylic paint
- Paintbrush
- Sanding block
- Hemp rope
- Hot glue gun & hot glue sticks
Directions
- Cut 5-7 different lengths from a dowel.
- Sand the cut ends to smoothen them.
- Paint the dowel cuts with red, white, and blue acrylic paint, according to the color combination and design you like.
- Make a knot on a length of hemp rope, then cut about 1 ½ inches from the knot.
- Hot glue the knot part to the top of the dowels to resemble a wick for the firecracker. Fray the ends of the wick.
- To assemble the firecracker decor, glue the firecrackers together, testing them as you go to make it stand.
- Tie them together with a length of hemp rope, going around the firecrackers until you get the thickness you want.
- Add some patriotic tags if you want. Instead of hemp rope, you may also use some printed burlap ribbon to make a messy bow.
13. Patriotic Windmill Decor

Recreate the wonder of vintage windmills and use this 4th of July crafts as party decor, wreath, or even as a fun trivet. If you want to use it as a trivet, though, we suggest you use ¼” dowels instead of bamboo skewers.
What You'll Need
- Placemat
- Bamboo skewers
- Wire wreath frame
- Wooden disk
- Acrylic paint
- Paintbrush
- Hot glue gun & hot glue sticks
- Antique wax
- Star stickers
Directions
- Cut the second wire from the wire wreath frame with a heavy-duty wire cutter.
- Make a pattern of your windmill blades out of cardboard. Adjust the size so you can fit 15 of these on your decor.
- Lay your placemat on the table, trace your pattern, and cut out 15 of these blades.
- Glue the blades to the bamboo skewers, then arrange them around the wreath. Adjust them, so they have an even distance between blades and apply hot glue.
- Apply antique wax to the visible ends of the bamboo skewers and the wooden disk.
- Paint blades: five blades with blue and alternate red and white paint on the remaining blades.
- Decorate the blue blades with star stickers.
- Distress the blades with more antique wax.
- Add a hanger by tying a hemp rope on it.
14. Messy Bandana Garland

Do you have fabric scraps that are too small or too random to use in other crafts? Rather than throwing them into the dumpster, that's just the thing you need for this garland. The hardest part here will be weeding out the fabric that does not belong to the holiday theme.
What You'll Need
- Colorful bandana
- Fabric scraps
- Cardboard
- Silver thumbtacks
- Glue stick
- Hot glue gun & hot glue sticks
- Hemp rope
Directions
- Make 3 triangles from a cardboard box, and the letters U, S, and A. Paint the letters white.
- Cut a piece of bandana into triangles, using the cardboard as the guide. Glue the bandana triangles to the cardboard triangles. Let it dry.
- Glue the letters to the bandana triangles, one for each triangle.
- Push a silver thumbtack to the corners of the triangles and fold the tip to prevent accidents.
- Stretch your hemp rope between two chairs or posts, then tie the fabric scraps to it.
- To finish the garland, line the triangles to the rope and glue them on the fabric scraps, leaving 4-6 inches of space between the letters.
15. Freedom Truck Planter

Create a customizable planter box that you can use for various holidays and occasions without spending more time and money. You may also use live plants in small pots or faux greenery arranged on a slab of floral foam.
What You'll Need
- Unfinished wooden panel, 4x4 inches
- Painter's sticks
- Scrapbook paper
- Acrylic paint
- Paintbrush
- Antique wax
- Glue
- Hot glue gun & hot glue sticks
Directions
- Paint the wooden panel and painter's sticks with ivory or tan. Set aside to dry.
- Measure the inner space of the panel, then cut a piece of scrapbook paper to go into it. Cut a different pattern for the outer side of the frame.
- Glue the paper on the inner and outer sides of the panel.
- Stand the wooden panels so that both are behind the front and rear bumpers of the truck.
- Measure the length from the inner side of the frames. Cut the painter's sticks to that size.
- Line 3 painter's sticks on the bottom frame and another 3 on both sides of the wooden panel, then secure them with hot glue.
- Paint the wooden truck red, the tires black, and make white lines for the door and fenders.
- You may also stencil the word Freedom on the side of the truck and add a small flag to tie the 4th of July theme.
- Attach wide zip ties to the 2nd slat on the planter and glue it to the truck. This way, you can change the theme of your planter box with the seasons.
16. Liberty Bell

The liberty bell is an iconic symbol of America's Independence Day. The words inscribed on it, "Proclaim liberty throughout all the land unto all inhabitants thereof," rings true for everyone living in this country. Make an iconic replica of this bell from a Christmas bell.
What You'll Need
- Christmas bell
- Acrylic paint
- Paintbrush
- Hemp rope
- Hot glue gun & hot glue sticks
- Popsicle sticks
- Wooden stars
Directions
- Paint the Christmas bell with red and white stripes on the lower part and blue on the upper part. Let it dry.
- Glue 4 popsicle sticks together to resemble the wooden beam on the liberty bell. Overlap the pieces, so it doesn't disintegrate when attached to the bell.
- Push the assembled beam into the hole on top of the bell.
- Add white dots on the blue part of the bell to resemble the stars.
- Decorate with hemp rope, a wooden star, and an old wooden chess pawn.
17. Wooden Cube Planters

Improve the classic stacked block craft, and make a planter box out of small wooden boxes for more practical use.
What You'll Need
- Small wooden boxes
- Acrylic paint
- Paintbrush
- Metallic gold paint
- Hemp rope
- Faux greenery
- Wooden stars
Directions
- Paint the wooden boxes separately in red, white, and blue acrylic paint. Paint also 2 wooden stars white and the third star with metallic gold.
- Glue the white stars on the red and blue boxes and the gold star on the white box.
- Wrap a length of hemp rope around the red and blue boxes.
- To assemble, glue the white wooden box upside down over the red upside-down box. Glue the blue box at the top, open side up.
- Glue a foam square inside the top box to arrange some faux greenery in it.
18. American Flag Flower Wreath

Who doesn't love a flower wreath? Why not use a giant one instead of a bunch of flowers? This wreath is an excellent choice to try for your patriotic crafts. To make one for other holidays, just change the color combination. You can go smaller or larger, too, depending on the wreath wire you'll end up using.
What You'll Need
- Navy blue burlap
- Red burlap
- White burlap
- Plastic canvas
- Wire wreath frame, 10”
- Wood burner
- Zip ties
- Foam disc, 5”
- Sanding block
- Hot glue gun & hot glue sticks
- White craft rope
- Wire
- Star stickers
Directions
- Trace the innermost circle on the plastic canvas and cut it out.
- Attach the plastic canvas to the center of the wire wreath using short zip ties.
- Measure 11 inches from the 10-inch wide navy burlap and cut using a wood burner to seal off the edges and limit the fraying.
- Fold the burlap into a triangle, finished side up, allowing that extra 1 inch over the finished edge.
- Make another cut on the extra 1-inch side, sealing the fray.
- For a 10-inch wire wreath, cut 9 pieces of navy blue, 13 pieces red, and 13 pieces white burlap.
- To attach the petals to the wreath, start with 5 navy blue petals on the second wire circle on the wreath.
- Hold the triangle burlap with the finished side to your left, then gather the wide part of the triangle then secure it directly to the wire wreath using a
- For the second layer of navy blue petals, attach it to the plastic canvas below the 1st navy petal.
- Follow the pattern for the rest of the petals, alternating the red and white until you finish the second layer.
- Take the foam disk, cut off the sides to resemble a small mound, then smoothen the edges with a sanding block.
- Push the two ends of the wire into the foam disk, about ½ inch apart, and glue a piece of felt or scrap fabric to cover the wire on top and protect the foam.
- Make a spiral of white roping on top of the foam disk, adding more hot glue as you go until you cover all the sides.
- Push the wire to the plastic canvas, tie it off, and cut the extra wire.
- Add a white star to each of the navy blue petals.
Note: An alternative way is to assemble the petals first. We recommend using a floral wire to create the petals.
19. Cookie Can Flower Pot

Upcycle an old cookie can into a flower pot for a fantastic patriotic craft you'll love to display on your porch. Just a dab of paint and some patriotic ribbons will do the trick.
What You'll Need
Directions
- Paint the cookie can with blue acrylic paint.
- Once dry, cover the can with a blue ribbon.
- Finish by wrapping a red and white ribbon around the can.
- Put a potted plant inside the planter or arrange a bunch of faux greenery in it. If using a potted plant, be sure to add a drainage tray to avoid damaging the planter.
20. Farmhouse Starry Beads

Wooden beads never lose their farmhouse allure, so they're a staple for almost every craft, even for patriotic theme decors. You may use these beads to adorn a bland mantelpiece or foyer table decor.
What You'll Need
- Wooden beads (varying sizes
- Red and blue beads (optional)
- Acrylic paint
- Paintbrush
- Hemp rope
- Wooden stars
Directions
- Count the beads and group them into three; large beads on one heap and two heaps of similar-sized beads.
- Paint one heap of smaller beads with blue acrylic paint and the other with red acrylic paint. Leave the larger ones in their original color.
- If using colored beads, you can skip Step 2 and proceed to step 4.
- To start the bead chain, tie a hemp rope to a wooden star.
- String the wooden beads, alternating them with a red or a blue bead.
- Once you've decided on the length, tie another star at the end.
21. 4th of July Flower Centerpiece

Make the perfect centerpiece in just 5 minutes with some faux flowers. If you saved some of the paper flowers you used during Memorial day, you could also use those.
What You'll Need
- Small beverage tub or ice bucket
- Floral foam
- Red peonies
- Blue peonies
- Blue hydrangeas
- Red gypsophila
Directions
- Cut the floral foam to fit the tub or pail.
- Arrange the flowers into the tub or pail, starting with the red and blue peonies.
- Accentuate the arrangement with the hydrangeas and gypsophila.
- You may also wrap stars & stripes ribbon or colored burlap ribbons around the tub.
22. Patriotic Drum

During the earlier wars, drums send signals, serve as a means of communication, and motivate the troops or demoralize the enemy. They also provide music and announce victory from a battle. Drums are now mainly for making music, but their significance to our independence will never be lost.
What You'll Need
- Circular gift box
- Blue spray paint
- Scrapbook paper
- Hemp rope
- Organza ribbons, red
- Gingham ribbon, blue
- Skewers
- Wooden beads
- Silver thumbtacks
Directions
- Paint two lids of the gift box with blue spray or acrylic paint
- Measure the circular box to get the proper size needed for your scrapbook paper.
- Divide the circumference of the drum and add thumbtacks on the upper and lower lids. Don't push it through yet.
- Loop the hemp rope on one thumbtack, then pull it diagonally to another thumbtack, loop and bring it to another thumbtack.
- Repeat this process starting from a different direction to make a criss-cross pattern on the drum, then push the thumbtacks all the way through to support the ropes.
- Add some glue using a hot glue gun into the hole on a wooden bead, then push a skewer into the hole to resemble a drumstick. Make two of these, then cut off the excess length of the skewers.
- Assemble a blue gingham bow and a red organza bow by gluing them together.
- Top the bows with the wooden star painted with white acrylic paint.
- Glue the drumsticks on the drum, then adorn it with the assembled bow.
23. Firecracker Wagon

To get all that fireworks, you need a bunch of them, then a wagon to carry them over to the open field. That's what we're trying to redo with this 4th of July craft that you'll love to have on your side table or mantel. The wagon also works, so you may have a hard time saying no to your kid if he wants to play with it.
What You'll Need
- Bamboo tray
- Dowels, 1/4"
- Toy truck
- Acrylic paint
- Paintbrush
- Spackling paste
- Putty knife
- Popsicle sticks
- Sanding block
- Coin wrappers
- Glue stick
- Hot glue gun & hot glue sticks
- July 4 gift wrapper or banners
Directions
- If your wooden tray has holes in the handle, you can cover it with a thin piece of wood or cardstock.
- Apply spackle to cover the holes.
- Paint the 3 dowels and 2 popsicle sticks black and the wooden tray red.
- Remove the wheels from the truck to use as wheels for your wagon.
- Push the dowels into the wheels, then glue the dowel to the bottom of the wagon. Secure the tires with small rubber bands.
- Cut the sticks to size, then make a V and attach it to the bottom of the wagon.
- Use another painted dowel, glue it to the end of the V, then cut another piece of popsicle stick for the handle.
- Wrap some coin wrappers with the gift wrapper or banner to resemble firecrackers.
- Cover the ends with circles cut from the paper you used and attach the hemp rope for the wick.
- Arrange the firecrackers into the wagon.
24. Flag Hanger

Celebrate Independence Day by hanging a wooden plaque on your front door. Compared to a wreath, this cute craft makes lovely 4th of July home decor, but without spending too much time on it so you can still make other crafts. You can make it as rustic as this example or use washi tapes to make proper stripes.
What You'll Need
Directions
- Paint a third of the wooden plaque with blue acrylic paint and the remainder with red and white stripes using acrylic paint.
- Paint a wooden star with white acrylic paint.
- Glue the wooden star on the plaque. Hang it anywhere to tie together the holiday spirit.
25. Patriotic Stack of Books

A book lover's patriotic stack of books is a perfect decor for the 4th of July. You can choose the shade of blue you want, but the crafter here wanted to go with a beachy feel, thus explaining the lighter blue color.
What You'll Need
Directions
- Paint the bamboo trays with red, blue, and white.
- On the red tray, add stripes by covering some red paint with washi tape and paint white and blue to resemble the flag.
- Stencil stars into the blue corner on the flag tray.
- Dry brush some paint on the boxes to give them a distressed look.
- Stack the "books" and secure them with a burlap ribbon. Wrap a hemp rope a few times around the books, then tie it securely.
- Add some vinyl in your Cricut for the title on the spine of your books.
26. Uncle Sam Nesting Boxes Sculpture

This nesting box craft is effortless to store because they nest inside one another. It also makes a suitable decor for Memorial Day, Veteran's Day, and other similar holidays.
What You'll Need
- Nesting gift boxes
- Blue spray paint
- Red spray paint
- Ivory spray paint
- White chalk paint
- Red gingham ribbon
- Hemp rope
- Scrap fabric
Directions
- Spray the boxes: blue paint on the largest, ivory on the middle, and red on the smallest. As soon as they're dry, decorate the boxes.
- Add star buttons of varying sizes on the blue box by hot gluing them. Distress the box by dry brushing white paint on it.
- Try a piece of fabric on the top of the blue box for the scarf.
- On the ivory box, decorate Uncle Sam's face - eyes, nose, eyebrows, and mustache.
- Distress the box by dry brushing some brown paint on it.
- Paint the red box with wide white stripes, leaving only a small strip of red between the white.
- Add a red gingham ribbon along the center of the wide stripe, then glue the edges on the top and bottom.
- Decorate the lower part of the box with a hemp ribbon and star buttons.
- Assemble the sculpture by putting the largest box turned upside-down, followed by the ivory box, the blue lid of the largest box, and the red box.
For the Party Table

What is a party without food? We wanted to give you some recipes that are so much fun to do with your kids and grown-ups will enjoy. Here are some potluck ideas to get you started if your friends are hosting one. You might also want to whip up these 4th of July drinks to keep up the festive vibe.
27. 4th of July Tablecloth and Seat Cushions

Here are a couple of patriotic craft ideas you'll want to grace your party table. Shop for two or more dozens of bandanas for these unique table decors, and you’re in for a treat.
What You'll Need
- Bandanas
- Foam cushion, 2” thickness
- String
Directions
- To make a tablecloth, sew the bandanas together, alternating the red, blue, and white bandanas until you get the right size for your table. Top your table cloth with a tablecloth protector.
- To make a table runner, alternate the bandanas but make one line only. Use this on top of a plain tablecloth.
- For the seat cushions, cut a 20x20-inch foam.
- Take two bandanas, put the foam between two bandanas, then tie the corners with a string. Put these seat cushions on the chairs to match your tablecloth.
28. Wreath & Candle Centerpiece

Centerpieces need not be flowers always. You may also use a centerpiece wreath like this from a pool needle and some American flag cake toppers. This centerpiece works well for the 4th of July dinner on the patio or the backyard.
What You'll Need
- Pool noodle or extruded wreath ring
- Hot glue gun & hot glue sticks
- Crepe paper roll or painter's tape
- US flag cake topper, 300-350 pieces
- Hurricane glass
- Pillar candles
Directions
- Measure the pool noodle around your hurricane glass, giving it at least an inch of clearance around the glass. If using a pool noodle, glue the ends together.
- Wrap the ring with crepe paper or painter's tape.
- Stick the cake toppers into the ring randomly until you cover the top and sides. No need to cover the bottom part since it will sit on the table.
- Put the hurricane glass into the center, then the candle.
29. Mason Jar Cups

Make a fun beverage jar cup you'll love to use all summer long with a simple mason jar. Some of these jars have a small hole on their lid to stick a straw into them, but if your mason jar doesn't have a hole, you can always punch one.
What You'll Need
- Mason jar
- Plumber's ring
- Superglue gel
- Blue spray paint
- Red spray paint
- White spray paint
- Paper straw
Directions
- Punch a hole into the center of the sliver lid of the mason jar. Smoothen the edges with a round file.
- Glue a plumber's ring over the hole to hide it. You may also paint the plumber's ring before attaching it to give it a different color.
- Paint the sliver lid and the main lid, using a different color for each. Be sure to paint only on the outer part of the lids.
- Stick a straw into the hole for a refreshing drink.
30. 4th of July Mason Jar Utensil Holders

Mason jars make a practical July craft you can use for your parties. Aside from silverware, you can also fill it with flowers or jams (properly labeled).
What You'll Need
Directions
- Paint the mason jars individually.
- One mason jar may be red with white stars, blue with white stripes, and plain white. You may also play around with the designs as long as you stay with the patriotic colors.
- Once dry, fill the jars with plastic cutlery.
Something for the July 4 Party Table
31. Fun Rice Krispies

Kids love Rice Krispies but they’ll love them even better with the added treat of chocolate and sprinkles. Adding the paper straw means less mess, and kids can eat them while playing with their friends. Check out here for more 4th of July snack ideas.
What You'll Need
Directions
- Skewer your Rice Krispies with a paper straw and set them aside.
- Melt white chocolate chips in three separate containers in the microwave.
- Mix red food coloring to one container and blue food coloring to another.
- Dip them into the melted chocolate, then into the sprinkles.
- You may also fill a piping bag fitted with a fine tip to adorn your Krispies.
32. 4th of July Chex Mix

Planning a movie night to cap your 4th of July party? Here's a snack idea that you can assemble out of your pantry supplies. You can even pack this mix in Ziploc bags as fun party favors.
What You'll Need
Directions
- Pop a package of popcorn into the microwave.
- If using classic M&Ms, pick out the red and blue M&Ms and set them aside in a small bowl.
- In a larger bowl, combine the popcorn, pretzels, and Chex. Top with the M&Ms.
33. Corn in a Cup
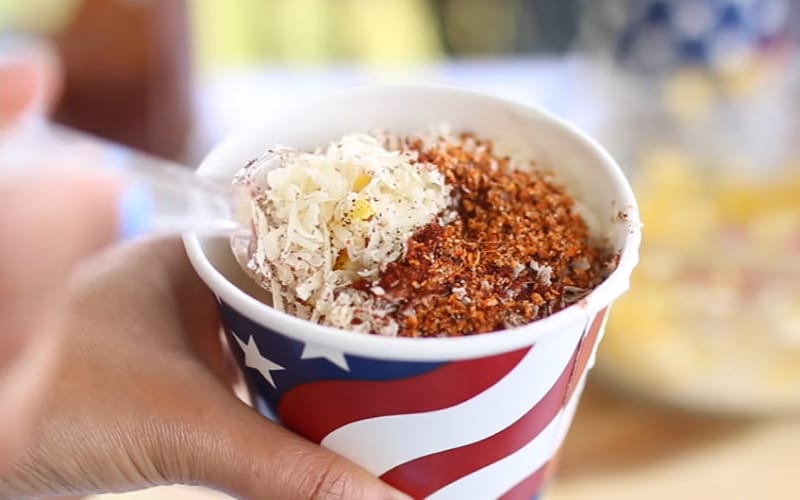
Don't forget corn on your party table. Corn was a staple for the American diet in the earlier days and instead of simple corn-on-a-cob, let's take it a little further by making a good salad out of it.
What You'll Need
- Sweet corn
- Butter
- Mayonnaise
- Lime juice
- Chili powder
- Tahini
- Grated parmesan cheese
Directions
- Roast the sweet corn for 15 minutes or until done. If you can’t find fresh corn ears, you can always use canned whole kernel sweet corn.
- Remove the corn kernels with a knife.
- Mix 1 tbsp butter, 1 cup mayonnaise, and 1 tbsp lime juice for every 2 cups of corn kernels.
- Fill a festive party cup with the corn salad, top it with parmesan cheese, chili powder, and tahini.
34. Rice Krispies Fruit Kebabs

For a dessert that kids and adults alike will love, make these Rice Krispies fruit kebabs. You may also take it a little further by dipping the rice crispies in melted white chocolate and into some festive sprinkles. These kebabs are so easy to make that your kids will pitch in to assemble them.
What You'll Need
- Rice Krispies
- Strawberries
- Blueberries
- Lollipop sticks
- Thin ribbon
Directions
- Cut your Rice Krispies with a star-shaped cookie cutter.
- Skewer a strawberry, 2 blueberries, and a rice crispy.
- Decorate the lollipop stick with a ribbon.
35. Glammed-Up Sugar Cone Wafers

Are you serving ice cream for your 4th of July party? Add a little glam to your sugar wafer cone by dipping it into some melted chocolate for an extra festive touch. You can add red or blue food coloring to your melted chocolate too.
What You'll Need
- White chocolate chips or candy melt
- Food coloring
- Star sprinkles
- Nonpareils
- Jimmies
- Sugar wafer cones
- Sugar
Directions
- Microwave some white chocolate chips for 2-3 minutes.
- Line a baking tray with parchment paper.
- Dip the cone into the melted white chocolate and then into the sprinkles.
- Let the cones dry on the baking tray.
- You can also mix some sugar with red or blue food coloring to make colored sugar. Instead of sprinkles, you may use this colored sugar.
Conclusion
We hope you enjoyed this roundup of 4th of July crafts. Have a wonderful holiday, and we look forward to hearing about your experience! Which craft did you like the best? Share with us in the comments below or on Pinterest.