How To Put Calligraphy Pen Together: Step-By-Step Guide

Do you want to learn how to write beautifully and elegantly by means of calligraphy? If so, you’ll first need to learn how to assemble your calligraphy pen. This can be tricky sometimes but don't worry - we've got you covered. Here's a step-by-step guide on how to assemble your calligraphy pen so you can get started on your journey to becoming the next great calligrapher!
What is Calligraphy Pen For
Before we get into the step-by-step guide, let's first review what calligraphy is. Calligraphy is writing, considered both an art form and a craft. It has been around for centuries, and it is still widely practiced today. Calligraphy is often used for special occasions, such as weddings, or other purposes, such as advertising.
Calligraphy pens are specifically designed for this type of writing, and they come in a variety of sizes and styles. These pens can produce stunning results and are surprisingly easy to use.
The Common Types of Calligraphy Pen
There are many types of calligraphy pens available on the market, but we will cover the most common ones, and these are:
- Dip pen
- Fountain pen
- Oblique pen
Dip Pen

Dip pens are the most common type of calligraphy pen. They consist of a nib, the part of the pen that makes contact with the paper, and an ink reservoir. The ink reservoir can be refillable or disposable. Dip pens are very easy to use and perfect for beginners.
Fountain Pen

A calligraphy fountain pen is another type of calligraphy pen. It consists of a nib and an ink cartridge. Fountain pens are more difficult to use than dip pens, but they produce beautiful results. They are between dip pens and rollerball pens in terms of ease of use.
Oblique Pen

Image by - OpenInkStand Art & Calligraphy
An oblique pen is a type of calligraphy pen slanted at an angle. This pen type is perfect for those who have difficulty holding a pen at the correct angle. It is designed to have a metal flange that helps the user to hold the pen at the right angle.
Step-by-Step Guide to Putting a Calligraphy Pen Together
Now that you know the different types of calligraphy pens, it's time to learn how to assemble them. Assembling a calligraphy pen is easy and only takes a few minutes. Follow these step-by-step instructions, and you'll be up and writing!
Dip Pens
Dip pens are the simplest type of calligraphy pen to assemble. All you need is a nib and a pen holder. To assemble it:
Step One
Get your nib and the dip pen holder. Make sure that your nib and pen holder are compatible. This ensures that your nib will fit properly into the pen holder. In this guide, we use a universal pen holder as an example, as it is compatible with any variants of nibs.

Pen holder and a nib - Image by Calligraphy Academy
Step Two
Hold the pen holder facing up, showing the top wherein you will put the nib.

Pen holder - Image by Calligraphy Academy
Step Three
Gently insert the nib into the pen holder. Be careful not to apply too much pressure when inserting the nib into the pen holder. Applying too much pressure can damage both the nib and the pen holder.

Pen Nib - Image by Calligraphy Academy
Step Four
And that's it! You can now use your dip pen.

Calligraphy pen - Image by Calligraphy Academy
Step Five
To remove it for later, do the above in reverse order. Unscrew the nib from the pen holder and store both pieces safely for later use.
Fountain Pen
Fountain pens are more complicated than dip pens, but they're still relatively easy to assemble. Before we get into step-by-step instructions, let's look at the parts of a fountain pen.
- Nib - this is the part of the pen that touches the paper and makes contact with the ink.
- Cap - this goes on the back end of the pen and protects the nib when it's not in use.
- Barrel - this is the main body of the pen.
- Cartridge - the one that holds the ink
Now that we know all the parts, let's put it together!
How to Put Cartridge Into Your Fountain Pen

Calligraphy pens - Image by JetPens
Let's now start putting the ink cartridge into your fountain pen. Cartridges come in various brands, but they are all assembled similarly. To do this:
Step One
The first thing you need to do is get the cartridge. If it is still screwed from the pen, unscrew it.

Pen, Cartridge - Image by JetPens
Step Two
Find the cartridge's opening.

Cartridge - Image by JetPens
Step Three
Insert the end with the opening into the pen's grip section. Make sure to press it firmly until you hear it clicks. This is to let you know that the cartridge is in its rightful place. If your pen has a converter, skip to the next step.

Cartridge - Image by - JetPens
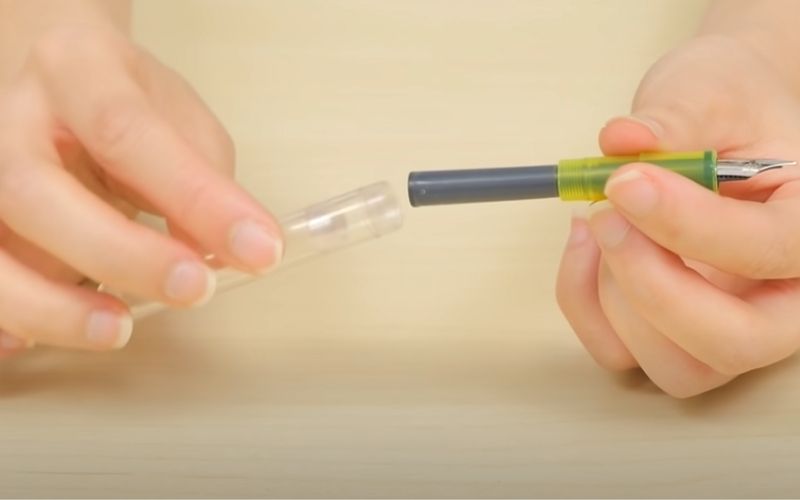
Step Four
Reassemble the pen by putting the barrel back in pen.
Putting the Barrel - Image by - JetPens
Step Five
Put the cap on the pen.

Putting the Cap - Image by - JetPens
Step Six
Store it pointing downward to make the ink saturated. If you notice that the pen is not writing right away, don't worry and let it be in that position for at least an hour.

Calligraphy pen - Image by - JetPens
How to Put Converter Into Your Pen
Step One
Some fountain pen uses a converter instead of a cartridge. If that’s your case, the steps may vary but are almost the same. But before we proceed, let's tackle first what a converter is.
The converter is a small cylindrical tube that you can screw in and out of the pen. It has a piston mechanism that allows you to control the amount of ink going into the pen. There are two types of converters: the push-type and the squeeze-type.
The push-type converter has a piston that moves up and down to draw ink into the pen, while the squeeze-type converter works by squeezing the air out and then releasing it to create a vacuum that draws ink up into the pen. Refer to the images below to see the difference between the two types of converters.

Types of the converter - Image by - JetPens
Step Two
Install the converter into the barrel of the pen. Start by screwing it in until it's snug, then give it an extra quarter turn to ensure it's secure.

Calligraphy converter - Image by - JetPens
Step Three
Now that the converter is installed, you can fill it with ink. Dip the nib into your ink bottle. Then, holding the converter by its barrel, use your other hand to twist the knob at its end clockwise. This will draw ink up into the converter. You can stop twisting when you see a small pool of ink forming at the nib's tip.

Pen and bottle of Ink - Image by - JetPens
Step Four
Now that your converter is filled with ink, you can reassemble the rest of the pen. Start by screwing the barrel back onto the section, then screwing on the cap. Ensure that all of the threads are tight so that there are no leaks.
Oblique Pen

Oblique pen holder - Image by Meg Bosse Calligraphy
Oblique pens are a little more complicated to assemble, but we will walk you through them step-by-step. Some oblique pens have an adjustable flange, so if you have trouble with the flange, try adjusting it with a flier until you find the perfect sweet spot.
To assemble an oblique pen:
Step One
Start by holding your pen with the flange on the left side.

Oblique pen holder - Image by Meg Bosse Calligraphy
Step Two
Get your nib and slide it into the pen until it clicks into place.

Oblique pen holder, Nib - Image by Meg Bosse Calligraphy
Step Three
Look at it from the top to ensure that your nib is properly positioned. The slit in the nib should be centered over the breather hole. If it is not, unscrew the nib and readjust it until it is proper.

Oblique pen - Image by Meg Bosse Calligraphy
Step Four
To make sure that it is in the proper position, the nib should be pointing up.

Oblique pen - Image by Meg Bosse Calligraphy
And that's it! You have now successfully assembled your oblique pen.
Calligraphy Pen Alternatives
If you are having trouble with your oblique pen, or you are simply looking for another type of calligraphy pen to try, there are a few other options to consider, such as:
Felt Tip Pens
Felt tip pens are the easiest type of pen to use. They have a nib made of felt, making them very soft and flexible. Felt tip pens are perfect for beginners. On the other hand, felt tip markers run out of ink quickly and may soak through papers or your writing surface. These pens are perfect for practice, but they should not be used in publications or artwork.
Brush Pens
These pens are great for calligraphy, but they can be difficult to use. They have a nib made of bristles, making them stiff and difficult to control. Brush pens are perfect for advanced calligraphy artists.
They are more expensive than felt tip pens and markers in terms of price. These pens may also be messy for beginners and more challenging than using a felt pen or a fountain pen.
Benefits of Proper Assembling of Calligraphy Pen
Some might think that a calligraphy pen is a regular pen with fancy embellishments. However, that is not the case. A proper calligraphy pen needs to be assembled in a specific way to work correctly. These are some of the benefits of taking the time to assemble your pen properly:
Improve Ink Flow
The ink will flow smoothly when you use a calligraphy pen that has been assembled correctly. This is because all parts will be in their proper place and working correctly together. If any of the parts are not properly aligned, it can cause issues with the ink flow.
This means that you won't have to deal with pesky clogs or ink skipping. As a result, you'll be able to produce better calligraphy overall.
More Comfortable to Use
Another benefit is that the pen is much more comfortable to use when you take the time to assemble it correctly. All parts will be positioned ergonomically for your hand, allowing you to write for long periods without experiencing any pain or discomfort.
You'll Be Able to Get a Pen That's Perfect for You
One of the best things about assembling your calligraphy pen is that you can customize it to suit your specific needs. This means choosing the right nib size, barrel size, and ink type for your personal preferences. As a result, you can create a pen perfect for you and your style.
Save You Time
If you know how to assemble your calligraphy pen properly, you can avoid any frustrating ink leaks, so you won't need to waste any time cleaning up leaks. In addition, your ink will flow more smoothly and evenly, resulting in neater lettering, so you'll be less likely to make mistakes that could ruin your work.
You'll Avoid Leakage
If your pen is not assembled properly, ink can leak out and cause stains on your clothes or work surface. It may result in ruining your project, which is extremely annoying. However, you can prevent this by taking the time to assemble the pen correctly. Furthermore, you can also avoid ink bleeding on paper if the pen is properly assembled.
Extend the Life of Your Pen
Replacing your pen can be annoying if you have to do it frequently. Age can damage your pen and cause you to replace it sooner than necessary. In addition to age, incorrectly assembled pens can also cause them to become damaged over time. By assembling your pen correctly, you can avoid replacing it prematurely.
Tips to Make Your Calligraphy Pens Last Longer
While calligraphy pens are easy to find in the market, it is still annoying when you have to buy them more often. So, make sure to remember these tips to make your calligraphy pen last:
Use Good Quality Calligraphy Ink
This is important because Calligraphy requires a lot of ink, and if you are using poor quality ink, it will clog your pen more quickly. There are many inks available in the market, so be sure to choose only the best for your calligraphy pen and needs.
Clean the Pen Regularly
Calligraphy pens require regular maintenance to perform at their best. One of the most important steps in caring for a calligraphy pen is to clean it after each use. This helps prevent the build-up of ink and prolongs the pen's life. Ink may also clog the pen's nib, making it difficult for the ink to flow smoothly.
For best results, use a soft cloth or cotton swab to wipe away any excess ink after each use gently. By taking proper care of your calligraphy pen, you can enjoy its beauty for years to come.
Store Your Pen Properly
When not in use, store your pen in a dry place. Avoid leaving it in direct sunlight or a humid pen together, as this can cause the ink to dry out or the pen to warp. Make sure to read the fine print usually found in packaging on how to store the item properly.
Common Mistakes To Avoid
While assembling a calligraphy pen is relatively simple, people often make a few mistakes. Here are some of the most common mistakes:
Not Inserting the Ink Cartridges Correctly
Inserting an ink cartridge into the calligraphy pen is not as straightforward as it seems. If you don't insert it correctly, the ink will not flow properly, and your writing will be affected. So before you start to write, make sure your nib is inserted correctly and properly positioned.
Using the Wrong Type of Nib
Calligraphy pens are not created equal. So, you might be using the wrong type of nib for your calligraphy if the results are not as expected. The right type of nib will produce the consistency in the thickness and color of the strokes you are looking for in your calligraphy.
It will also help you to create curved strokes more easily. There are tons of nibs in the market, so take time to choose what suits your pen holder and your needs.
Putting Calligraphy Pen Together FAQ

1. Do I need to use an ink converter?
Calligraphy Pens come in two varieties: Fountain Pens and Dip Pens. Fountain Pens are pens that use a converter to take action. On the other hand, dip pens are pens that must be constantly dipped in an inkwell to function. So if you choose to use a fountain pen, you may need a converter. If you choose a dip pen, the converter is not necessary.
2. Which type of nib should I use?
The most common nibs used for calligraphy pens are nibs with a chisel edge. When choosing a nib, it depends on your expertise. We recommend a chisel as it is much easier to use than a pointed nib if you are a beginner. For those doing calligraphy for a while, a pointed nib might be better suited as it provides more control and precision.
3. I don't have ink cartridges; can I use bottled ink instead?
Yes, you can. If you're thinking about using bottled ink instead of an ink cartridge, you'll need to invest in a dip pen. Calligraphy pens are designed to work with thick ink, and the pen nib can be dipped directly into the bottle. As a result, they're much more efficient than traditional pens when using bottled ink.
4. What is the difference between a calligraphy pen and a regular pen?
Calligraphy pens are specially designed for those who love beautiful handwriting. The nib of a calligraphy pen is much wider than that of a regular pen, allowing for different lettering styles. Additionally, the ink flow of a calligraphy pen is also much smoother. On the other hand, a regular pen often produces uneven and messy results.
5. How do I clean my calligraphy pen?
Cleaning your calligraphy pen is important to maintain the quality of your pen. Here's how you clean your calligraphy pen:
- To clean your pen, you will need to unscrew the nib unit from the pen's barrel.
- Next, soak the nib unit in cool water for about 15 minutes.
- After that, use a soft cloth to wipe away any ink residue on the nib.
- Finally, screw the nib unit back onto the barrel of the pen.
Conclusion
Putting the calligraphy pen together is not as daunting as it seems. All you need to do is follow the step-by-step guide above, and you will be well on your way to creating beautiful calligraphy pieces in no time!
Now that you know how to assemble your calligraphy pen and take care of it, you can start enjoying the beautiful art of calligraphy! If you're looking for more information on getting started with calligraphy, check out our beginner's guide to calligraphy.
If you have any questions or comments, please feel free to leave them below! We would love to hear from you. Thanks for reading!
Very nice very clear and crystal
Explaination Thank u
Pl which calligraphy fountain
Pen is best for beginners and
Where it available pl inform me