How To Use Glass For Painting: Helpful Ideas To Get You Started

How do you use glass for painting? Well, it certainly takes a lot of practice to perfect it.
First, clean it well to remove dirt and grime. Prepare your design or reference image, then transfer the design to your glass using paints appropriate for the material. Let the paint dry completely before curing it in the oven.
Everything from the best paints to tips to get you started with glass painting will be covered in this blog. Hopefully, these ideas will make painting on glass a little easier and more enjoyable for you!
What You'll Need
- Clean glassware
- Rubbing alcohol
- White vinegar
- Mild dishwashing soap
- Glass cleaner
- Acrylic paint
- Foam plate or palette
- Paintbrushes
- Brush basin
- Foam dabbers
- Paper towels
Step-by-Step Instructions
1. Clean the glass surface you want to paint
- To clean the glass, wash it in warm, soapy water to remove dirt, dust, and grease film.
- Let the glass dry fully after washing before using it again. You can also use glass cleaner spray or rubbing alcohol.
- Remove any cloudiness on the glassware with white vinegar if it is cloudy. Allow 15 minutes for air drying.
2. Prepare your design or reference image
- Prepare a reference image for the glass painting, depending on how you want to execute it. Separate the layers if you're going to perform 3D glass painting.
- Mirror the reference image before printing if you're doing reverse glass painting.
3. Paint your glass surface
- Paint your design on the glass surface, allowing the paint to dry between layers before adding a new layer.
4. Seal or cure the painting if needed
- After painting your glassware, you'll need to cure it to keep the finish and make it washable.
- Before baking, always read the directions for your product since not all require this step.
- Mod Podge or a clear coat varnish can also be used to seal your glass artwork. This method of sealing your glass painting does not make it washable. But you may wipe the glass with a damp cloth.
Glass Painting Ideas
1. 3D Glass Painting on Bottles

3D painting on glass bottles - Image by Abhaya Art World
With this easy process, you can turn your old bottles into works of art. Allow acrylic paint to dry for a few minutes before painting straight on the glass bottle.
You may also use a string of fairy lights to provide some soft lighting to the bottle.
What You'll Need
Directions
- Wrap your glass with a paper napkin after cleaning your bottle.
- Combine 1 part water and 2 parts glue in a small container, then brush the solution over the paper napkin. White acrylic paint combined with talcum powder can also be used.
- Begin painting your design after the paper napkin is dry to the touch.
- Using a thick coating of Mod Podge, embellish the beach painting with sand and tiny seashells.
2. Stained Glass Effect on Wine Glasses
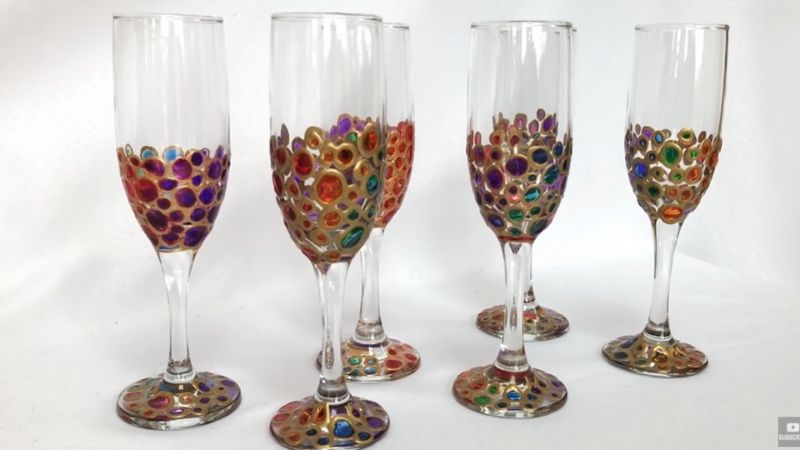
Painted wine glasses - Image by Style by Sweets
With these painted mimosa glasses, brunch will be more enjoyable. Inspire your friends to make this craft using this simple technique and only two art supplies (no brushes required!).
What You'll Need
Directions
- Using gold, silver, or lead glass paint outliner, create a circular outline on the wine glass. Allow it to completely dry.
- Glass paint is used to fill in the outline. Do not use acrylic since it will have an opaque finish. To get the stained glass effect on your glasses, you'll need a translucent finish.
- Allow at least an hour, preferably overnight, for the painted glass product to dry. Make sure the paint is thoroughly dry to the touch before baking.
- Place the glasses on their sides on a parchment-lined baking sheet.
- Preheat the oven at 350 degrees Fahrenheit and bake the glass project for 20 minutes (or according to the manufacturer's instructions).
3. Glass Window Paintings

Paintings on a boutique window - Image by IamSamWhite
Paintings on glass windows are ideal for keeping up with the seasons or promoting a sale. To turn your windows into pieces of art, all you'll need is acrylic paint, brushes, and a lot of creativity.
What You'll Need
Directions
- Start with white acrylic paint if you want an opaque finish.
- Once the white paint is dry, start coloring in your design.
4. Mandala Design on Black Jar

Black jar painted with simple mandala - Image by DiYBigBooM
A mandala is hard to resist. It has an easy-to-follow, detailed, but repetitive design. Mandalas are also a great way to unwind.
Paint your glass jar black to provide a strong contrast between your mandala and the background. With just a Q-tip, you can create this design in no time!
What You'll Need
- Glass jars
- Acrylic paint
- Foam dabbers
- Q-tips or stylus
Directions
- Wash the jar and let it dry.
- Apply a base paint on the bottle with a foam dabber. Allow the first coat to completely dry before applying the next layer until you're satisfied with the result.
- Add a few drops of acrylic paint to a palette. Add two to three colors from different women.
- Dip a Q-tip or stylus into the paint and apply it to the bottle.
- Allow for drying time before applying more color. To complete this jar, you may use a basic Mandala method.
5. Painting on Glass Christmas Ornaments

Painting glass Christmas ornaments - Image by Donna Dewberry
Christmas ornaments never go out of style. Build up your collection over a period, or build some to sell or give to friends. Although they are only available for a limited time, they are a major hit every year.
What You'll Need
Directions
- Prepare your reference image so you know which colors of acrylic paint you will use.
- Pour some acrylic paint into a palette or disposable plate.
- Paint your design on your glass ornament, switching paintbrushes as you go for best results.
6. Painting on Fishbowl
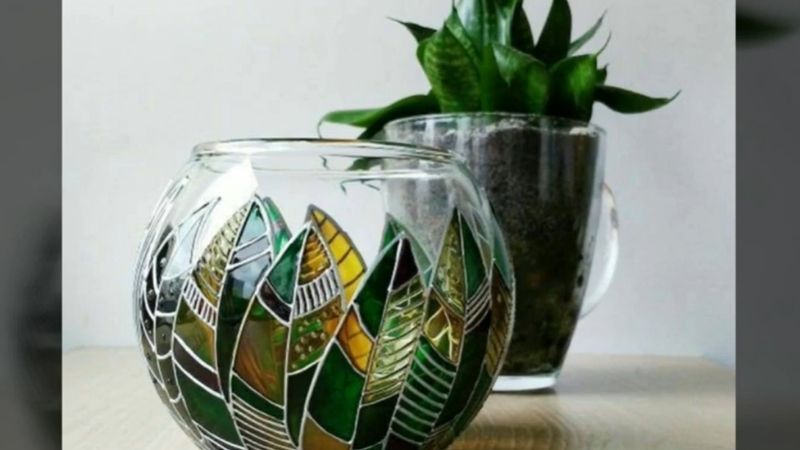
Painting on fishbowl planters - Image by Fashion Glam
Aside from keeping your pet, fishbowls may be used for a variety of purposes. You may create them in any way you want, with only your imagination limiting your potential.
It may be used as a votive candle holder, a planter, or as a treat container.
What You'll Need
Directions
- Start by tracing the leaves, or pick your design for your fishbowl planter.
- Allow 2-3 hours for the paint outliner to dry before filling with glass paint.
- Use glass paints to get the desired translucent finish, keeping the color palette in mind to preserve consistency.
- Allow the fishbowl to air dry until the paint is dry to the touch.
- Cure it in the oven according to the temperature and time suggestions on the paint packaging.
7. Painting on Glass Vases

Marbled glass vases - Image by SplendidIdeasWithMaria
A marble vase is hard to resist. You can now make a marble vase in the comfort of your own home with a plain glass vase and acrylic paint. Let's get to work on some crafts!
What You'll Need
Directions
- Using rubbing alcohol and a paper towel, clean the glass vases. Take 15 minutes for the alcohol to drain totally before continuing to work on your vases.
- Pour acrylic paint into the vase, be careful not to mix them. Choose 2-3 complementary colors that best reflect your style.
- Slowly tilt the vase to coat the inner surface, allowing the colors to mix fully.
- If you haven't covered the entire vase yet, add more as you go. Excess paint should be poured out.
- Let the paint dry for 24 hours before using the vases.
8. Painting on Glass Cabinet Doors

Spray-painted glass doors - Image by CassieFairy
Glass doors on your cabinets let you see what's within, but they become old after a while. Here's a simple hack if you're considering a DIY makeover for your cabinet glass doors.
What You'll Need
- Sandpaper
- Wood conditioner
- Painter's tape
- Newspaper
- Grape glitter spray
- Pink glitter spray
- Sapphire glitter spray
- Rose gold glitter spray
Directions
- Make a design choice. Before you begin, it's a good idea to print or create your reference image.
- Before painting the cabinet, remove the glass doors.
- Because you'll be using spray paint, tape off your pattern using painter's tape and old newspaper.
- Spray one color at a time, then remove the painter's tape once it has completely dried.
- Steps 2 and 3 should be repeated for the remaining colors and designs.
- You may also sand down the cabinet's wooden parts and varnish or paint them to give them a new look.
9. Painting on Mirrors

Circular mirror painted with flowers - Image by Sostrene Grene
Who can say no to a beautiful mirror? Mirrors don't have to be practical or utilitarian to be useful. Any mirror may be enhanced with a few strokes. Why don't you go ahead and make that old mirror look new?
What You'll Need
Directions
- To clean any cloudiness, dust, or grease from your mirror, use rubbing alcohol or white vinegar.
- Paint your pattern on the mirror one color at a time, allowing plenty of time for it to dry between coats. Before you apply another layer, it should be dry to the touch.
- Complete your artwork by adding details.
The Best Type of Paints for Glass
Acrylic Enamel Paint
This paint is made out of acrylic and oil-based paint. Because of this special component, it clings to various surfaces, including tiles, granite, glass, and other non-porous surfaces.
Acrylic Glass Paint
Acrylic glass paint is specially formulated paint for glass. Look for a wine glass icon on the plastic cap or label when purchasing it. These glass paints contain chemical ingredients that help acrylic paint adhere to your glass furniture.
Solvent-Based paint
For outdoor projects, solvent-based (or oil-based) paints are preferable. To ensure your safety, they also emit toxic fumes. Thus, it's advisable to put on protective gear before using them.
Glass Painting Markers
There are two types of marker pens. They might be made of water or oil. When it comes to outdoor use, oil-based painting markers are the more reliable of the two. A unique glass painting marker that changes color with a spray of mixing solution is also offered.
If you can't manage your paintbrush but can use a painting marker, these glass painting markers are ideal.
Outliner Paint
Outliner paint is available in tubes and bottles and is thicker than other paints, creating a three-dimensional effect on the glass. You may select various colors to get the stained glass effect, including gold, silver, black, lead, bronze, and copper.
Glass Painting Tips
Don't leave fingerprints or smudges
Beware of leaving your fingerprints on the surface you want to paint.
Hold the stem of the wine glass in your hand to prevent smudging the painting on the bowl. Stemless glasses are more challenging to work with. Wear nitrile gloves to avoid leaving fingerprints on the glass.
If you're doing reverse glass painting on a flat surface like a glass pane, use painter's tape around the edge to keep your grip on the taped areas.
Don't take shortcuts
Don't take shortcuts, especially if you're working on a reverse glass painting. Additional steps, such as applying an undercoat or topcoat with specific glass paints, must be followed. You might risk the quality of your project if you disregard these tips.
Use the right supplies and tools
Synthetic brushes may leave bristles that can harm your glass painting, but natural bristles provide more coverage and a smoother finish.
People who do stenciling might want to consider using applicator sponges or foam dabbers instead of brushes. Because they don't leave brush strokes like brushes, they're the most common choice when painting with a stencil. Foam dabbers give your glass artworks a more textured look.
Do not paint on surfaces that come in contact with food
It's best to leave 3/4" of the rim unpainted when painting glasses. Paint only the rim of plates, not the center or underside. If you want your artwork in a clear plate's center, paint it on the underside.
Oven Curing Tips
Curing your paint not only makes it washable but also renders it inert, making it safer to use with food. However, we always recommend keeping it off of surfaces that come in contact with food.
Do not preheat the oven
The shock of preheating the oven will cause cracks and chips in the glass. Also, inspect your glass for cracks and chips before painting or placing it in the oven.
Let the cured glass cool down in the oven
After oven-curing your project, do not take the cured glass out of the oven immediately. Wait for it to cool down to room temperature to avoid shattering.
Do not use recycled glass
Because of its changed composition, recycled glass has a reduced coefficient of expansion (COE). Lower COE indicates that the glass will expand and shrink less during heating and cooling, which may cause fractures and breaks in your oven-cured projects.
When making glass paintings, always use new glass, especially if you want to oven cure it.
Always use nitrile gloves
Natural oils on your fingers may leave prints on your ready-to-cure glass project. Remember to wear nitrile or latex gloves while placing them on the baking sheet and in the oven to avoid leaving unpleasant marks.
Do not oven-cure glass projects sprayed with chemical sealants
During the curing process of chemical sealants, fumes are produced in the oven, affecting its performance and safety. If you're using sealants, be sure not to use them to keep or serve food.
Refer to manufacturer instructions
Different paints take different amounts of time to dry, but they all fall within the same range. To avoid mistakes and damage to your project, read and follow the manufacturer's instructions.
Glass Painting FAQ
1. How do you make the paint stay on glass?
Make sure the paint is thick by mixing it with a brush. Because well-mixed, thicker paints cling better to surfaces, this will help you prevent messes like drips or streaks.
It also helps dry the finished project in the oven to make it washable, as recommended by the paint manufacturer.
2. What is the best paint to use when painting on glass?
There are a lot of paints made specifically for painting on glass. Go to The Best Type of Paints for Glass section above to read more about them.
3. Does acrylic paint work on glass?
Yes. Aside from ordinary acrylic paints, there are also acrylic paints developed explicitly for glass. A wine glass icon is frequently found on the cap or label of these paints.
4. Do I need to sand the glass before painting?
No. The surface of the glass will be scratched and damaged if it is sanded. To offer your paint a greater chance of adhesion, wipe the glass free of dirt, dust, grime, grease, and fingerprints.
5. How do you paint glass without brush strokes?
Use only natural fiber brushes to avoid visible brush strokes on your glass painting since they are softer and more flexible, spreading the paint more evenly on glass.
Conclusion
With these tips, you'll do great on mastering how to glass paint. We hope you found this post valuable and exciting!
If that's the case, feel free to share the post with others who might need some help with their first few glass paintings. Give us a shout, and don't forget that practice makes perfect!