Best Oil Painting Techniques To Make Your Masterpiece

One of the most popular art mediums is oil painting. Oil painters love using various techniques to make their paintings look like a masterpiece. This blog post will discuss those best oil painting techniques that will help you create beautiful artwork and find success as an artist.
Top Preparatory Techniques
1. Underpainting

Underpainting of a bottle and a pear - Image by Creative Thinking KCC
No artist wants to start with a black canvas because it is intimidating. Beginners don't know better and therefore may start with blocking the painting in bold colors where they have no idea how to correct later.
As with other painting mediums, like watercolors, underpainting removes the starkness of the canvas. Using a thin layer of paint, you can start by making a sketch of the image you want to paint, blocking out the light and dark values, so you know what to add later. The underpainting helps make the finished painting stand out better than directly on the white canvas.
2. Imprimatura

An artist painting imprimatura - Image by Damian Osborne
Though imprimatura may look like underpainting at first glance, it is toning your canvas to establish a distinction between light and dark tones. It is best to do imprimatura after you've done the underpainting to seal it. For adding the imprimatura, you'll need a solvent and a transparent pigment.
You can use some colors for imprimatura: Burnt Sienna, Red Ochre, Yellow Ochre, Mars Brown, Burnt Umber, and Raw Umber. Your subject also determines the imprimatura you apply. Mars Brown, Burnt Sienna, Magenta, and Red Ochre offer good contrast if you're doing landscapes.
Burnt Sienna and a little Cadmium Orange are excellent for seascapes and winter scenes where blues dominate. For portraits, Mars Brown and Burnt Umber are perfect choices. To lighten some parts, you can use a rag to wipe off some paint, then blend the paints with your fingers.
3. Blocking in

An artist blocking in his canvas - Image by Andrew Tischler
Blocking in or underdrawing is another technique you can use to prepare your canvas for painting. Where underpainting uses almost the same color, you do for your imprimatura. You use nearly the same colors as you would use for the painting itself.
You'll need oil paint or acrylic paint, solvent or odorless mineral spirits, and a stiff hog bristle brush.
Top Blending Techniques
4. Alla Prima

A portrait of a woman - Image by Louis Smith
Alla prima, also known as wet-on-wet technique, comes from an Italian phrase that means "at the first attempt." Before its invention by Frans Hals in the 15th century, artists had to wait for the layers to dry before adding subsequent layers. This lengthy process discourages would-be oil artists from stopping before actually starting.
However, with the alla prima technique, artists can finish a painting in one sitting, usually less than an hour, making oil paints a good medium for Plein air projects. This technique is not easy to do, though, especially for newbies who don't have a good grasp of how oil paints behave. Compared with wet-on-wet for watercolors, though, wet-on-wet for oils is less intimidating.
One important thing to remember when working with the alla prima technique is to work at a comfortable pace. Do not hurry or drag your painting process, especially when painting outdoors where you are on borrowed time for the light you want to catch. For wet-on-wet painting, you need a stiff brush to apply a new layer later.
5. Chiaroscuro

Girl with the Pearl Earring by Johannes Vermeer - Image by Britannica
Chiaroscuro is one of the essential oil painting techniques. It is one of the 4 canonical painting modes, including sfumato, unione, and cangiante. Often employed by Italian masters like Rembrandt, Caravaggio, and Leonardo da Vinci, chiaroscuro uses the contrast of light and darkness to create 3D forms in their paintings to look more lifelike.
Chiaroscuro comes from two Italian words: chiar, meaning might, and oscuro, meaning dark. In the painting Girl with the Pearl Earring, Johannes Vermeer employs the contrast of a dark background to emphasize the light on the face and the pearl earring on the girl.
6. Cangiante

The Virgin Mary with the apostles and other saints - Image by The National Gallery
Cangiante is one of the canonical painting modes during the Renaissance period, where the painter swaps one color for another. For example, you may replace black with dark blue, brown, or mauve. This technique also represents freedom.
As artists believe, art is about beauty rather than reality. You can see this claim with the impressionist and surrealist art forms. In the painting above, the fourth and eighth person from the topmost row from the right, the shadow on their clothes is blue, when the rest of their clothing is pink, another is yellow.
7. Unione

The Alba Madonna - Image by Wikioo
Unione or the union of planes is a tool with an edge that you can use to give your project a more professional look without hard edges. The softer version will help create sharper corners without over-emphasizing them, so it's perfect for beginners who want their work done quickly but still get quality results.
Unity allows for a high tonal key with primarily light tones in your image without any dark shadows or excessive darks that would compete against them and remove its beauty. Raphael used vivid and intense colors in the painting The Alba Madonna, but instead of being overwhelming, it looks very together, thanks to the unione technique.
8. Sfumato
 Mona Lisa - Image by Britannica
Sfumato comes from the Italian word that means "soft lie smoke." Artists go for the smoky effect to manifest the gradual transitioning of the colors. For a newbie artist, it may mean blending, but masters use this technique to give style to their paintings.
Leonardo da Vinci invented a realistic, well-transitioned painting where sharp lines are absent but details are unmistakable. In his portrait of the Mona Lisa, you'll see the details without perceiving harsh brush strokes.
Instead, da Vinci achieved a smoky effect to soften the features of the painting and add interesting effects. You'll need a goat mop brush to apply this technique successfully.
9. Tenebrism

The Calling of Saint Matthew - Image by Caravaggio website
When discussing different oil painting techniques, tenebrism is not as common as techniques like alla prima and chiaroscuro. It is a technique where the artist uses a stark contrast between light and dark, where dark dominates the painting, thus portraying a gloomy effect.
Some newbie artists interchange chiaroscuro and tenebrism, while others treat them as synonyms. Italian artists employ these two distinct techniques in the strict sense of the terms, primarily attributed to Michelangelo Caravaggio.
In the Calling of Saint Matthew, Michelangelo Caravaggio uses tenebrism as the oil painting technique to depict the light that hits the men sitting on the table to create a contrast between the dark planes in the background and the foreground.
10. Grisaille
 Grisaille oil painting of a young woman - Image by Stephen Bauman
Although grisaille is a much older technique and no longer used for making oil paintings, it is a good way to practice adding light and dark values to your artwork without contending with color blending.
Grisaille is a good beginner technique to practice until you're confident enough to move on with colors. The artist used the grisaille technique in this portrait painting, adding multiple layers until he got the desired effect on his monochrome painting.
Top Texture Techniques
11. Impasto

An impasto painting of a sunflower field - Image by Palette Knife Painting Tutorials
Impasto painting is a technique that uses thick paint, and the brushstrokes are visible. You can do this technique with a palette knife or a brush, but the idea is to make the strokes visible to get a textured effect. Make a thicker paint by blotting a piece of paper over them to absorb the oil paint on the palette.
You may also add dry mediums like sand or fine marble dust that you can get from art stores. You can use impasto mediums like Gamblin cold wax or liquin impasto to thicken the oil paints enough, so they hold firm when applied for impasto.
12. Sgraffito

Sgraffito details on an oil painting - Image by Gibsons Public Art Gallery
If you're familiar with oil pastels, you'll know that sgraffito is an oil pastel blending technique where you scratch a layer of oil pastels to create a design. Sgraffito in oil paintings is much the same as when doing it on oil pastels.
Instead of using a sharp point, you use the blunt end of the brush or a palette knife to scrape away some wet paint from the painting, like when adding details for the hair, grasses, etc. However, if painting on textured canvas, refrain from using this technique as the canvas will give a grainy effect that will ruin your painting.
13. Scumbling
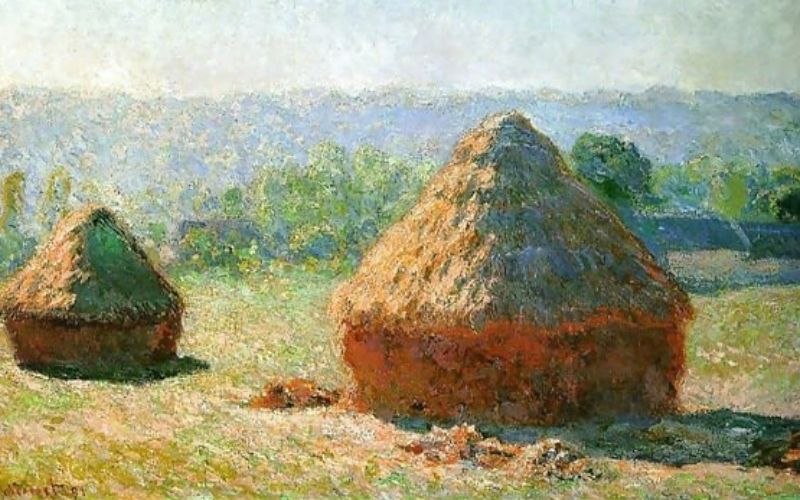
Grainstacks at the end of a summer morning - Image by Claude Monet Gallery
Unlike scumbling in oil pastels, where the artist applies the oil pastels in small circular motions to effect blending, scumbling in oil painting employs a dry, stiff brush to create texture to the painting. Scumbling achieves several effects on oil painting.
Aside from adding texture and depth, it makes the painting less monotonous and highlights your painting. It also builds structure and form. To do scumbling using oil paints, wipe off the oil and solvent from the brush, then rub it on a piece of paper.
However, we encourage artists to wait until the uppermost layer is fully dry before you dry brush to prevent a muddied look on your painting. In the example above, Claude Monet uses scumbling to create the texture of the grain stacks.
14. Glazing

An artist applying glaze on an oil painting - Image by Florent Farges
Glazing gives a painting a glow, making it look softer and more realistic than when done without glazing. Artists use glazing to change the color of an object in a painting. For example, if you want your skin tone warmer. You can also use glazing techniques on shadows to deepen them.
Pigments used for glazing are transparent, like ultramarine, madder lake, verdigris, yellow lake, indigo, and magenta. Artists use several recipes for the glaze, but the most popular is the mixture of 1 part turpentine, 2 parts refined linseed oil, and the transparent pigment you want to use. For a more glossy glaze, use stand oil instead of the linseed oil in the standard mixture.
You can also remove the turpentine for a solvent-free glaze and use only refined linseed oil. However, to prevent beading over the glaze, you may want to use the resin glaze made of damar resin, refined linseed oil, and turpentine in a 1:2:5 ratio.
Three Rules for Oil Painting
Before you go any further, we want you to remember these top three rules for oil painting so you can paint like a pro. These rules ensure that you get the best possible quality and finish for your oil paintings.
Fat over lean
Oil paints contain oil, and you also use oils, usually linseed, as a medium for your oil paintings. However, use less oil for the lower layers and paint with more oil for the upper layers. The amount and the kind of oil you use also determine where you should apply it to your painting.
Thick over thin
Aside from oil medium, you may also use solvent or turpentine to thin your oil paints. When underpainting, use more solvent and lessen the amount of your painting. If you apply a thin layer over a thick one before it fully dries, the upper layer dries first and cracks when the lower layer dries.
Slow-drying over fast-drying
The amount and kind of medium you add to your oil paints also determines the drying time of your oil painting. Some mediums, like liquin, are fast-drying compared with other mediums. So if you use liquin or alkyd medium, apply it on the lower layers.
Check the kind of medium used in the paint itself. Some oil paints use safflower oil as a component medium. Safflower is the slowest-drying oil medium, so expect your oil paint to take some time to dry.
However, oil paints contain alkyd medium, usually labeled as solvent-free. Therefore, these paints have a stiffer consistency and dry faster than traditional oil paints.
Top Tips to Paint Like a Master

An artist adding details to his painting using a palette knife - Image by Kevin Hill
If you want to perfect your oil painting skills, study these top tips that guide masters to make their masterpieces. If you need more, check out our blog article on the best online painting classes where you can get free lessons or enroll in affordable online painting classes.
1. Invest in high-quality supplies.
If you want a good oil painting, start with high-quality supplies. You can't expect your oil paintings to look like a masterpiece if you use poor supplies, especially paint and brushes. Save on your canvases by assembling, stretching, and priming your own.
2. Hold the paintbrush correctly.
Your hold on your paintbrush is one way to ensure the excellent quality of your painting. Hold your paintbrush as near the tip of the brush as is comfortable. If you're a newbie and are more comfortable holding the brush as you would a pen, unlearn that skill so you can perfect holding your brush.
Instead of using the movement of your wrist alone, holding the brush in this manner allows you to use the whole arm strength. This wider movement means less fatigue and more control over your brushes.
3. Master your brush for versatility.
If working with a flat brush, you can use the flat, wider, and narrower sides. Moving the brush at an angle gives you a different stroke. Control your brush orientation to get the stroke width, depending on the desired effect.
4. Control the pressure.
When working with oils, use light pressure to correct any mistakes you make during the painting process. However, if you want to do impasto painting, you'll need to add thick globs of paint on the canvas, usually using a palette knife.
5. Use pure colors.
Clean your brushes well before using them on another color to keep your colors pure. You don't want to make your painting look muddy, so dip your brush in the solvent, then wipe it on a paper towel.
6. Use two-color mixtures.
Understanding how your colors work makes your painting more interesting. The masters love working with a basic palette rather than a full one. A basic palette allows them to mix their colors but get the best color mixture by limiting two colors.
Likely, you can make brown from orange and blue, purple and yellow, or red and green. You can lighten it with white or darken it with black. You can also mix red, yellow, and blue to make brown but controlling the amount of each color is much harder than when working with just two.
7. Don't overmix your paints.
Overmixing your paints robs your painting of the character it can get from the tiny inconsistencies on your paint after mixing it. Combine your paints enough to get the color you want. Otherwise, the resulting mixture will be flat.
8. Apply the right amount of oil paints.
You probably know by now that thick layers of oil paints take a long time to dry. It is tempting to add thin layers to make your painting dry faster. However, there are techniques that you need to apply thickly to get the best results.
A good measure to see if your paint is too thin to pick up is if you have to swirl your brush several times. You'll need to add more paint to your palette to apply the right amount to your painting.
9. Use the right technique.
Before you use a particular technique, determine what you want to achieve. Different styles achieve different results. If you want to work on a painting faster, you may want to use the alla prima technique since you don't have to wait for the lower layers to dry before adding subsequent layers.
Adding texture may entail using techniques like sgraffito, scumbling, and impasto. Understand how each method works so you can employ it accordingly.
10. Blend with your fingers.
Your fingers are an excellent tool to use for blending your oil paints. Using your fingers allows you better control over blending than using a brush. Your fingers are more sensitive to the feel of the paint and the canvas, so you can gauge what strokes you want better.
While there is an unwarranted fear of handling oil paints, you won't have any problems as long as you don't put it into your mouth. If you feel a little paranoid about it, you can always use a finger cot to prevent oil paint from getting to your skin.
11. Use the palette knife.
A palette knife is a great tool for creating texture and depth. You can create unpredictable strokes that would prove difficult with an artist's brush. The palette knife is especially useful when working on textured paintings or other surfaces where you want more control over how the final product looks.
Conclusion
We hope this blog post has given you some great ideas about making your oil paintings stand out. Whether you are a beginner looking for the best techniques or an expert with years of experience, something here can help you improve your oil painting. Which one piqued your interest? If so, we encourage you to explore it further!