15 Best Marker Drawing Ideas & Tips To Make Your Artwork Stand Out
Are you looking for some inspiration to help you create amazing marker drawings? If so, you have come to the right place! In this blog post, we’ll share 15 of the best marker drawing ideas and tips to help make your artwork stand out. Whether you are a beginner or an experienced artist, you’ll surely find something helpful here.
Still-Life
Still-life is a perfect subject for drawing with markers. You can create and customize a setup without considering the source of natural light as you would when painting or drawing outdoors. It also gives you more freedom to study your tones and values for a more professional look.
1. Still-life Drawing of a Bottle and Glass

Still-life drawing of a bottle and glass - Image by Sketch A Day
For this marker drawing, artist Spencer Nugent, also known on his YouTube channel as Sketch A Day, uses pen and markers to make this still-life drawing of a liquor bottle and a glass. He first drew with his pen, then slowly built up colors, tones, and values using markers of different nibs.
In this image, he shows how even the most subtle colors like the very light gray he used for shadows created a huge difference in this drawing.
2. Food Illustrations

Still-life drawing of a sweet treat - Image by Arteza
You'll love drawing this sweet treat if you're into food and have a sweet tooth. Learning to use markers might be a challenge, but it will be worth the effort. Blend the marker colors well. Start with a lighter-colored marker, detail with a darker one, then blend the medium color.
3. Colorful Doodles

Colorful Doodles - Image by Nur Izzati Azizi
Doodles are another example of illustrations you'll love doing with marker pens. Though doodles are usually in black and white, you can also color them to make them more interesting. In contrast, you have the freedom to use any color, so your doodle doesn't look like a clashing plate of colors.
Nature & Landscapes
If you're looking for inspiration for your next marker drawing, you might want to consider nature and landscape as they can be easy to start from. Nature scenes work best when painted under natural light.
As a tip, if you want to capture a specific mood for your drawings, it is best to take several snaps of your subject. For example, if you're going for a nostalgic effect, consider taking photos at sunset.
4. Trees

Marker drawing of trees on a sketchbook - Image by Aimian Mao
The artist in this drawing expertly used natural light and captured the values and tones on her drawing by blocking the areas first. Making a swatch of the colors first helps achieve consistency in her work that even subtle differences in colors made the picture look more natural. She applied soft strokes using chisel tip markers and added details using bullet markers.
5. Colorful Flowers

Colorful flower illustrations on a sketchpad - Image by Tanya Leintz
Watercolor markers are trickier than alcohol markers, but the result is worth the effort. Draw with the watercolor markers on the recommended watercolor paper, then blend the colors with a watercolor brush pen. You'll make a watercolor painting without the hassle of handling a watercolor brush.
6. Garden Landscaping

Garden landscaping - Image by Aimian Mao
Drawing a garden landscaping is another excellent marker drawing idea. Whether the garden is still in the planning stages or if you want to draw an existing garden landscape, this particular subject is very rewarding. By using different shades and tints of greens, blues, grays, and other colors, the artist captured the garden beautifully, even the water.
People
People are interesting subjects for drawing with markers. However, we recommend alcohol-based markers for realistic portraits because they blend better than the other marker types because of the tricky blending.
7. Realistic Portraits

Portrait of a crying woman in a gray veil - Image by LaRa Art Unlimited
This realistic portrait of a crying woman in a veil is an example that cheap alternatives of Copic markers work well for your art projects. The artist also used colored pencils to enhance the colors and blend the marker lines on the portrait. However, the artist used alcohol markers for the base of the portrait. The artist also used hot-pressed watercolor paper and maximized the textures on the paper to recreate the woman's veil.
8. Colorful Portraits

Colorful portrait of a young girl - Image by Jordy B Art
Here is another example of a colorful portrait with micron pens, alcohol markers, and colored pencils. The artist used watercolors to add highlights and details on the girl's face, hair, and clothes. By using a white colored pencil, the artist captured the realistic-looking marker drawing.
Manga and Cartoon Illustrations
Most manga and cartoon illustrators rely on alcohol markers to color their drawings and illustrations because they blend well and are resistant to smearing and smudging.
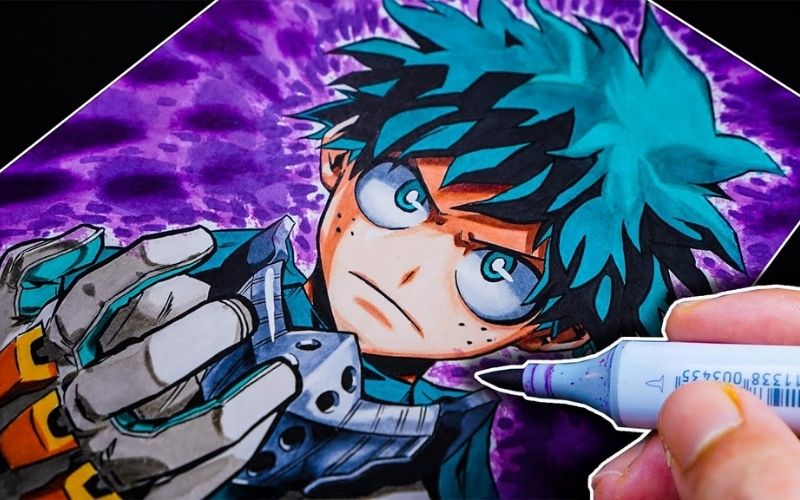
9. Manga Characters

Illustration of a manga character - Image by Laovaan
This manga illustration is very detailed. The colors are vibrant and very realistic, if not for the pen lines. The artist used Copic markers to achieve the excellent blending of the colors, building the layers slowly until he achieved the quality he wanted. The colorless blending marker also played a big role in this artwork.
10. Cartoon Characters

Marker drawing of Gary from Spongebob Squarepants - Image by Art for Kids Hub
This marker drawing idea is best for little kids because of its easy design and minimal color blending. Aside from Gary, the snail from Spongebob Squarepants, kids can also draw similar projects using markers.
11. Fairy Characters

Fairy Characters - Image by Drawing Wiff Waffles
Fairy characters is another popular marker drawing idea for kids and adults alike. Start with a rough sketch with a pencil. Outline with a micron pen. You may also use the extra-fine tip of a dual-tip marker of the same color as the main colors you'll use. Be sure to erase all pencil markings on the drawing before coloring.
Technical Drawings
Artists will love the challenge of technical drawings and taking their work to the next level. To get started with technical drawings, find images of objects online or in magazines. Use a lightbox for tracing paper to trace the image onto your drawing paper. Once you have the basic outline, start adding details with markers.
12. Perspective Drawings

Perspective drawings of various textures - Image by Harry Chapman
Technical drawings are a great way to improve your perspective, scale, and accuracy skills. You can choose several 3D images to model for your drawing and improve your drawing techniques. However, for best results, we recommend drawing using a real-life model to get a better feel of drawing in perspective and textures.
13. Textures

Drawing of different tile textures - Image by Ariel Brindis Sketch
Another great idea is to draw textures using tile samples. You'll understand how to visualize these textures by practicing with textures, thus improving your drawing skills. The artist also used micron pens for details, a white gel pen for highlights, and different marker colors to get your drawings' right tones and values.
14. 3D Mixed Media Art

Mixed media art on glass - Image by Jazza
Artist Jazza elevated mixed media art with this 3D presentation using colored pencils, acrylic paint, and alcohol markers on paper and plexiglass. Layering the plexiglass sheets and drawing on them deepens the colors and gives the artwork an ethereal look. The resulting artwork is something that you'll love displaying on your shelf.
15. Fashion Illustrations

Fashion illustrations - Image by Zoe Hong
Zoe Hong is a foremost fashion designer and teacher who shares her amazing fashion illustrations on her YouTube channel. She expertly used her markers to adjust the tones and values on the dress so it looked more lifelike. If you love to draw with alcohol markers, building a career in fashion illustration is a terrific way to earn while indulging in your art passion.
Do's and Don'ts When Working with Marker Pens
-
Don't draw over the ink before it dries.
Ink may run when you draw over it before it dries. It is best to wait until the ink is dry before drawing over it to avoid smearing and smudging.
-
Do make a swatch of the colors you use to keep it consistent.
Before drawing with markers, make a swatch of the colors you'll use, preferably on the same paper you'll use for drawing. Swatching will help you keep the colors consistent and avoid accidentally mixing them.
-
Don't use broad tip markers for detailing work.
When working on details, use fine tip or brush markers, not broad-tip markers. Broad-tip markers are best for coloring large areas, not for details.
-
Don't block in all the colors at once.
When starting with marker pens, always begin with the lightest tones and gradually add darker colors. This technique will give you more control over the shading and prevent your drawing. Understand the tones and values of your marker drawing for a more natural effect.
-
Do remember to recap your marker pens.
Marker pens easily dry when you leave them open, so you're better off recapping your markers after using them.
-
Do start with lighter colors.
When you work with markers, start with lighter colors and build them up as you progress with your drawing. Leave enough space between the light and dark colors for blending with the medium color.
-
Do store your markers in a horizontal organizer.
Markers, especially alcohol markers, must be stored horizontally to avoid ink pooling on one side of the marker. The ink will slowly drip down to one end and ruin your markers when you store them vertically.
- Do blend the colors on a palette when creating gradients.
When creating a smooth gradient with your markers, blend the colors on a palette to get a more consistent color. Use a light touch when blending, so you don't damage the nibs of your markers or the paper's surface.
Tips on Using Colorless Blenders
When you work with alcohol markers, you will encounter colorless blenders. While some artists are fine without a blender marker, mastering its use is a must if you want to perfect your alcohol marker art.
- Use the colorless blender as a primer.
We think the name blender is a misnomer for these markers since they don't blend the alcohol markers. Instead, you use it to prime (saturate) your paper so that you can blend them better when you add the alcohol markers.
- Use the colorless blender to pick up colors from a palette.
If you're working on gradients, adding a few strokes of your alcohol marker on a plastic palette is best. When using a single color, use the blender marker to pick up the colors, then apply it to your drawing.
When using several colors, add the darker color first before the lighter one. Use the lighter color marker to pick up the mixed color on paper. Use the blender marker toward the end to blend the colors better.
- Use colorless blenders to erase your marker errors.
When working with alcohol markers, even professionals make mistakes. However, alcohol markers are much more forgiving. You can lighten the marks outside the outline, so the colors are not visible when you draw over it.
Aside from correcting, blender markers can also add details or lighten the values on your drawings so they look more realistic.
-
Stay within the outlines to prevent smudging and flooding.
Newbie artists may complain about smudging or smearing when working with alcohol markers and colorless blenders. It is natural, especially when you oversaturate the paper while priming with the colorless blenders.
When priming your paper for alcohol markers, stay within 1/16 of an inch within the outlines. This trick will ensure that your alcohol marker inks won't run outside the outline while giving them enough space to blend and bloom.
Conclusion
Get started and have a go on one of these amazing marker drawings today. See how your skills improve with each new masterpiece. Once you have tried out a few of these ideas, be sure to come back and share your artwork with us in the comments section below.