The Basics Of Left-Hand Calligraphy: A Guide To Getting Started

Basics of left-handed calligraphy - Image by JetPens
Do you want to learn calligraphy but feel left out because most resources are geared towards righties? Well, good news! This left-hand calligraphy guide will show you how to get started with this beautiful art form.
Lefties Can Do Calligraphy
If you are an avid reader of our blogs, you may probably know the origin of calligraphy and everything about it, as we always left no stone unturned in our previous posts. So, let's proceed to most people's question, can left-handed people do calligraphy?
The answer is a resounding yes! Lefties can write calligraphy just as well as righties. In fact, many left-handed people find that they have an advantage in this particular art form. It’s because the natural swirls and loops of left-handed calligraphy are often more aesthetically pleasing than right-handed calligraphy.
Righties vs. Lefties
Righties and lefties have a few things in common when it comes to calligraphy. However, there are some things that righties and lefties differ. Let's take a look at those.
Holding the Pen

Righties vs. Lefties - Image by JetPens
In the picture above, lefties and righties hold their pens differently. Lefties often rest their hand/wrists on the paper while writing, whereas righties will typically hover their hand above the paper. And this is one of the reasons for smudging. However, if you are an over-writer, you can avoid ink smudging.
There are left-handed oblique holders which help with the writing angle issue, but they can be pricey. If your budget is tight, you can try using a right-handed nib in a left-handed holder or upside-down!
Writing Strokes

Calligraphy strokes - Image by Dina Lu & How to Hand letter
Looking at the picture, what do you notice? It is clear that when writing the basic strokes in calligraphy, both lefties and righties have almost the same form. The main difference is the lefties need to start from the top left while the righties from the top right.
This means that lefties will have a more difficult time when it comes to connecting letters since they will be going from left to right (backward). Another thing to note is that left-handed calligraphy will appear to be "mirrored" compared to right-handed calligraphy.
The Tools Needed For Lefties
If you are left-handed, you might think that the tools you need might differ from those used by right-handed people. Well, that's true, as you may need to use some special tools to write comfortably and achieve perfect calligraphy. To understand what these tools are and how to use them, let's shred them one by one!
Pen with an Ergonomic Nib
As a lefty, you know that finding the right tools can be a challenge. Everything seems to be designed for right-handed people, making simple tasks much harder than they need to be. Using a pen with an ergonomic nib can make a big difference in writing.
These pens are designed to be used with the left hand, and they feature a nib that is slightly angled to reduce smudging. In addition, the ink flow is specially calibrated to prevent skipping and provide a smooth writing experience. An ergonomic nib pen will make writing much easier, whether you're taking notes in class or jotting down a grocery list.
Quick Drying Ink
Ink is an essential part of any pen, and the type of ink you use can make a big difference in your writing experience. If you're left-handed, you'll want to choose an ink that dries quickly, which will help prevent smudging. There are a few different quick-drying inks on the market, and each has its advantages and disadvantages.
Water-based inks are usually the quickest drying, but they can be more prone to smudging than other inks. Oil-based inks take longer to dry, but they tend to be more resistant to smudging. Ultimately, the best type of ink for you will depend on your personal preferences. Experiment with a few different quick-drying inks until you find one that suits your needs.
Pen with Steel Nib
Lefties, rejoice! There are now pens specifically designed with you in mind. These pens have a steel nib that is angled to provide a smooth and comfortable writing experience for those who write from left to right.
In addition, the ink flow is specifically engineered to prevent smudging and smearing. So pick up a pen with a steel nib and let the world know you're a lefty!
Left Handed Paper
Left-handed paper is specially coated to prevent ink from bleeding through to the other side. This makes it ideal for calligraphy, as it allows for a smooth, even flow of ink. In addition, left-handed paper is typically wider than standard paper, giving the artist more space to work with.
Tools lefties needed for calligraphy can be found at most art supply stores. By using the proper tools and left-handed paper, anyone can create stunning calligraphy pieces.
Step-by-Step Guide to Lefty Calligraphy
1. Learn to Hold the Pen Properly
If you choose to use a brush pen, that's great! The most significant advantage of using a brush pen is efficiency and versatility! When holding the pen or pencil, try to put it away for about 1 inch or 1.5 inches from the pen or pencil point to see what you are writing. You might notice that the grip is tight, but you'll get used to it with time and patience.
However, if you decide to use a nib pen, find a comfortable position to change the angle between your hand, your paper, and your nib. It's also possible to adjust the three angles between hand, writing-line, and nib-tip as a lefty does.
Reversing the 90-degree clockwise rotation that comes with left-handedness restores your writing set-up to its normal alignment so that you can form calligraphic letters in the same manner as right-handed.
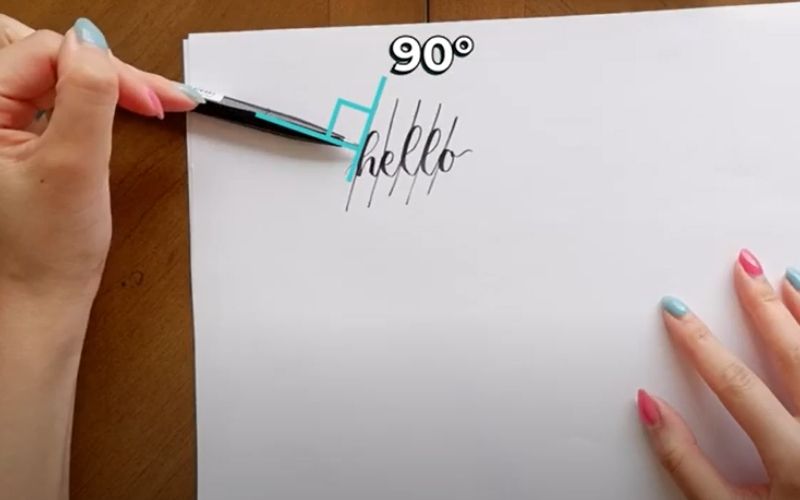
Holding the pen properly - Image by Dina Lu
2. Find Your Comfortable Angle

Overwriting, Underwriting - Image by JetPens
There are various methods to do this, depending on your tools. These are:
- Rotating the paper (including the writing line) accordingly to the nib
- Rotate your wrist and hand according to the writing line but not to the extent that it will injure you!
- Rotate the nib accordingly with your hand. You may do this by adjusting the grip angle of the pen.
You might be thinking that starting to write calligraphy is a bit daunting for left-handed like you, but that's wrong! It may be a significant sacrifice to change your writing posture only for calligraphy, but do you know that it's quite common for any calligrapher, including right-handers? Yes! So there's nothing to worry about, and let's proceed!
If you're an over-writer, you may try the following:
- Rotate the paper anticlockwise,
- Pointing the nib down the page towards the bottom right corner
- Pull the nib towards you.
- Starting at the bottom of each letter and working upwards.
If you're an underwriter, you may try the following:
- Put the paper's left-hand side at an angle towards you instead of the right. This will help with leftward strokes.
- Reversing your nib: some nibs can be inserted into their holders backward so that the left side is used for downstrokes and the right side for upstrokes.
- Flipping your paper: left-handers often find it helpful to write on the back of the paper so that their hand doesn't smear the ink. This means, of course, that you'll need to use a mirror when you're writing.
3. Learn How to Control Your Pen
Now that you know how to hold your pen, it's time to start learning how to control it. Use light pressure for upstrokes while increasing pressure for downstrokes. This will give your letters a gradient effect and look more natural. Also, don't forget to practice your flourishes!
4. Get Ready to Write
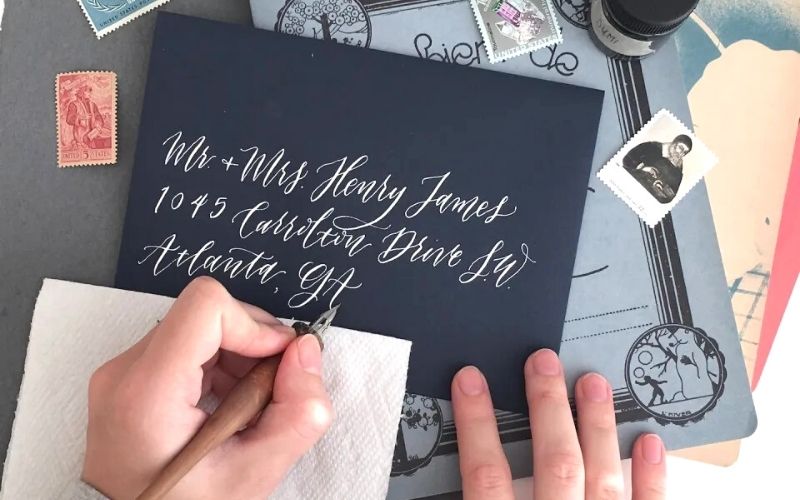
You are learning very fast! Now let's try to write a left-handed calligraphy word. You should consider reading back the basic strokes we learned earlier when writing a word. Depending on the letters you will use, you can start from the left or the right. The image below shows an example of left-handed calligraphy.

Left-handed calligraphy - Image by ElisaAnne Calligraphy
As you can see, the left-handed calligraphy is a mirror image of right-handed calligraphy. If you would notice, the upstrokes appeared as thin lines, and the downstrokes appeared as thick lines, the same as the right-handed calligraphers. The main difference is that you will be holding your pen in your left hand and writing from left to right.
If you want to see how left-handed write in action, you may check the video below.
Left-Handed Obstacles
While left-handed calligraphy may not be as daunting as it seems, there are still some obstacles that lefties face when learning calligraphy. Some of the biggest ones are the following:
Smudging
This is one of the most annoying left-handed and trying to write with a dip pen. Because you are left-handed, your hand will naturally move from left to right as you write, and this will cause the ink to smudge. This can be frustrating and make your writing look messy.
The solution:
First, try using a different type of pen or pencil designed for lefties. Second, use heavier paper, so the ink doesn't seep through as easily. Finally, make sure you give the ink time to dry before smudging it with your hand. With a little effort, you can overcome this obstacle and produce beautiful, smudge-free writing.
Hand Positioning
This is another common issue lefties face when learning calligraphy. Because you are left-handed, it can be difficult to find a comfortable position for your hand. You might have to experiment with a few different positions before finding one that works for you.
The solution:
You may adjust your grip several times to find the perfect fit. Once you have a good grip, you'll be able to produce cleaner and more consistent letters. In addition, make sure to practice regularly. The more you write, the more comfortable you'll become with the left-handed hand. With a little bit of patience and practice, you'll be writing like a pro!
Spacing
One of the most important aspects of calligraphy is spacing. This can be especially difficult for left-handed people, as it can be hard to space letters evenly. Because lefties tend to pull the pen across the paper rather than push it, creating even spacing between letters can be difficult.
This often leads to letters either too close together or too far apart. A few things left-handed calligraphers can do to make the process easier.
The solution:
First, they can use a lightbox to help them see the spacing between letters. Second, they can use a ruler or other straight edge to help guide their pen. Finally, they can take their time and focus on creating even spacing between letters. With some practice, left-handed calligraphers can create beautiful, evenly spaced letters.
Paper Placement
Left-handedness can present several obstacles, both obvious and not-so-obvious. One such obstacle is paper placement. Lefties often have difficulty keeping their paper in the correct position, leading to smudging or incorrect letter formation. However, you can fix this problem with the following solution:
The solution:
The key is to find a paper placement that is comfortable and natural for you. Once you find the sweet spot, it will be easier to produce beautiful, legible calligraphy. So don't get discouraged if you're struggling at first - with a little bit of practice, you'll be writing like a pro in no time.
Ready to Start Calligraphy? Keep These Tips in Mind!
By this time, you may want to start your calligraphy writing journey. But before you do, let us give you some tips. In addition to the solutions to the left-handed obstacle above, here are some things to remember before you start to write.
The left-handed calligrapher has different challenges when learning than a right-handed person. Here are five left-handed calligraphy tips:
Use a left oblique holder
Left-handed writers often find it difficult to produce neat, consistent letters using a standard oblique holder. This is because the left hand is positioned awkwardly around the nib, making it difficult to apply even pressure.
A left oblique holder is specifically designed for left-handed writers and helps alleviate this problem. The left oblique holder positions the nib more ergonomically, making it easier to write and produce neater letters. If you're left-handed and struggling with your calligraphy, consider switching to a left oblique holder - it could make all the difference!
Find your comfortable sitting position
Lefties, this one is for you! When you sit down to write, ensure that your body doesn't restrict your left arm. Otherwise, you'll find it difficult to produce the sweeping motions necessary for beautiful calligraphy. Instead, position yourself so that your left arm has plenty of space to move.
You might need to adjust your chair or desk or even change how you hold the paper. But once you find a comfortable and unrestricted position, you'll be amazed at how much easier it is to produce stunning calligraphy. So don't be afraid to experiment until you find a left-handed writing position that works for you!
Use a light touch
If you're left-handed, you might find it difficult to write in a consistent calligraphy style. This is because lefties tend to be heavier-handed, making it hard to produce the delicate lines and strokes required for calligraphy. However, there is a simple solution - use a light touch. By applying less pressure to your pen, you'll be able to create more consistent lettering.
In addition, lefties often find it helpful to practice with a pencil before moving on to a pen. This way, you can feel the level of pressure required before making any permanent marks. With a little practice, you'll be writing like a pro in no time!
Don’t rush
Calligraphy is not a race. It's important to take your time and enjoy the process. After all, calligraphy is about being creative and putting your personal touch on each letter. Let your hands familiarize the basic strokes slowly but surely.
Rushing will mess up your writing, especially when writing strokes. So when writing the basic strokes, focus on what you're doing, take your time and savor the experience. Who knows, you might surprise yourself with what you're capable of.
Experiment
Although left-handed calligraphy may seem daunting at first, it is not that different from right-handed calligraphy. The main difference is that lefties will hold their pens differently and will need to write from right to left.
Other than that, the same basic principles apply. When starting left-handed calligraphy, the most important thing is to experiment with different nibs, pens, and papers until you find what works best for you. Have fun with it!
These tips will help you get started on your left-handed calligraphy journey. With a little practice, you'll be creating beautiful left-handed calligraphy in no time.
Left-Handed Calligraphy FAQ
1. Is calligraphy different for left-handed people?
Though calligraphy is often associated with a specific type of writing, it can be used by people of all handedness. For those left-handed, calligraphy may be slightly different due to the hand moving across the paper. Ink output may also be affected. Some left-handed calligraphers find that their ink smears more easily than right-handed calligraphers.
Left-handed calligraphers may also find it necessary to use a different type of paper than right-handed calligraphers due to how the hand moves across the paper. Overall, though there may be slight differences, calligraphy is possible for people of all handedness.
2. Is left-handed calligraphy hard to learn?
For lefties, calligraphy can be a bit of a challenge. Most calligraphy pens are designed for right-handed people, making it difficult to produce crisp, clean letters. However, you can learn to write beautiful calligraphy with your left hand with a little practice. The key is to hold the pen at a slightly different angle than if you were right-handed.
This will help you maintain control of the pen and produce cleaner letters. You may also need to adjust your grip slightly to accommodate your left-handedness. With a little experimentation, you'll find the perfect grip and angle for your hand. With practice, you'll be producing stunning calligraphy with your left hand in no time!
3. What type of paper should I use?
When it comes to calligraphy, the type of paper you use is important. You can do calligraphy on any paper, but we recommend using thicker paper, so the ink doesn't bleed through. There are many calligraphy papers available today; make sure to choose one that suits the marker you will be using.
Calligraphy paper comes in many different weights, textures, and colors. There are also some papers that are meant for left-handed. And the good thing is they are available in the local and online stores. Once you've mastered the basics of calligraphy, you can experiment with different papers to find the best suits your style.
4. What type of calligraphy style is best suited for left-handed calligraphers?
There are numerous calligraphy styles, such as faux calligraphy, italic calligraphy, and many others. The good news is that lefties can try it all! Some styles may be more challenging than others for left-handed calligraphers, but any style can be mastered with practice.
For instance, faux calligraphy may require more effort to achieve the correct letter formation, but the results can be beautiful. Similarly, italic calligraphy may take some getting used to due to the slanted letters, but the finished product is definitely worth the effort.
5. Are there any special tools exclusively for left-handed calligraphers?
No, left-handed calligraphers can use the same tools as right-handed calligraphers. Although some calligraphy tools are designed specifically for lefties, such as oblique pens with nibs on the right side, lefties can also use the same tools as right-handed calligraphers. So, if you're feeling inspired to try your hand at calligraphy, don't let the lack of left-handed specific tools deter you!
Conclusion
Left-handed calligraphy can be just as beautiful and intricate as right-handed calligraphy. So, if you’re ready to start your calligraphy journey, just know It takes some practice and a lot of patience, but it'll be so worth it.
We hope this left-handed guide has been helpful and provided you with all the information you need to get started. If there's anything we missed mentioning in this article, please don't hesitate to reach out. We want to hear about your calligraphy adventure!