25 Advent Calendar DIY For An Exciting Christmas Countdown

It's that time of the year again! The Christmas countdown is on, and if you're looking for some DIY ways to make it more exciting, then this article is just for you. We've compiled a list of 25 advent calendar DIY ideas that will have your family counting down the days until Santa arrives with glee. You can make these crafts in less than a day, so get ready to fill up your calendar! For the bonus, we included some affordable gifts to fill your calendars.
Rustic Advent Calendars
No one can say no to rustic and farmhouse-themed decorations. Not only are they cute, but they are also easy to make and do not need anything fancy at all.
1. Hanging Advent Calendar

Hanging Advent Calendar - DIY Nikol & Alexandra
Advent calendars are fun but are very time-consuming to make. However, this DIY is super easy and fun to make. Also, you can customize the size of the envelopes to fit the gifts you want to put in them.
What You'll Need:
- White printer paper
- Construction paper
- Snowflake stencil
- Acrylic paint
- Jute string
- Wooden shape cutouts
- Old wooden hanger
Direction
- Cut printer paper in half. Fold it to make an envelope.
- Stencil the snowflakes on the envelope.
- Fill the envelopes with small treats.
- Print numbers on construction paper. Cut the shapes out.
- Punch a hole on the paper numbers and the envelopes.
- Cut the jute string at several lengths.
- Fold the string in half and thread it into the hole on the number and envelopes.
- Tie the envelopes on the hanger at different lengths.
2. Rustic Winter Forest Advent Calendar

Rustic Winter Forest Advent Calendar - Image by Bizarre Island
Make your mantel come alive with this rustic winter forest advent calendar. The lovely Christmas decorations of this calendar let you get away with less because you have it all together in one decor.
What You'll Need:
- Cupcake boxes with insert
- Kraft cardstock
- Printable white cardstock
- White paint pen
- Double-sided tape
- White acrylic paint
- Scoring tool
- Hot glue gun & glue sticks
- Christmas woodland figurines
Direction
- Assemble the compartment boxes. You need 24 compartments for this project.
- Measure the inner sides of the compartments.
- Make markings of the width of the inner compartment on the kraft cardstock. Allow a 2-inch allowance for the flaps, then cut. Make 24 of these cards.
- Mark the center of this kraft cardstock with numbers 1-24.
- Measure 1" from the edge, score, then fold.
- Measure the height of the compartment, then score and fold the second flap.
- Divide the second flap into three, then make 2 cuts. Fold the outer cuts inward, then pull the inner cut outward.
- Tape the lower flap, then put it into the appropriate compartments.
- Repeat steps 4-8 on all 24 cards.
- Paint the sides and top of the cardboard compartment with white acrylic. Paint also over the 1st line of compartments to resemble snow.
- Make Christmas trees and woodland animals from printable cardstock. You can skip this part by using store-bought woodland figurines.
- Glue the figurines on top of the advent calendar.
- Fill the compartments with cheap gifts such as DIY keychains, leather bracelets, or treats.
3. Paper Bag Advent Calendar

Paper Bag Advent Calendar - Image by Shannon Schmid
Do you want something economical and easy to make? Don't look any farther. You probably have the supplies you need for this craft at home that you can get your advent calendar up in no time.
What You'll Need:
- Brown paper lunch bags, 4" wide
- Wooden clothespin
- Hot glue gun & glue sticks
- Red acrylic paint
- Paintbrush
- Number stencils (optional)
- Christmas stencils (optional)
- Wood planks or plywood
Direction
- Make a 30x30-inch square board from scrap wood planks or plywood. No need to finish the wooden board to stay with the rustic theme.
- Line the paper bags on the board to see how your board looks before assembling. Mark where the clothespin should go.
- Hot glue the clothespins on the board.
- Paint or stencil your numbers on the paper bags. You may also add Christmas-related designs to your paper bag.
- Fill the bags with your treats or trinkets like these rhinestone brooches, hair scrunchies, or DIY leather keychains.
4. Mixed Media DIY Advent Calendar

Mixed Media DIY Advent Calendar - Image by Minnie and Moore
Ever thought of mixing different materials to make something extraordinary? This DIY calendar doesn't follow a single theme but brings together random materials to create a beautiful advent calendar you'll be proud to display anywhere in your house.
What You'll Need:
- Paper cups
- Paper twine
- Popsicle sticks
- Barbecue sticks
- White acrylic paint
- Mini canvas
- Letter & number stamps
- Hot glue gun & glue sticks
- White construction paper
- Jute string
- Mini envelopes
- Corkboard roll
- Small jars
- Gold paint pen
- Mini clothespins
- Burlap ribbon
Direction
- Make small buckets from paper cups.
- Cut off the top of the paper cup and paint it with white acrylic paint.
- Cut some popsicle sticks or barbeque sticks to size, then decorate them with burlap ribbon and jute string.
- Finish with paper twine, cardstock, or jute string for the handle.
- To make the canvas suitcase, prepare some mini canvases.
- Wrap them with newspaper design scrapbooking paper.
- Glue them together on one side, then decorate with a cardboard handle.
- Make small envelopes from white construction paper. You can also use some old envelopes.
- Decorate the envelope with stamps, numbers, buttons, or mini clothespins.
- Fill the smaller envelopes with chocolate coins and the larger ones with squishy toys.
- Make banners out of cardboard, burlap ribbon, and corkboard.
- Sew drawstring canvas or muslin bags from burlap ribbon. Fill them with small toys.
- Wrap some small plush toys in kraft paper, then tie them with paper twine or jute string.
- Cut out some numbers you haven't stamped on the other gifts from the corkboard.
- Hang each gift and token on a branch.
5. Farmhouse Advent Calendar

Farmhouse Advent Calendar - Image by Remodelaholic
How much fun is it to add a Christmas ornament to your Christmas tree while doing the Christmas tree countdown? A lot of fun! You can make your DIY ornaments and hang them on the Advent calendar. Then, take one off every day and hang them on your tree.
What You'll Need:
- Gingham ribbon, 5/8"
- Christmas ribbon, 3/8"
- Chunky yarn
- Jute string
- Christmas garland
- Hot glue gun & glue sticks
- Pinecones
- Natural wood slices
- Black chalkboard paint
- Felt cloth
- Wooden planks or plywood
- Wood dowel rod
- Hardware nails
Direction
- Make 5 of each of these ornaments to hang on your advent calendar:
- Mini wreaths
- Yarn pom poms
- Chalkboard wood slices
- Pine cone ornaments
- Felt cloth Christmas tree ornament
- To make the mini wreaths, cut a 6-inch Christmas garland. Twist the ends to make a circle, then decorate with a bow made from the 1/2-inch satin ribbon.
- Wrap chunky yarn (preferred color) about 15 times around two of your fingers.
- Tie the middle with a short yarn for the yarn pom-poms, then cut the ends to make the pompom. Shape the pom poms.
- Drill a small hole on the wood slices. Paint the center of the wood slices with black chalkboard paint. Let dry.
- Glue a jute string to a pine cone, then decorate it with a gingham bow.
- For the last ornament, cut out Christmas tree shapes from felt cloth. You can use two different colors, cut one smaller and glue them together.
- Glue a jute string to the ornaments to hang them on your Christmas tree.
- Paint an 18x30-inch wooden plank or plywood with black chalk paint.
- Frame the board with the wood dowel.
- Hammer a nail on each of the 24 unpainted wood slices. Glue these wood sliced on the wooden board, leaving enough space to hang the Christmas ornaments.
Classy Advent Calendars
If you're looking for something classy, the following advent calendars will surely suit your style. Choose from the four DIYs here to get the best look for your calendar.
6. Advent Calendar Book

Advent Calendar Book - Image by Tanu Creative
We love the classy look and easy-to-store design of this advent calendar book. You can use this design for years. All you need to do is update the design. Better still, you can make a few of these calendars to give to your friends for a practical, early Christmas gift.
What You'll Need:
- Black construction paper, 18x24"
- Scrapbooking paper, 12x12"
- Kraft board
- Glue
- Scoring tool
Direction
- Make twenty-four 2 1/2 "x 2 1/2 "x3/4" covered boxes out of colored cardstock of choice.
- Print number labels on the cover of the individual boxes.
- Cut a kraft cardboard using these dimensions: 8 1/4 "x11" and 2 1/4" x 11".
- Place them on top of the black construction paper, leaving 1/8" between the cardboard pieces.
- Score around the cardboard pieces then cut off the black construction paper.
- Glue the black construction paper around the cardboard pieces.
- Cover the center spine with black construction paper.
- Score the edges of the spine to make folding the book easier.
- Cover the inside and outside of the book with scrapbooking paper with the design of choice. Add ribbon strips to close the book.
- Arrange the smaller boxes inside the book, then glue them on.
- Fill the boxes with chocolate treats, chocolate truffles, or rainbow twists.
7. Fishbowl DIY Advent Calendar

Fishbowl DIY Advent Calendar - Image by Great Home Ideas
Ever thought of using a fishbowl for a DIY advent calendar? Well, it's possible with this craft. If you don't use matchsticks, you can make your boxes or use small envelopes to go into the fishbowl. Place the fishbowl calendar on your foyer table or a side table so you can pick one treat a day before you go out or while relaxing at home.
What You'll Need:
- Gift wrapper
- Glue
- Empty matchboxes
- Satin ribbons, 1"
- Double-sided tape
Direction
- Wrap the matchboxes in the gift-wrapping paper.
- Cut 1-inch circles from construction paper, and number them from 1-24.
- Wrap a 3/4-inch ribbon around the matchbox and seal the ends with the number circles.
- Fill the matchboxes with small gifts, then drop them into fishbowls.
- You can assemble leather necklaces with these charm pendants to fill the boxes.
8. Countdown Board for Christmas

Countdown Board for Christmas - Image by Remodelaholic
This countdown board is something you can use for Christmas, birthdays, and other holidays. Just change the word Christmas to the name of your holiday. You can also write treats at the back of each number. This trick is enjoyable for kids who are still too young to read.
What You'll Need:
- Wooden board, 1"x4"x16"
- Wooden board, 1"2"x16"
- Sandpaper
- Red acrylic paint
- Paintbrush
- Jute string
- Mini clothespins
- Printed calendar numbers
- Screw eyes
Direction
- Cut the wooden board to size and sand them.
- Paint with red acrylic paint. Let the paint dry, then do a second coating.
- Glue the 1x4 board on the wide side of the 1x2 board.
- Attach the screw eyes on both ends of the board.
- Tie the jute string on the screw eyes.
- Print the calendar numbers on a printable cardstock, then cut them out.
- Do the same for the "days until" and "Christmas."
- Hang the calendar numbers and the other words on the jute string using the mini clothespins.
9. DIY Advent Calendar Wreath

DIY Advent Calendar Wreath - Image by HGTV Handmade
Wreaths are a must for Christmas, and if you share the same sentiment, why not assemble this DIY advent calendar wreath? Make your gift boxes or get some little boxes from your local art and craft store, then use the color combination and design of the scrapbooking paper to use the wreath.
What You'll Need:
- Gift boxes, 2x2x2"
- Cardboard
- Scrapbooking paper
- Satin ribbons, 1"
- Foil gift wrapper
- Hot glue gun & glue sticks
- Adhesive tape
Direction
- Cut a big circle from cardboard, then a smaller circle inside it to make the wreath base.
- Wrap the circle with a foil gift wrapper. Secure the ends with adhesive tape.
- Cut squares from the scrapbooking paper. Glue the squares on top of the boxes.
- Arrange the boxes around the wreath base, then glue them on.
- Print numbers and cut them out. Glue the numbers on the boxes.
- Fill the boxes with your treats.
10. Hanging Advent Calendar

Rotating Advent Calendar - Image by Rejoice and Create
This super easy DIY is so much fun to make. Also, you can customize the size of the envelopes to fit the gifts you want to put in them.
What You'll Need:
- White printer paper
- Construction paper
- Snowflake stencil
- Acrylic paint
- Jute string
- Wooden shape cutouts
- Old wooden hanger
Direction
- Cut the scrapbooking paper to 4x7 inches. Make 25 of these cards.
- Score the scrapbooking paper at 1, 3, 4, and 6-inch marks.
- Turn the scrapbooking paper and score at 1 and 3-inch marks.
- Make a cut at the score lines for making the boxes later.
- Assemble the box, then add a small cardstock or ribbon handle for opening the box.
- Score 1-inch lines around a 12x12-inch scrapbooking cardstock.
- Fit all the boxes inside the 12x12-inch cardstock, then glue the boxes on the cardstock.
- Glue the scored sides of the cardstock to the smaller boxes to stabilize them.
- Glue the black of the larger box to another cardstock for the base to hang the calendar later.
- Decorate the smaller boxes with numbers. Use a circular die-cut for the numbers' backing pieces.
Advent Calendars for Kids
Christmas is for kids, and what better way to celebrate Christmas than to count down the days with an easy DIY calendar for them? Instead of wrapping treats, why not wrap some toys and 3D puzzles for them so they can spend an enjoyable Christmas day? Here are a few DIY crafts to make for your children.
11. Mini-Present Calendar

Mini-Present Calendar - Image by Craft Factory
Children love receiving gifts. Divide a Lego puzzle or building toys into the 24 boxes, so they can assemble them on Christmas morning when they complete the pieces. This mini present advent calendar is also a fun activity to share with the kids during the holiday season.
What You'll Need:
Direction
- Cover a 15x24-inch board with a gift wrapper.
- Make twenty-four 3"x3"x1" boxes from construction paper.
- Fill them with small toys and chocolate candies. Wrap the presents with a satin ribbon.
- Stick a piece of hook strip at the back of the boxes. Use the one with adhesives, so you don't need gluing.
- Stick the loop strip on the board.
- Stick the mini presents on the board.
- Finish the board with a Christmas message or label.
12. Paper Roll Advent Calendar

Paper Roll Advent Calendar - Image by Slick Slime Sam
Take out those paper rolls you hoarded during the year, and let's get crafting with the kids. Granted, you can have some store-bought advent calendars, but where's the fun in that?
What You'll Need:
- Toilet paper rolls
- Green spray paint
- Construction paper, 12x18"
- Glue
- Christmas stickers (optional)
Direction
- Spray the toilet paper rolls with green spray paint.
- Stack the toilet paper rolls, so it resembles a Christmas tree.
- Glue them together.
- Trace the outline of the Christmas tree on the construction paper. Make two of these outlines.
- Cut out the outline, and glue one to the back of the paper roll Christmas tree.
- Fill the paper rolls with DIY beads or jewelry gift sets, then cover the front with the other Christmas tree outline.
13. Muffin Advent Calendar

Muffin Advent Calendar - Image by DIY Nikol & Alexandra
Making muffins can be tiring, but rest your oven for a while and use your muffin mold. Having an extra mold won't hurt, so you can still make your favorite muffins since you'll use this mold for almost a month.
What You'll Need:
Direction
- Measure the muffin hole.
- Cut circles from red construction to cover the muffin hole.
- Print numbers (1-24) on plain printer paper. Cut out the numbers in circles.
- Glue the number circles over the red circles.
- Fill the muffin holes with treats.
- Glue the red circles over the holes to cover them.
- Punch the paper when you're ready to take your ring pops, chocolate candies, or peppermint jingles candy.
14. DIY Advent Calendar for Kids

DIY Advent Calendar for Kids - Image by The Little A Theatre
Here’s a fun advent calendar that you can make with your kids. They will surely love coloring and making ornaments for your kids. Just be careful with the glitters, or you’ll have a glitter bomb at home.
What You'll Need:
- Construction paper, 12x18"
- Black marker
- Glue
- Velcro circles
- Colored pencils
- Colored pens
- Glitter powders
Direction
- Make a Christmas tree outline on a 12x18-inch construction paper.
- Cut 24 2x4-inch rectangles and a 2x8-inch rectangle from white construction paper.
- Fold these rectangles in half, then glue them to the construction paper. You now have mini-windows for your advent calendar.
- Draw or write on the inside square, then add small Velcro circles to close the windows.
- Draw and color over the rectangles, so it looks like a snowed-in Christmas tree with gifts underneath it.
- Number the mini-windows randomly.
- Add glitters on the Christmas tree ornaments you've drawn on the Christmas tree.
15. Advent Activity Calendar

Advent Activity Calendar - Image by Random Bites of a Sweet Life
You don't have to give treats and gifts to your kids, but you can fill your advent calendar with fun Christmas activities to share with your kids every evening. It could be board games, reading a book together, or playing their favorite video games. The possibilities to be a wish-granting elf for your kids are endless and fun.
What You'll Need:
- Gold metallic construction paper
- Black marker
- Baker's twine
- Single-hole puncher
- Hot glue gun & glue sticks
- Wooden beads
- Eucalyptus leaves
- Christmas garland
- Forest branch
Direction
- Make a star template. Draw the templates on the back of the gold construction paper.
- Cut the 48 stars from the construction paper, glue the sides, leaving the top open.
- Punch a hole on the stars, then thread a string through the hole. You may add wooden beads, birchwood leaves, or Christmas garland.
- Tie the string on.
- Write a Christmas activity on a narrow piece of paper and insert it into the opening on the star.
16. Advent Calendar Gnomes

Advent Calendar Gnomes - Image by Cleverly
This Christmas advent calendar is a perfect holiday activity that you can make with your kids. If you don't have felt cloth, though, you can use colored paper instead.
What You'll Need:
- Toilet paper rolls
- Felt cloth
- Hot glue gun & glue sticks
- White construction paper
- Markers
- Chocolate candies and treats
Direction
- Wrap two-thirds of the toilet paper roll with green felt. Close the opening with hot glue.
- Make the gnome's hat from a red felt cloth.
- Cut out circles from white construction paper.
- Write numbers 1-24 on the circles.
- Fill the toilet paper rolls with chocolates and other treats.
- Cover the toilet paper roll with the gnome hat. Use a black Sharpie to make the gnomes' faces.
- Line the gnomes on the mantel or foyer table.
Advent Calendar for Pets
Pets are family, and won't it be fun to have an advent calendar for them? You can even use this calendar for grooming and deworming reminders (yeah, the not-so-fun part of having pets), but mostly you can use the calendar with treats and little toys for your pets.
17. Advent Calendar for Cats

Advent Calendar for Cats - Image by Pixie & Bluebell
Now you have an excuse to buy treats for your pet cats. Each day, add a random treat, so your cat or kitten gets a new treat. You may even include a massage! We're sure your cats will love that extra pampering they get.
What You'll Need:
- Cardboard box
- Construction paper
- Glitter paper
- Paper twine
- Holly leaves and berries
- Pet-themed tissue paper
- Number stickers
- Hot glue gun & glue sticks
- Craft knife
- Cat treats
Direction
- Cut 24 shapes on the cover of the cardboard box.
- Wrap a cardboard box in red construction paper.
- Cut the shapes without cutting through completely to make a window of sorts.
- Cover the windows with tissue paper.
- Make dividers for the cardboard box.
- Cut tissue paper into squares.
- Wrap the treats in the tissue paper squares and tie them closed with paper twine.
- Seal the cardboard box with tape.
- Decorate the top of the box with numbers, glitter paper shapes, and holly leaves and berries.
18. Advent Calendar for Guinea

Advent Calendar for Guinea- Image by LooBoosShedZoo
Guineas are easy pets to care for. Since its food is usually fresh, like carrots, grass, and similar food items, you cannot wrap them. Just write your treats for the day and clip them on the calendar for your advent countdown.
What You'll Need:
Direction
- Tape three letter-sized metallic construction paper.
- Cut a Christmas tree shape out of this construction paper.
- Cut 1 "x2" rectangles from glitter paper. Write the name of treats at the back of the rectangles.
- Glue the clothespins on the Christmas tree shape.
- Clip the glitter paper on the clothespins.
- Number the clothespins and decorate them with colored markers.
19. Advent Calendar for Dogs

Advent Calendar for Dogs - Image by Gone to the Snow Dogs
Next to cats, dogs are the most popular pets in any US home, so having a separate advent calendar for your pets is an excellent idea. Customize your treats according to the breed of your dogs.
What You'll Need:
- Paper cups
- Wood glue
- Acrylic paint
- Black marker
- Rubber band
- Satin ribbon, 1/4"
- Mini clothespins
- Foam board panel, 9x12"
- Burlap bows
- Dog treats
Direction
- Tape 2 foam board panels together. Cut a Christmas tree shape from this large foam board.
- Paint the board with green acrylic paint.
- Fill the paper cups with dog treats, then cover them with Christmas-themed tissue paper.
- Seal the cups with a rubber band, then tie a satin ribbon around the cup.
- Glue the cups to the foam board panel. Finish the calendar with a bow on top of the tree.
20. Holiday Countdown Calendar for Pets

Holiday Countdown Calendar for Pets - Image by Erins Animals
If you want to make your pet's Christmas special, try making a countdown calendar for them, a rustic treat keeper, and a calendar in one craft. The Perspex helps make keeping the treats visible for your pets. Don't go too crazy giving them treats, though, or they'll be sick, and you don't want to spend the holidays at the vets.
What You'll Need:
- Wood board, 8"x16"
- Wood board, 2 1/4" x 2 1/4"
- Wood board, 2 1/4 "x8"
- Perspex
- White cardstock
- Single-hole puncher
- Pet stencil
- Letter stencils
- Black acrylic paint
- Paintbrush
- White paint pens
- Hot glue gun & glue sticks
- Metal nails
- Screws
Direction
- To make the feed container box, screw the 2 1/4" x 2 1/4" board on the 2 1/4 "x8" board.
- Screw this setup to the 8 "x16" wooden board. Glue Perspex to cover the feed container box.
- Mark 5 rows for the nails to go. Hammer in about 1/4" of the 1-inch metal nail on the board, 5 for each row to make 25 nails.
- Number the nails from 1-25 using a white paint pen.
- Cut a circle from cardstock, then stamp or stencil it with a pet silhouette. This circle will be your countdown marker.
- Paint the board with black acrylic paint, leaving about 4 inches unpainted for the calendar name.
- Stencil the calendar name on the space.
- Fill the feed box with dog or cat treats. Move the countdown marker every day and give your pet a treat.
Advent Calendars for the Office
Since you stay in the office most days of the week, it's also fitting to have an advent calendar for the office. This section listed some office-appropriate DIYs you can easily make in a day.
21. Rustic Pouches Advent Calendar

Rustic Pouches Advent Calendar - Image by Guidecentral English
Turn a dull burlap cloth into a rustic advent calendar that you can display in the office. We love how this rustic calendar adds a hint of color to your wall.
What You'll Need:
- Burlap cloth
- Christmas ribbon
- Felt cloth
- Christmas stencils
- Acrylic paint
- Hot glue gun & glue sticks
- Colored markers
- Jute string
- Scissors
- Drawstring bags
- Craft snowflakes
- Poinsettia
Direction
- Cut ½ yard from the burlap cloth. This burlap cloth measures 40 inches wide, so fold it in half, so the burlap cloth measures 17 x 20 inches.
- Seal the sides, then remove any excess burlap.
- Lay the burlap flat on the table, then arrange five pieces of jute rope across the burlap.
- Glue the ends of the rope to the end part of the burlap, then secure the excess length to the back.
- Repeat steps 3 and 4, but arrange them from the opposite direction.
- Make 24 tags from felt cloth using colored markers, Christmas stencils, and acrylic paint. Number them from 1-24.
- Punch a hole on the tags, then thread a length of baker's twine through the holes.
- Tie the tags to the ropes on the burlap. Glue around the three sides to make a pocket.
- Glue some poinsettia to decorate the burlap calendar. Glue is also an occasional glitter snowflake on the calendar.
- Put a stick into the top of the burlap calendar to spread the calendar to its shape.
- Tie 18 inches of jute string to the ends of the stick inside the calendar. Decorate the top of the tie with a burlap bow.
- Tie a few drawstring bags on the calendar.
- Fill these pockets and drawstring bags with candy canes, pens, sticky notes, or anything your friends can use in the office.
22. Christmas Forest Advent Calendar

Christmas Forest Advent Calendar - Image by HGTV Handmade
You don't need a separate Christmas decoration with this Christmas forest advent calendar for your office. The festive forest calendar will indeed tie the Christmas vibe together.
What You'll Need:
- Colored cardstock
- Gift wrapping paper
- Glitter paper
- Round dowels, ¼"
- Hot glue gun & glue sticks
- Letter stamps
- Small gift boxes
- Glue
- Wood slices
Direction
- Make 24 pairs of thin triangles from green cardstock and gift wrapping paper glued to green cardstock.
- Make a pair of bigger triangles from glitter paper.
- Cut a small incision on the triangles to fit them together into a tree.
- Make a ½-inch stump from round dowels for the Christmas trees. Glue these stumps to the trees.
- Stamp numbers on cardstock then cut them into small ribbons.
- Glue the trees to the small gift boxes and then the number names.
- Fill the gift boxes with small treats and charms for your officemates.
- Paint two large wood slices with white acrylic paint. Use these wood slices to display your advent calendar.
23. Mini Liquor Bottle Advent Calendar

Mini Liquor Bottle Advent Calendar - Image by eHow
Though liquor is not allowed in offices, employees can take these mini bottles home to grace their mini-bars or display them somewhere in their houses.
What You'll Need:
- PVC pipes, 1 ½" diameter
- Hot glue gun & glue sticks
- Mini liquor bottles
- Construction paper
- Christmas scrapbook paper
- Number stickers
- Gingham ribbon
Direction
- Cut the PVC pipes into 6-inch sections.
- Glue the PVC pipes together to form a Christmas tree.
- Fill the cavities with mini liquor bottles. Instead of mini liquor bottles, you can also try these liquor-filled chocolates.
- Close the holes with construction paper and scrapbook paper circles.
- Put number stickers on circles for the advent calendar.
24. Stationery Advent Calendar

Stationery Advent Calendar - Image by Sharmane Coquilla
If you've got friends in the office who's into journaling, wrapping stationery for an advent calendar is an excellent way to put up something to brighten up your office space.
What You'll Need:
- Tissue paper
- Kraft paper
- Jute string
- Sticker paper
- Washi tape
- Journaling stickers
- Sticky notes
- Journal pens
Direction
- Wrap your treats (washi tape, stickers, sticky notes, pens, etc.) in tissue paper, kraft paper, old newspapers.
- Tie the gifts with jute string.
- Print calendar numbers on sticker paper then cut them into individual stickers for the gifts.
- Put the gifts into a basket and let one of your friends pick one every day.
25. Christmas Tree Countdown Calendar
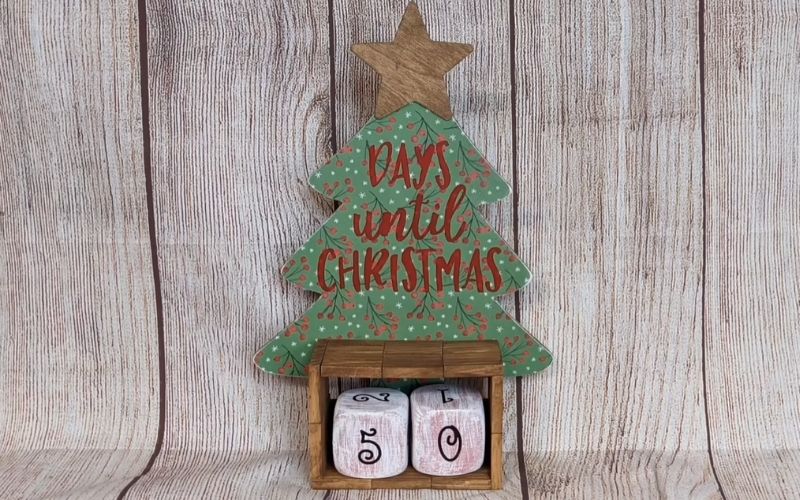
Christmas Tree Countdown Calendar - Image by Monarch Mom DIY
Everybody loves to count the days before the big event. Here’s a non-fussy way to let the Christmas countdown begin at your office. Maybe you’re counting the days before a bonus or a big office party for a year-end blast with your officemates.
What You'll Need:
- Christmas tree cutout
- Wood glue
- Jenga blocks
- Wooden dice
- Acrylic paint
- Paintbrush
- Gift wrapper
- Sandpaper
- Wood stain
- Carbon paper
Direction
- Glue the Christmas tree cutouts together.
- Paint the wooden dice with red acrylic paint. Let it dry.
- Cover the Christmas tree cutout with gift-wrapping paper.
- Print the words "days until Christmas" on printer paper, then trace it over carbon paper to the Christmas tree cutout.
- Buff the wooden dice with sandpaper, then paint it with white acrylic paint, showing some red.
- Glue 4 Jenga blocks side by side. Make 10 of these.
- Make a box of these blocks to hold the calendar dice together.
Conclusion
So there you have it, 25 DIY advent calendar ideas to keep your family excited this Christmas. Share these with friends and family so that they can share the countdown too! To make things easier for everyone, we also included some suggestions for treats and gifts you can have in your advent calendar.